The Claim Engine
The goal of the CareLogic billing system is to produce complete claims that are accepted by third-party payers. The Claim Engine, which is the heart of the billing system, is the process by which activities (services) are transformed into claims. On a nightly basis, the Claim Engine processes each activity that has been marked with a status of Kept. To ensure the claims are created with the best chance of being paid in a timely manner, the Claim Engine performs two sets of checks:
The first check is to ensure the activity is complete by checking for any missing information, such as a missing primary staff credential or missing service document. After the activity validation is complete, the Claim Engine performs a second set of checks, claim validation. The purpose of this check is to reduce the number of rejected claims due to insufficient information, such as a missing activity/procedure crosswalk or missing authorization. Once the claims pass this validation process, they are flagged as successful and ready to be batched for billing.
This section includes the following topics:
• Understanding the Claim Engine Process
Understanding the Claim Engine Process
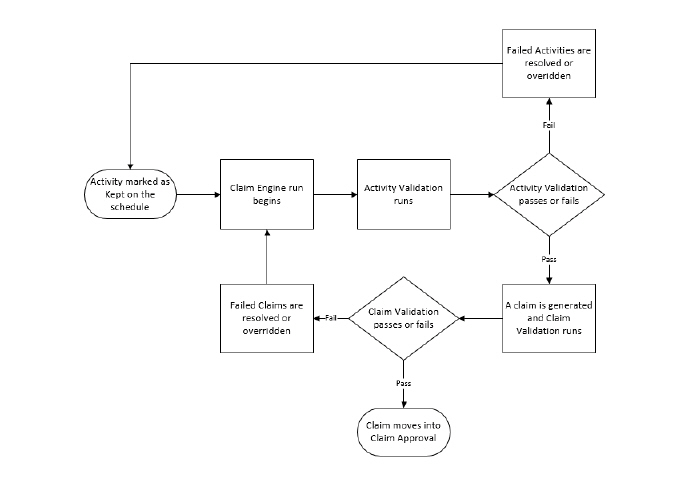
The Claim Engine process is the foundation of the billing system. The purpose of the Claim Engine is to process activities (services) and generate claims that are accepted by third-party payers. When processing activities, the Claim Engine performs two major checks: activity validation and claim validation.
If errors are found during activity validation, the activity does not become a claim and the error must be resolved or overridden before the activity can pass validation. The Claim Engine moves all activities that fail during activity validation into Failed Activities. If no errors are found, the Claim Engine moves to the next step.
If errors are found during claim validation, the activity becomes a claim, but it cannot be billed until the error is resolved or overridden. The Claim Engine moves all claims that fail during claim validation into Failed Claims. If no errors are found, the Claim Engine moves to the next step.
If no errors are found during activity validation and claim validation, the claim is moved into Claim Approval.
All billing is based on billable activities. The first step of the Claim Engine run is activity validation. The Claim Engine performs activity validation to ensure the activity is billable and has the necessary information to become a clean claim. If errors are found during activity validation, the activity does not become a claim and the error must be resolved or overridden before it can pass activity validation. Activities that fail during activity validation are moved into Failed Activities. The Failed Activities module is used to review and process failed activities.
The following topics are covered in this section:
• Overriding Errors in Failed Activities
|
Only billers should access Failed Activities in the following manner. Clinicians should access their failed activities and claims through Alerts. |
All scheduled activities that failed the activity validation process during the Claim Engine run are moved into the Failed Activities module. To access failed activities:
1. Navigate to Billing/AR > Show Menu > Failed Activities.

2. Fill out the needed information and click Submit in the status bar.

Overriding Errors in Failed Activities
All scheduled activities moved into Failed Activities have an error code assigned to them. Staff typically works to resolve failed activities so they can be converted into claims. Depending on the error code, they may also choose to review and then override the error. Once a failed activity is overridden, it will be processed by the next run of the Claim Engine.
Not all failed activity errors can be overridden. Errors that can be overridden appear with an Override button.
The following failed activities errors can be overridden:
• Service Documentation Not Found
• Service Documentation Not Signed
• Client Address Missing or Incomplete
1. Navigate to Billing/AR > Show Menu > Failed Activities > Fill out the information needed and click Submit in the status bar.

2. Click the Select button that corresponds with the failed activity that needs to be overridden.
3. Click the Override button. A confirmation pop-up appears. Click OK and the error is overridden.
Manually Reprocessing Failed Activities
Once a failed activity has been resolved, it will be processed by the nightly run of the Claim Engine. However, if a quicker resolution is needed, activities can be manually reprocessed. When a failed activity is manually reprocessed, the Claim Engine runs the selected failed activity alone. No other activities or claims are processed by a manual Claim Engine run.
1. Navigate to Billing/AR > Show Menu > Failed Activities > Fill out the needed information and click Submit.

2. Click the Select button that corresponds with the failed activity to process.

3. Click the Reprocess All Errors button. The selected activity is instantly processed by the Claim Engine. If no errors are found by the Claim Engine, the activity is removed from the Failed Activities Results page. If an error is found, the activity remains on the page and an error message is displayed.
1. Navigate to Billing/AR > Show Menu > Failed Activities > Fill out the needed information and click Submit in the status bar.
2. Click the Select button that corresponds with the failed activity to process.
3. Click Reverse Activity. This allows the user to correct what is needed. The activity will be processed during the next Claim Engine run. If the activity needs to be adjusted off as non-billable, it can be done through Failed Activities, Failed Claims, or Claim Maintenance.
Failed activity errors prevent an activity from becoming a claim. This section includes an explanation of possible errors and provides the steps necessary to resolve them. Generally, the staff member who provided the service must complete the steps to resolve these issues.
To navigate to Failed Activities, click Billing/AR > Show Menu > Failed Activities > Enter Search criteria if desired and click Submit > Click Select for the desired failed activity.
The following are common conditions that will result in the Claim Engine generating an error during the activity validation process and how to correct those errors:
|
The last step of the following sections involves reprocessing errors. If desired, the failed activities can be left for the nightly run of the Claim Engine instead of being reprocessed. |
No Primary Staff Credential Entered

1. Navigate to Employee > Search for the employee and click Submit > Click the Select button for the desired employee > Show Menu > Credentials > Add the appropriate credential, if needed, and click Submit > Click the Primary button for the credential > Add Primary Date Range > Fill out the needed information and click Submit. The Primary Credential has been set.
2. Navigate to Billing/AR > Show Menu > Failed Activities > Search for the failed claim and click Submit > Click Select for the failed activity > Click Reprocess All Errors. If all was done correctly, the system returns that the activity was reprocessed without errors.
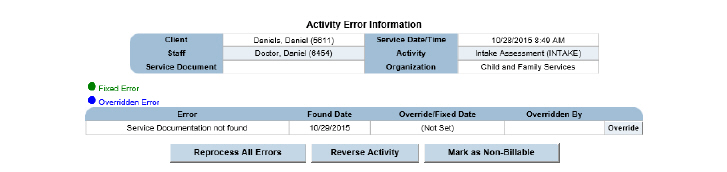
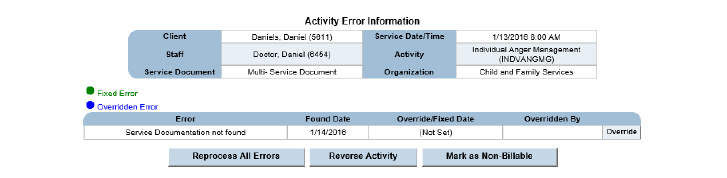
Service Documentation Not Found

This error can be overridden using the Override button. If the error is overridden, it will no longer alert. Alternatively, it can be corrected using the following process:
1. Errors should be corrected through staff member’s alerts or can be searched for using the Client Search in the status bar > Click the Schedule button for client > Click the No-Add button for the activity throwing the error > The missing service documentation appears, fill it out clicking Submit to progress through any service document wizards > Sign the document if needed.
2. Navigate to Billing/AR > Show Menu > Failed Activities > Search for the failed activity and click Submit > Click Select for the failed activity > Click Reprocess All Errors. If all was done correctly, the system returns that the activity was reprocessed without errors.
Service Documentation Not Signed

This error can be overridden using the Override button:
1. Errors should be corrected through staff member’s alerts or can be searched for using the Client Search in the status bar > Click the client’s Schedule button > Click the Yes button for the activity throwing the error > In the service document wizard, click the Signatures link > Sign the document and click Submit.
2. Navigate to Billing/AR > Show Menu > Failed Activities > Search for the failed activity and click Submit > Click Select for the failed activity > Click Reprocess All Errors. If all was done correctly, the system returns that the activity was reprocessed without errors.
Client Address Missing or Incomplete

1. Search for the client using the Client Search in the status bar > Click the client’s ECR button > Show Menu > Client Address/Phone/Email > Add Address > Pick Mailing from the drop down > Fill out the address and click Submit.
2. Navigate to Billing/AR > Show Menu > Failed Activities > Search for the failed activity and click Submit > Click Select for the failed activity > Click Reprocess All Errors. If all was done correctly, the system returns that the activity was reprocessed without errors.
The second step of the Claim Engine process is claim validation. If errors are found during claim validation the activity still becomes a claim, but it cannot be billed until the error is resolved or overridden. The Claim Engine moves all claims that fail during claim validation into Failed Claims. The Claim Engine also looks for auto claim approval, auto claim batching, and auto payment approval rules and performs these actions during its run, if applicable.
The Failed Claims module is used to review, resolve, process, and override failed claims.
• Overriding the Errors in Failed Claims
• Marking Claims as Non-Billable
All scheduled activities that failed the claim validation process during the Claim Engine run are moved into the Failed Claims module. This task includes instructions for accessing failed claims by entering search criteria.
1. Navigate to Billing/AR > Show Menu > Failed Claims.
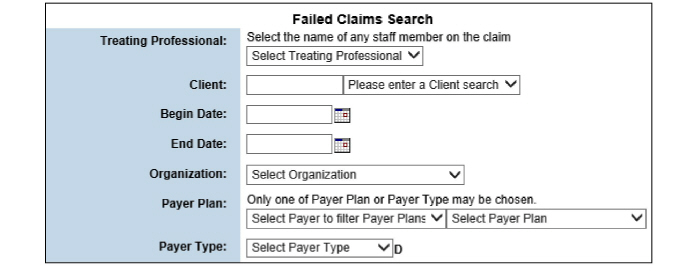
2. Fill out the needed information and click Submit in the status bar.

3. Click the failed claim desired.

Overriding the Errors in Failed Claims
All activities that are moved into Failed Claims have an error code assigned to them. In most cases, billing staff will work to resolve Failed Claims so they can be sent out for billing. The only failed claim error that can be overridden is No Authorization. It is possible to review and then override a No Authorization error. For all other failed claims, the Override button will not be available. Once a failed claim is overridden, it will be processed by the next run of the Claim Engine.
1. Navigate to Billing/AR > Show Menu > Failed Claims > Fill out the needed information and click Submit in the status bar > Click the failed claim desired.

2. Click the Override button for the claim needing to be overridden.
3. Select OK, the claim is overridden.
Once a failed claim has been resolved, it will be processed when the Claim Engine runs. If a more immediate resolution is needed, the following instructions detail how to manually reprocess a failed claim. When a failed claim is manually reprocessed, the Claim Engine runs against the selected failed claim only. No other activities or claims are processed by this action.
1. Navigate to Billing/AR > Show Menu > Failed Claims > Fill out the needed information and click Submit in the status bar > Click the failed claim desired.

2. Click the Reprocess All Errors button. The claim is instantly processed by the Claim Engine. If no errors are found by the Claim Engine, the claim is removed from the Claim Error Information page and put in Claim Approval. (See Claim Approval.) If an error is found, the claim remains on the Claim Error Information page.
When a failed claim is reversed, it is removed from the Failed Claims module, sent back to the Schedule, and will be processed by the next Claim Engine run.
1. Navigate to Billing/AR > Show Menu > Failed Claims > Fill out the needed information and click Submit in the status bar > Click the failed claim desired.

2. Click Reverse Claim. The failed claim is reversed out of the Failed Claim module, and the billing flag for the activities associated with the failed claim are reset so they will be processed by the next Claim Engine run.
Marking Claims as Non-Billable
When a failed claim is marked as non-billable, it is removed from the Failed Claims module.
1. Navigate to Billing/AR > Show Menu > Failed Claims > Fill out the needed information and click Submit in the status bar > Click the failed claim desired.

2. Click Mark as Non-Billable.
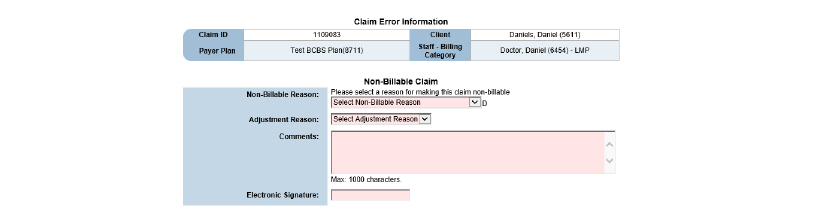
3. Fill out the needed information and click Submit. A write-off is generated for the amount of the claim.
When the Claim Engine encounters errors during the claim validation process, the activity becomes a claim, but it cannot be billed until the error is resolved in Failed Claims.
To navigate to Failed Claims, click Billing/AR > Show Menu > Failed Claims > Enter Search criteria if desired and click Submit > Click the desired failed claim.
The following are the most common conditions that result in the Claim Engine generating an error during the claim validation process:
No Fee Matrix Setup for Procedure, Licensure, or Payer

1. Note the service date, procedure code, payer plan, and staff member associated with the claim.
2. Check the licensure: Navigate to Employee > Search for the staff member and click Submit > Select the correct employee name > Show Menu > Credentials > Select the Primary button and check that there is a Primary Date Range entered that covers the failed claim. If there is not, add the range by clicking Add Primary Range.
3. Check the payer: Navigate to Administration > Show Menu > Payers > click the Payer Plans button for the plan involved > click the Fees button for the plan involved > click the Fee Matrix button for the record that overlaps the service date and organization of the failed claim > Add New Fees > enter the Procedure code for the claim item throwing errors and put billing information under the correct billing category.
4. Navigate back to Failed Claims, click Billing/AR > Show Menu > Failed Claims > Enter Search criteria if desired and click Submit > Click the desired failed claim > Click Reprocess All Errors. If the activity was reprocessed correctly, the Failed Claims Search Results page will reappear without the offending claim.
Standard Fee Cannot be Less Than Contracted Rate
This error occurs when the Standard Fee (billed amount) that is set up for the procedure is less than the Contracted Rate (expected amount) that is set up in the payer plan. This problem can be resolved by increasing the Standard Fee amount or by decreasing the Contracted Rate amount. For either method, note the service date, staff member, payer plan, expected amount, and billed amount associated with the claim.

Increasing the Standard Fee Resolution:
1. Navigate to Administration > Show Menu > Procedures > Click the procedure code needing an update > Enter a standard fee that is greater than the contracted rate and click Submit.
2. Navigate back to Failed Claims, click Billing/AR > Show Menu > Failed Claims > Enter Search criteria if desired and click Submit > Click the desired failed claim > Click Reprocess All Errors. If the activity was reprocessed correctly, the Failed Claims Search Results page will reappear without the offending claim.
Decreasing the Contracted Rate Resolution:
Navigate to Administration > Show Menu > Payers > click the Payer Plans button for the plan involved > click the Fees button for the plan involved > click the Fee Matrix button for the record that overlaps the service date and organization of the failed claim > Click the Edit button for the fee matrix needing update > Update and click Submit.
Once the problem is resolved the claim can be reprocessed:
Click Billing/AR > Show Menu > Failed Claims > Enter Search criteria if desired and click Submit > Click the desired failed claim > Click Reprocess All Errors. If the activity was reprocessed correctly, the Failed Claims Search Results page will reappear without the offending claim.
The goal of the CareLogic system is to get viable claims to payers. The Billing System is what allows CareLogic to achieve that goal. Using the Billing System, the results of the nightly Claim Engine can be monitored and failed activities and failed claims can be resolved. Once the activities and claims are resolved, they will be processed again by the Claim Engine.
This chapter section includes the following topics:
• Entering Non-Activity Invoices (Manual Claims)
• Using Mass Reverse for Submitted Claims
• Generating Client Statements
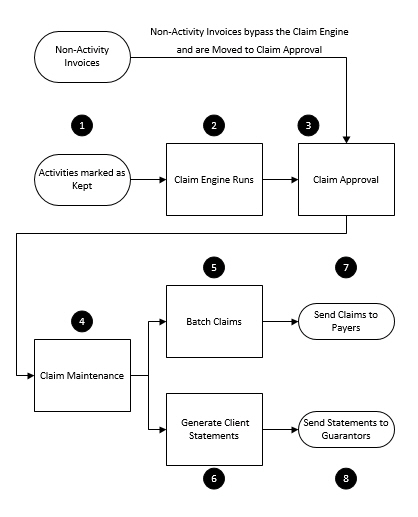
1. Activities Marked As Kept - Once the status of an activity is marked as Kept through the Schedule or Front Desk, the activity will be processed by the nightly run of the Claim Engine.
|
Because non-activity invoices are not associated with scheduled services, they bypass the Claim Engine. |
2. Claim Engine Runs - The Claim Engine performs activity validation, checking for all service requirements related to the activity. If the activity passes the activity validation process, it becomes a claim and is moved to claim validation. During this phase, the Claim Engine checks for all financial requirements related to the claim. If the claim passes the claim validation process, it is moved into Claim Approval.
3. Claim Approval - This step gives the billing staff an opportunity to review the claims before they are sent out to payers. By reviewing the claims, the organization can improve the likelihood that the claims are successfully paid.
4. Claim Maintenance - After claims are approved, they are moved into Claim Maintenance. Once in Claim Maintenance, the billing staff can make adjustments to claims and reverse claims, as necessary.
5. Batch Claims - When batching claims, the system allows the definition of criteria to use for the batching process. For example, a batch can be created that includes claims falling within a date range, or claims associated with a particular billing type, EDI type, payer, payer type, organization, program, client number, or claim number.
6. Generate Client Statements - Guarantor bills are generated using the Client Statement module. If a client has multiple guarantors set up in the system, a Client Statement can be generated for each guarantor whose record is marked to receive statements.
7. Send Claims to Payers - After claim batches and client statements are created, they are sent out for billing. For paper claims, a HCFA file can be created and printed. For electronic billing, an 837 file can be created.
8. Send Statements to Guarantors - Statements can be generated, printed, and provided to clients.
Entering Non-Activity Invoices (Manual Claims)
Non-activity invoices allow an organization to bill for events that are not related to services (scheduled activities). Some examples of non-activity invoices are returned checks or fees charged to the consumer for missed appointments. Once a non-activity invoice is created, it is moved into Claim Approval. (See Claim Approval.)
1. Navigate to Billing/AR > Show Menu > Non-Activity Invoice (Called Manual Claim in some systems).
2. Fill out the needed information and click Submit in the status bar.

3. Click the client needing a non-activity invoice.
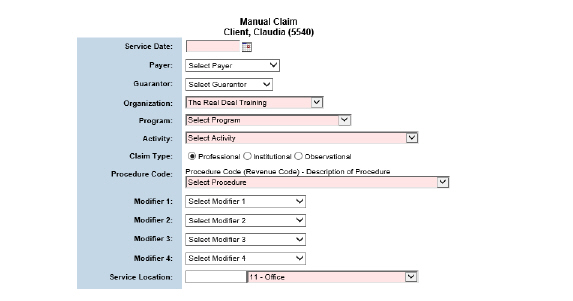
4. Click Submit in the status bar. The non-activity invoice is created and moved into Claim Approval. (See Claim Approval.)
All activities (services) that are successfully processed by the Claim Engine are moved into the Claim Approval module. This module provides the opportunity to review claims and manually approve them before they are sent out to payers. If errors are discovered, billing staff can reverse the claims and ask the appropriate staff to resolve the errors. Once the errors are resolved, the Claim Engine will process the activities during the next run.
|
By default, zero dollar guarantor claims appear in Claim Approval. Contact QSI Support if it is wished to drop zero dollar claims. |
The Claim Approval module is used to perform the following tasks:
• Accessing Claims for Approval
All scheduled activities that are successfully processed by the Claim Engine are moved into Claim
Approval.
To access claims for approval:
1. Navigate to Billing/AR > Show Menu > Claim Approval.
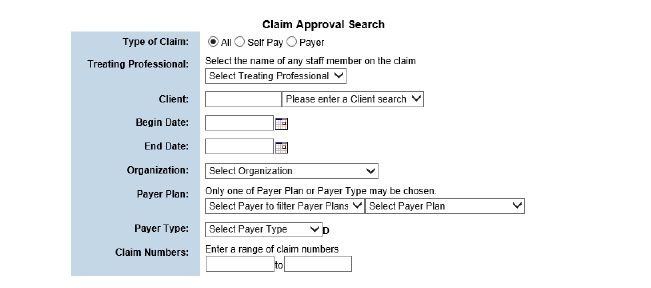
2. Fill out the needed information and click Submit in the status bar.
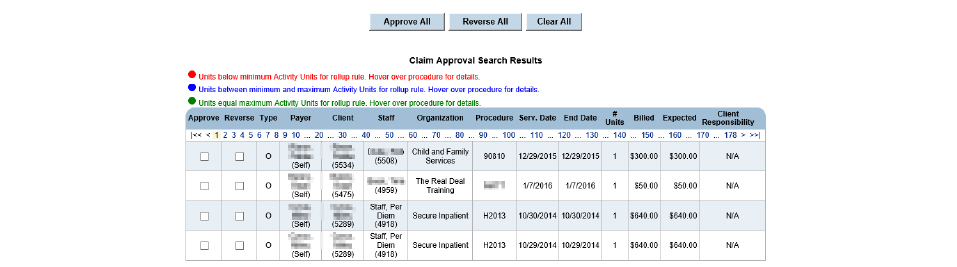
Once the Claim Engine runs, it moves all of the activities that were successfully validated and converted into claims into Claim Approval. The Claim Approval module gives the billing staff an opportunity to review the claims before they are approved and sent out for billing.
1. Navigate to Billing/AR > Show Menu > Claim Approval > Fill out the needed information and click Submit in the status bar.
2. In the Approve column, check the boxes for claims it is desired to approve.
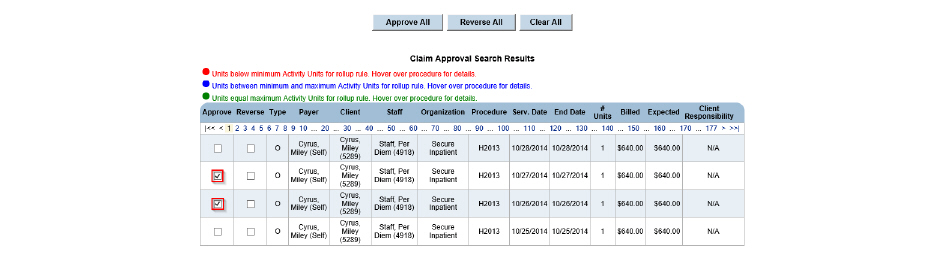
3. Click Submit in the status bar. The selected claims are approved and removed from the Claim Approval Search Results page. A confirmation message appears on the Claim Approval Search page. Once the claims have been approved, they can be batched.
Reversing a claim allows it to be removed and run through the Claim Engine again. When a claim is reversed, the system resets the billing flag on the activities associated with the claim so they are processed by the next run of the Claim Engine.
1. Navigate to Billing/AR > Show Menu > Claim Approval > Fill out the needed information and click Submit in the status bar.
2. In the Reverse column, select the check boxes that correspond to claims that need to be reversed.

3. Click Submit in the status bar. The selected claims are reversed, and the billing flag for the activities associated with the claims are reset so they are processed by the next run of the Claim Engine.
After the claims have been approved, they are moved into Claim Maintenance. Once in Claim Maintenance, staff can make adjustments and reverse claims.
The Claim Maintenance module is used to perform the following tasks:
• Viewing the Services Related to Claim Items
• Viewing a Claim Item’s Financial Transactions
• Viewing a Claim Item’s Batch Information
• Viewing the Claims Related to a Claim Item
1. Navigate to Billing/AR > Show Menu > Claim Maintenance.

2. Fill out the needed information and click Submit.

When a claim is selected on the Claim Maintenance Search Results page, the related claim items are listed on the Items tab of the Claim Information page. Claim rollup rules determine the relationship between the number of claim items for each claim. If the selected claim is part of a rollup rule, there may be multiple claim items for each claim. If the selected claim is not part of a rollup rule, there will be only one claim item for each claim.
1. Navigate to Billing/AR > Show Menu > Claim Maintenance > Fill out the needed information and click Submit > Click the Select button for the desired claim.

The Items tab is used to perform the following tasks:
1. Navigate to Billing/AR > Show Menu > Claim Maintenance > Fill out the needed information and click Submit > Click the Select button for the desired claim.

2. Click the Adjust button for the claim item needing adjustment. The Claim Adjustment Entry page appears. A claim item adjustment can be made using the Adjustment Type and Adjustment Amount fields or a next action can be taken using the Next Action field.
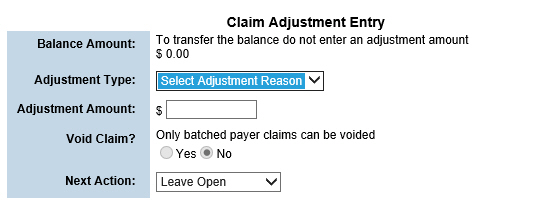
|
Beside each selection in the Adjustment Type drop-down is a plus or minus, which indicates write ups and write offs. Adjustment Types can be adjusted as needed in Administration > Show Menu > GL Code Admin > Transaction Reasons. |
3. Fill out the needed information and click Submit in the status bar.
Claim items that have already been approved or posted can be reversed. When a claim item is reversed, a reverse entry transaction is created and the claim item is removed from the system. Once that occurs, any issues with the scheduled activity that were part of the claim item can be resolved, then the Claim Engine can process the activity again.
• For claims that are not in a closed GL period, the Reverse button reverses all related transactions, including revenue, and re-processes them through the Claim Engine as a new claim.
• For claims that are in a closed/locked GL period, the Reverse button will enable the claim engine to adjust the revenue transactions per the correction and no new revenue transaction is created.
1. Navigate to Billing/AR > Show Menu > Claim Maintenance > Fill out the needed information and click Submit > Click the Select button for the desired claim.

2. Click the Reverse Claim button.
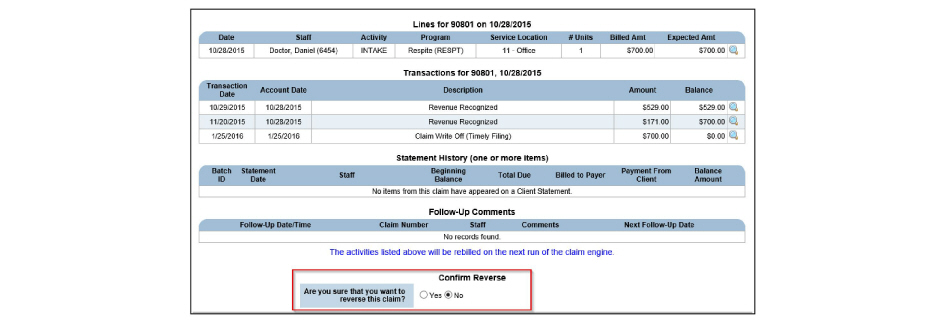
3. Select Yes to confirm the reverse and click Submit in the status bar. The reversed activity now appears in red on Claim Maintenance Search Results.
Viewing the Services Related to Claim Items
The number of services included in a claim item is determined by claim rollup rules. (See Claim Rollup Rules in the System Administration Guide.) If the selected claim item is part of a rollup rule, there may be multiple services listed on the Lines tab. If the selected claim item is not part of a rollup rule, then there will be only one service listed on the Lines tab.
1. Navigate to Billing/AR > Show Menu > Claim Maintenance > Fill out the needed information and click Submit > Click the Select button for the desired claim.
2. Click the Lines tab. The services associated with the selected claim are listed.

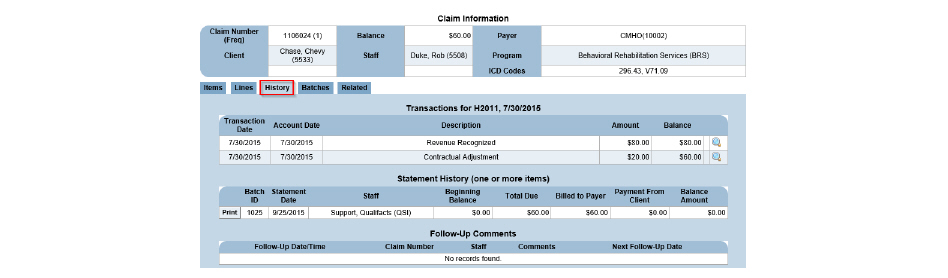
Viewing a Claim Item’s Financial Transactions
The financial history includes transactions related to the claim item, such as claim approvals, payments, refunds, approved payment lines, claim item write ups, claim item write offs, contractual adjustments, reversals, and transfers.
|
If a bill next adjustment (see Adjusting Claim Items) was made on a claim item, it appears as a Transfer on the History tab. If a claim item contains a Transfer (Money Move), it is always listed as the last line on the History tab. Once a Transfer transaction occurs, the text, ‘Balance Transfer’ replaces the Adjust and Backout buttons on the Items tab. (See Viewing Claim Items). To view the claim for the payer that was billed next, click the Related tab. (See Viewing the Claims Related to a Claim Item.) |
1. Navigate to Billing/AR > Show Menu > Claim Maintenance > Fill out the needed information and click Submit > Click the Select button for the desired claim.
2. Click the History tab. The financial transactions are listed for the selected claim item.
Viewing a Claim Item’s Batch Information
If the claim item is part of claim batch, the Batches tab can be used to view information about the claim batch.
1. Navigate to Billing/AR > Show Menu > Claim Maintenance > Fill out the needed information and click Submit > Click the Select button for the desired claim > Click the Batches tab. This tab lists the information about the claim batch associated with the selected claim item.

Viewing the Claims Related to a Claim Item
Related claims occur for several reasons, such as the service involved a co-pay or the original claim was written off and billed to the next payer.
1. Navigate to Billing/AR > Show Menu > Claim Maintenance > Fill out the needed information and click Submit > Click the Select button for the desired claim. Click the Related tab on the Claim Information page.

Once a claim is approved, it can be batched based on user-defined criteria. For example, batches can be created that include claims that fall within a specific date range or the claims associated with a particular billing type, EDI type, payer plan, or payer type. Claims can also be batched based on organization, program, client numbers, or claim numbers.
1. Navigate to Billing/AR > Show Menu > Claim Batches.
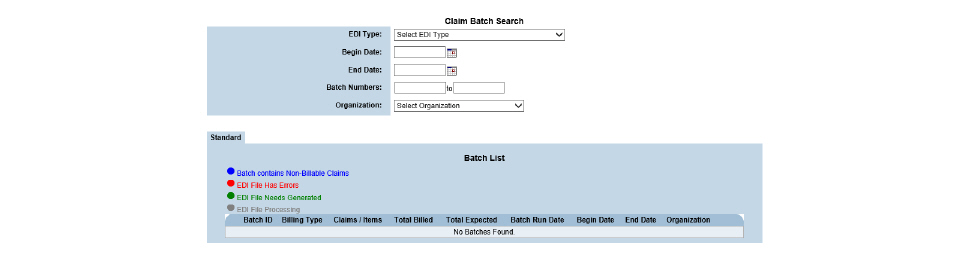
This page is used to perform the following tasks:
• Downloading HCFA Claims in Batches
• Downloading UB04 Claims in Batches
• Downloading 837 Files in Batches
• Regenerating 837 File Batches
Creating a new claim batch includes defining the criteria for the claims that will appear in the batch.
1. Navigate to Billing/AR > Show Menu > Claim Batches > Click Create Batch in the status bar.

2. Fill out the needed information and click Submit in the status bar. If claims matching the criteria are found, a claim batch is created and a Claim Batch ID is assigned.

Downloading HCFA Claims in Batches
|
Before printing claims on physical HCFA forms, DOS print configuration files must first be loaded to the local computer. If the print configuration files are needed, please contact the Qualifacts Support Team. |
1. Navigate to Billing/AR > Show Menu > Claim Batches.
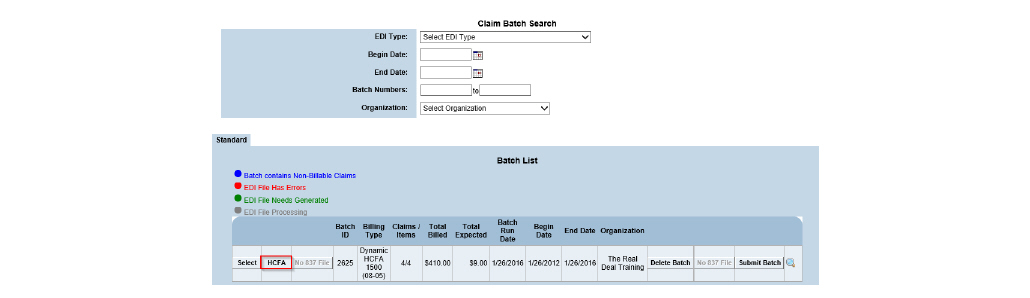
2. Click the HCFA button for the desired claim. The selected claim batch is downloaded as a text file and can be opened in a text editor.
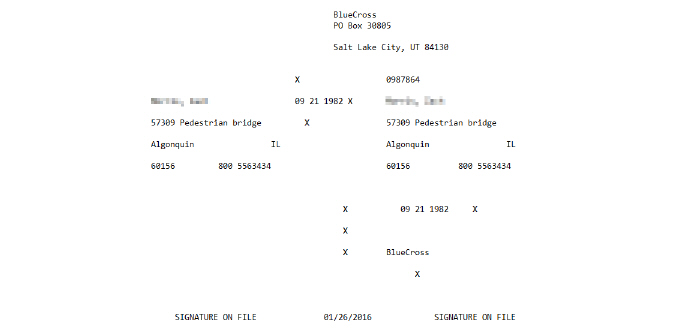
3. Go to the desktop and drag and drop the text file onto the appropriate DOS print configuration icon (DosPrn or DosNetPrn). The HCFA file is sent to the selected printer.
Downloading UB04 Claims in Batches
1. Navigate to Billing/AR > Show Menu > Claim Batches > Click the UB04 button for the desired batch. It is downloaded as a PDF file that can be printed directly on the UB04 form.


Downloading 837 Files in Batches
1. Navigate to Billing/AR > Show Menu > Claim Batches.

2. Click the 837 File button for the desired batch. The file can be saved and uploaded to a clearing house or payer. If Emdeon is used, the Submit Batch button can be used to send the batch.
Viewing the Modifiers Associated With a Claim
Once a claim becomes part of a batch, the modifiers associated with it can be viewed.
1. Navigate to Billing/AR > Show Menu > Claim Batches > Click the Select button for the desired claim batch.
2. Locate the desired claim batch line and click its Modifiers button.

|
The Claim Frequency Code dropdown and Payer Claim Control Number fields are also included on the page and can be used to indicate secondary billing if required by the payer. |
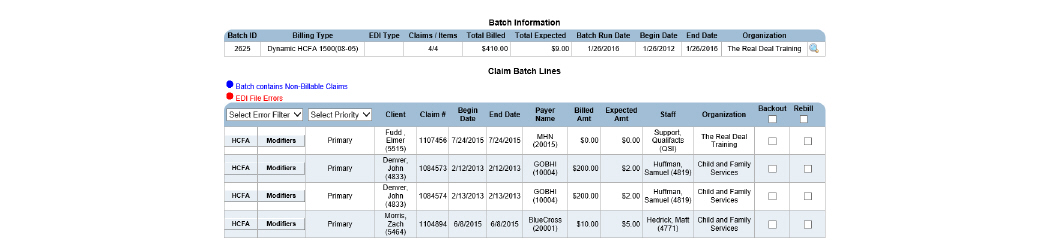
After selecting a batch, general information about the claims within the batch can be accessed. Individual claims can also be downloaded or backed out.
1. Navigate to Billing/AR > Show Menu > Claim Batches > Click the Select button for the desired claim batch.

This page is used to perform the following tasks:
• Downloading HCFA Claims Individually
• Downloading UB04 Claims Individually
Downloading HCFA Claims Individually
|
Before printing claims on physical HCFA forms, DOS print configuration files must first be loaded to the local computer. If the print configuration files are needed, please contact the Qualifacts Support Team. |
1. Navigate to Billing/AR > Show Menu > Claim Batches > Click the Select button for the desired claim batch.
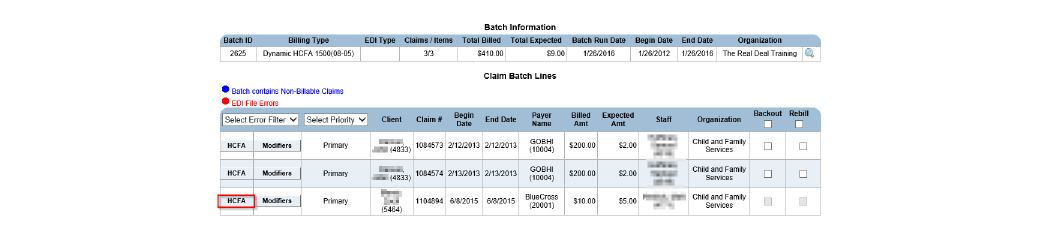
2. Click the HCFA button for the desired claim. The selected claim is downloaded as a text file and can be opened in a text editor.
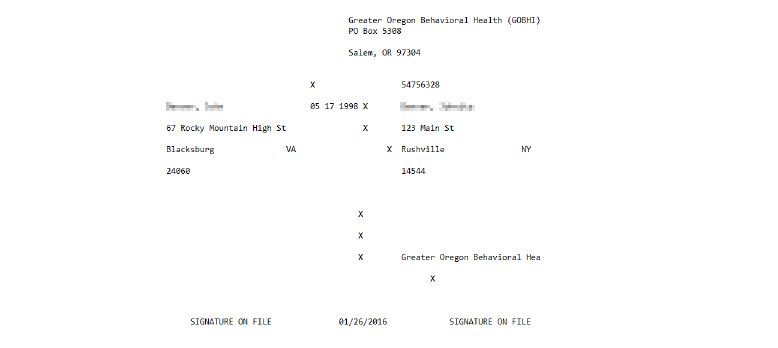
3. Drag and drop the text file onto the appropriate DOS print configuration icon (DosPrn or DosNetPrn). The HCFA file is sent to the selected printer.
Downloading UB04 Claims Individually
1. Navigate to Billing/AR > Show Menu > Claim Batches.

2. Click the UB04 button that corresponds with the desired batch. All of the claims in the selected batch are printed to a PDF file, and a dialog box appears prompting to Save or Open the PDF.
3. Print the UB04 PDF directly onto the UB04 claim form.
When a claim is backed out, it is removed from the batch. It still exists as a claim and is available in Claim Maintenance as an approved claim. When the next batch is created with the same criteria, this claim will be picked up again.
|
If a claim needs to be reprocessed, it is reversed from Claim Maintenance. Then, when the Claim Engine runs, a new claim is created. |
1. Navigate to Billing/AR > Show Menu > Claim Batches > Click the Select button for the desired claim batch.

2. Check the Backout box for the claim needing to be backed out and click Submit. The claim and service lines are backed out of the system, but the individual activities remain in the system. During the next Claim Engine run, activities are processed, and new claims are created.
Using re-bill creates an exact copy of a claim. If a payer rejects a claim that is part of a batch in error, like if the claim were denied because the client's coverage wasn't recognized though they did have coverage, issues with the claim can be resolved and then re-billed.
1. Navigate to Billing/AR > Show Menu > Claim Batches > Click the Select button for the desired claim batch.

2. Check the Rebill box for the desired claim and click Submit. The selected claim is re-billed. The claim remains a part of the current batch, but it is also available to be included in a new batch.
When a claim batch is deleted from the system, all of the claims that were associated with the batch remain. A new batch can be generated if necessary. (See Creating a New Claim Batch.)
|
Once a batch has been submitted, it cannot be deleted. If a batch has been submitted, the Delete Batch button is replaced with Batch Sent. |
1. Navigate to Billing/AR > Show Menu > Claim Batches > Click the Delete Batch button for the desired batch.

2. Click OK to confirm deletion. The claim and the service lines are backed out of the system, but the individual claims remain.
If something is wrong with the EDI Type in the Billing Configuration Entry setup and errors occur in a batch, like client’s social security numbers or addresses are not pulling into the 837s, the batch does not have to be reversed to be corrected. Errors in Billing Configuration Entry should be resolved before continuing. (See Configuring Payer Plan Billing Information in the System Administration Guide.) Once errors are resolved, the 837 file from the batch can be regenerated. The newly-generated file overwrites the old file. Once it is regenerated, it can be sent out for billing.
|
If the claim batch is not in an electronic format, the Generate button is replaced with No 837 File. |
1. Navigate to Billing/AR > Show Menu > Claim Batches.

2. Click the Generate File button for the desired batch. The 837 file is regenerated.
After a claim batch has been sent out for billing, its status can be changed to keep track of batch status in the system.
|
In systems without Emdeon, the Submit Batch button is used only as a visual indicator that the batch has been submitted. Batches must be submitted to payers in a manner the payer accepts. In systems with Emdeon, the Submit Batch button sends the claim batch directly to Emdeon. |
1. Navigate to Billing/AR > Show Menu > Claim Batches.
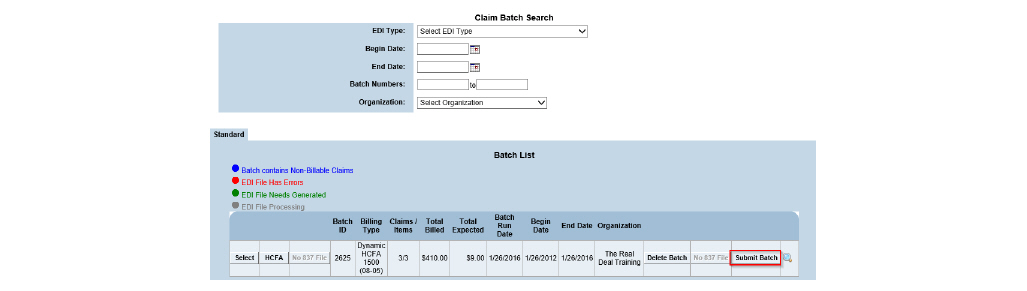
2. Locate the batch file that has been sent out for billing and click the Submit Batch button. The Submit Batch button is updated with Status: Submitted.
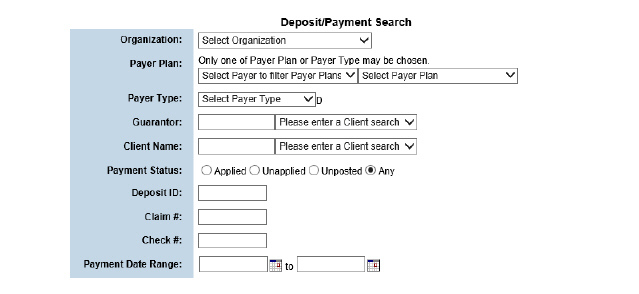
Using Mass Reverse for Submitted Claims
There are times when several claims at a time need reprocessing for reasons such as changes to a payer plan, changes in payment amount, or corrections to administrative data. The Mass Reverse module allows the reversal of multiple claims so that they do not have to be done individually. Based on the criteria entered, the system recognizes claims that need to be re-billed, checks to see if they have any related claims, and backs out or reverses those claims to allow their primary claims to be re-billed.
1. Navigate to Billing/AR > Show Menu > Mass Reverse.

2. Click Add a Mass Reverse in the status bar. The Mass Reverse wizard appears, displaying the Claim/Payment Search page.

3. Fill out the needed information and click Submit in the status bar.

|
Search results cannot exceed 200 results. If search parameters return more than 200 results, the search should be narrowed by entering more criteria. |
4. Check the boxes of the claims it is desired to Restart Claiming or Unapply Payment to and click Submit.

|
From this page, the Mass Reverse information can be exported into an Excel spreadsheet by selecting the Report to Excel button in the status bar. |
5. Fill out the needed information and click Submit in the status bar.
6. Once the Mass Reverse record is signed and submitted, the following actions are taken:
• If the claim is found in Failed Claims or Claims Approval, it is backed out, and the activity is reset to re-bill.
• If the claim is found in Claim Maintenance, the system looks for child claims and co-pay claims to complete first, then un-posts any payments applied to the claim, reverses adjustments on the claim, reverses the claim, and resets the activity to re-bill. If a payment for reversal is selected, the payment is reversed from the deposit ID from which it is associated.
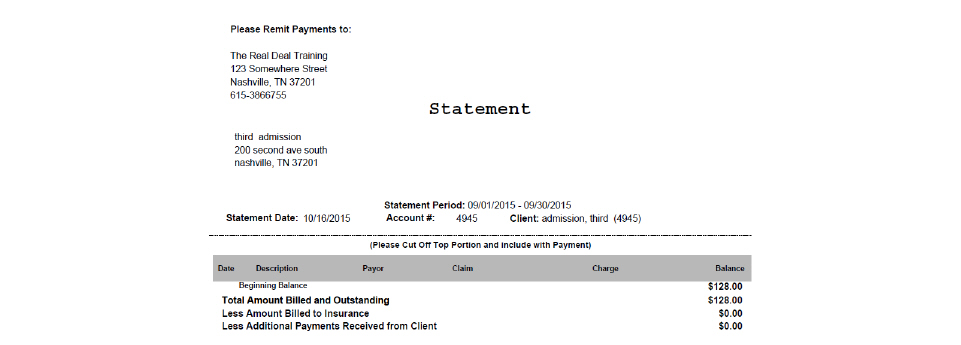
The Client Statement module is used to generate guarantor bills. The report can be run for an individual client or in batch mode.
|
The Client Balance can be checked immediately by navigating to Billing/AR > Show Menu > Billing Reports > Click Select for the Client Balance report > Fill in the search criteria and click View Report. |
1. Navigate to Billing/AR > Show Menu > Client Statement Batch.
2. Click New Batch.
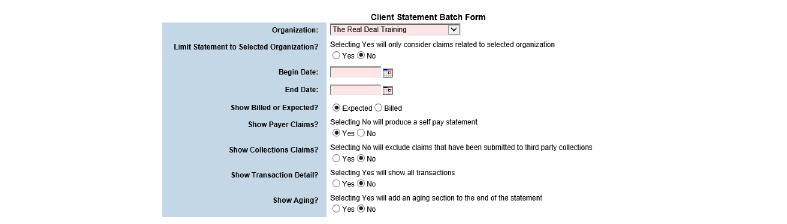
3. Click Submit in the status bar. The report parameters are saved as a new record and the record is listed on the Pending Batches page.
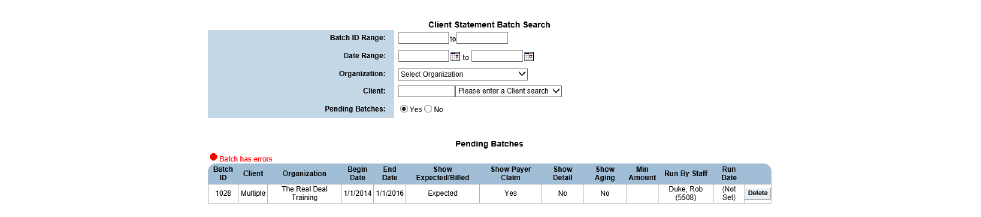
4. Each night a script runs that processes all of the Client Statement Batch records that exist. After the client statement batch records are processed, their status is changed to active and they are listed on the Completed Batches page.
After the script runs at night and they are listed on the Completed Batches page, statements can be printed:
• Printing Client Statements in Batch Mode
• Printing Client Statements for Individual Guarantors
Printing Client Statements in Batch Mode
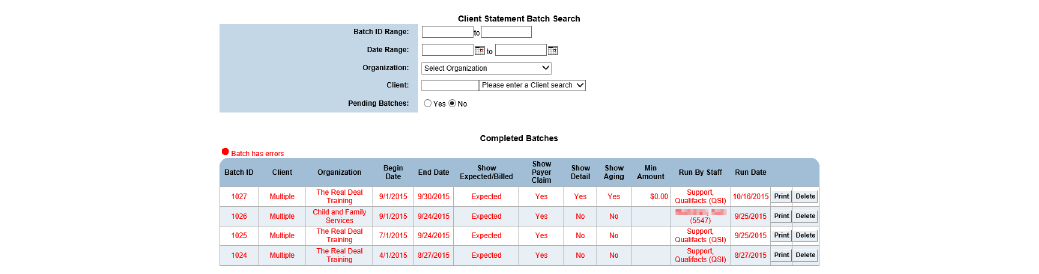
Once a client statement batch record has been processed by the nightly run of the Client Statement Batch, the client statements can be printed.
1. Navigate to Billing/AR > Show Menu > Client Statement Batch.
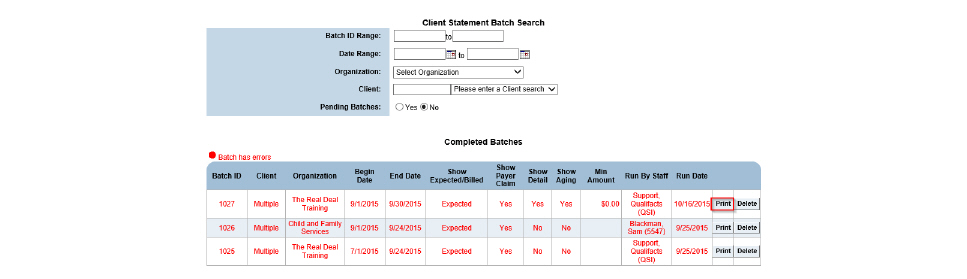
2. Click the Print button for the desired batch record. A PDF of the master report is generated, which can then be printed.
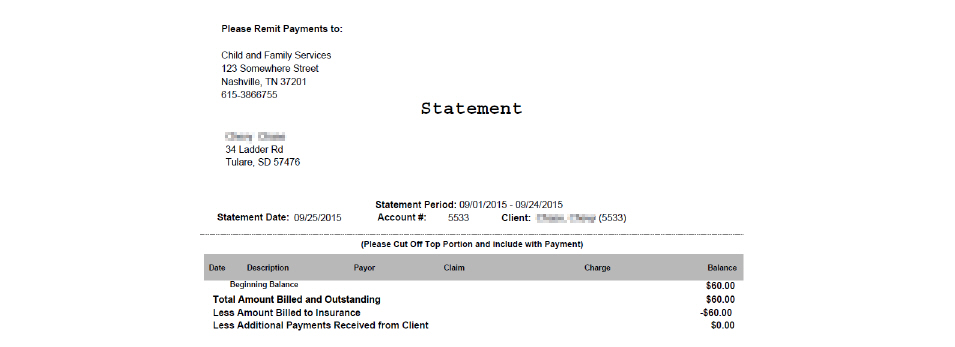
Printing Client Statements for Individual Guarantors
Once a client statement batch record has been processed by the nightly run of the Client Statement Batch, a client statement report can be printed for individual client guarantors.
1. Navigate to Billing/AR > Show Menu > Client Statement Batch. The Client Statement Batch Search and Completed Batches page appears.
2. Click the desired batch record. The Client Statement Batch page reappears with the Client List in the bottom section.
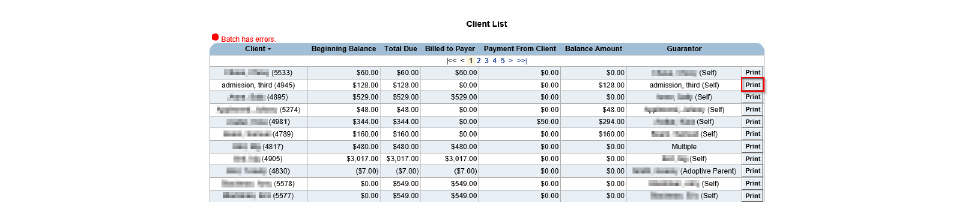
3. Click the Print button for the desired guarantor. A PDF of the report is generated, which can then be printed.
|
Auto approval is a special configuration and will not function unless Auto Claim Approval Settings are configured. |
Ground Rules:
• Claims that are pending roll-up are not eligible for automatic approval until after roll-up rule requirements are met, and roll-ups match exactly.
• Auto Claims Approvals can be set up by an organization after they have been live for more than 90 days.
• The Claim Engine will look at the most specific criterion first, then check each in turn to the least specific criterion for auto-approval inclusion.
• Auto Claim Approval is n-tier compliant.
• Claim details must match the auto claim approval rule.
1. Navigate to Billing/AR > Show Menu > Auto Claim Approval Settings.

2. Click Add Auto Claim Approval Setting.

3. Fill out the needed information and click Submit. The auto claim approval setting created is listed in the Current Auto Claim Approval Settings screen.
|
Claims that have been approved automatically show up in bold on the Claim Maintenance screen. |
|
Auto Claim Batch is a special configuration and will not function unless Auto Claim Batch Settings are configured. |
|
Claims cannot be batched until they are approved manually or via Auto Approval. |
Ground Rules:
• Auto Claims Batching can be set up by an organization after they have been live for more than 90 days.
• The Claim Engine will look at the most specific criterion first, then check each in turn to the least specific criterion for auto claim inclusion.
• Auto Claim Batching is n-tier compliant.
• The automatic claim batches will need to be sent to the payer.
1. Navigate to Billing/AR > Show Menu > Auto Claim Batch Settings.

2. Click Add Auto Claim Batch Setting.

3. Fill out the needed information and click Submit. The auto claim batch setting created is listed in the Current Auto Claim Batch Settings screen.
|
Batches that have been created automatically show up in bold in the Claim Batches module. |
The Accounts Receivable System
The Accounts Receivable system is used to enter payments into CareLogic, make any necessary adjustments, and ultimately approve the payments. When the system processes payments, it matches them to open claims. Payments must be approved before an accounting period can be closed and the general ledger data is exported from the system.
This chapter section includes the following topics:
• Accounts Receivable Process Flow
• Transferring Approved Payments
Accounts Receivable Process Flow
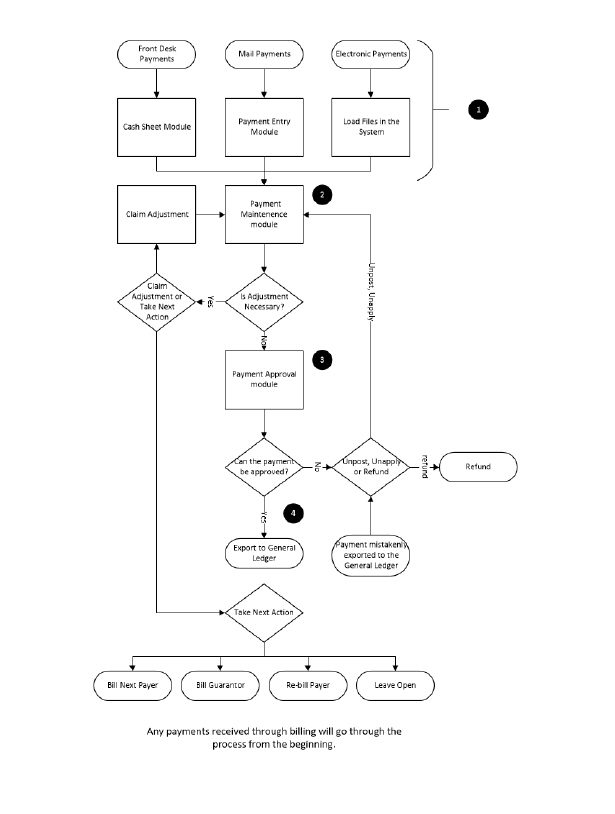
1. Receive and Enter Payments:
- Electronic Payments - Electronic payments are received as 835 files and uploaded through the EDI Upload module. Once the payments are uploaded, the system creates a deposit and a payment record for each payer plan in the file. The system processes payments and applies them to open claims.
- Mail Payments - These payments are received by mail and are entered manually through the Payment Entry module. It is possible to make adjustments and define the next action in the billing process when manually entering payments.
- Front Desk Payments - These payments (generally co-pays) are received from clients and are entered through the Cash Sheet module. At the end of each day, an electronic signature is required to close out and approve the Cash Sheet. Each night an automated process runs that posts the client co-payments against the approved co-pay claims. (See the Front Desk Guide.)
2. Payment Maintenance Module
- Make Claim Adjustment - When a claim adjustment is made, an adjustment transaction reason must be selected. For each adjustment reason, a unique general ledger code can be assigned in the GL Code Admin module. (See General Ledger.)
- Take Next Action - Possible choices include Bill Next Payer, Bill Guarantor, Re-bill Payer, or Leave Open.
3. Payment Approval Module - Provides an opportunity to review the payments applied to claims before they are posted to the General Ledger.
- Unpost or Unapply - If a payment was applied to an open claim in error, it can be un-posted or un-applied and sent back to the Payment Maintenance module.
|
If a payment that was originally a part of an 835 file is backed out, it must be manually re-entered into the system. |
- Refund - If a payment is received in error, it can be refunded.
4. Export to General Ledger - After the payments are approved, the accounting period is closed by exporting the General Ledger data to a file.
Payments that are received in person, such as client co-pays, are written to a daily cash sheet. At least one daily cash sheet is created for each organization.
Once a cash sheet is approved, a new deposit is generated and can be accessed in Payment Maintenance. For deposits generated in Cash Sheets, the system attempts to match the payment to the most recent claim. This is done because most cash sheet payments correlate to that service date’s co-pay collections. If no co-pay claim is found, the payment remains in Unapplied until a claim that matches is generated or until a user moves the payment manually.
1. Navigate to Billing/AR > Show Menu > Cash Sheet Approval.

2. Click the Select button that corresponds with the cash sheet needing approval.

3. Sign in the Signature field and click Submit in the status bar. The Cash Sheet is approved and the payments on the Cash Sheet are entered into the system.
|
Once the Cash Sheet is approved, no further changes are allowed. If the individual payments within the Cash Sheet need modification, it can be done in Payment Maintenance. (See Payment Maintenance.) |
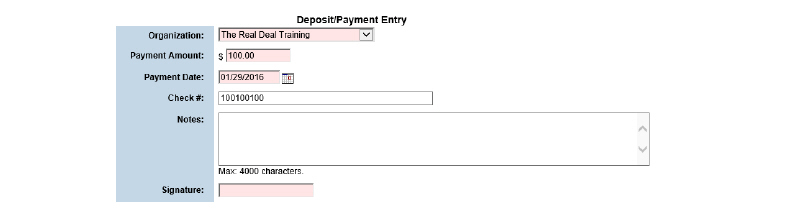
Separate payments can be entered as one deposit batch. Once a deposit batch is entered, a system-generated ID number is automatically assigned to the deposit. This deposit ID number is used to track payments within the deposit.
|
A history of changes to the deposit batch can be viewed by clicking View Payment Activity in the status bar. |
1. Navigate to Billing/AR > Show Menu > Payment Entry.

2. Fill out the needed information and click Submit in the status bar. The deposit batch is created.
|
If the deposit needs to be edited, click Edit Payment in the status bar. Once a payment has been matched to an open claim (applied) or matched to a client (unapplied), the deposit information is updated using the Deposit Edit module. (See Editing Deposits.) |
|
If a payment is incorrectly applied to a claim, use the Payment Transfer module to transfer the payment to the correct claim. (See Transferring Approved Payments.) |
The Payment Maintenance module is used to maintain deposits. (See Entering Deposit Batches.) It also maintains payments that have been entered into the system. (See Entering Payments.)
1. Navigate to Billing/AR > Show Menu > Payment Maintenance.
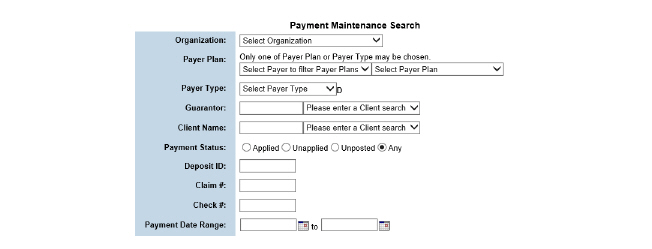
2. Fill out the needed information and click Submit in the status bar. The Payment Search Results page appears. Each time a deposit from Payment Maintenance is opened, the system attempts to match any payments sitting in the Unapplied tab.

The Payment Maintenance module is used to perform the following tasks:
• Manually Matching Payments to Claims
• Addressing Claim Balances on Applied Payments
Once a deposit batch is created and some of the deposit amount has been applied to claims, the Edit Payment button on the Payment Posting page is no longer available. The Deposit Edit module allows the update of deposit batch information to ensure balancing.
|
Deposit dates can be modified as long as the month has not been closed. If the date of the deposit is changed to a month that has been closed through the General Ledger, the system notifies that the deposit cannot be changed to another month. If the General Ledger has not been closed for the accounting period, the date of the deposit can still be modified. If the deposit is part of a closed period, the General Ledger is unlocked, corrections are made, and then the accounting period is closed again. (See Reversing Claim Items) |
|
A history of changes to the deposit batch can be viewed by clicking View Deposit Activity in the status bar. All deposits that do not have payments attached to them can be viewed by clicking View Unposted Payments. An un-posted deposit is one in which the deposit amount is equal to the un-posted amount. |
1. Navigate to Billing/AR > Show Menu > Deposit Edit.
2. Fill out the needed information and click Submit in the status bar.

3. Click the Deposit ID button for the deposit needing edits.
4. Edit the desired information and click Submit in the status bar. The deposit batch information is updated in the system.
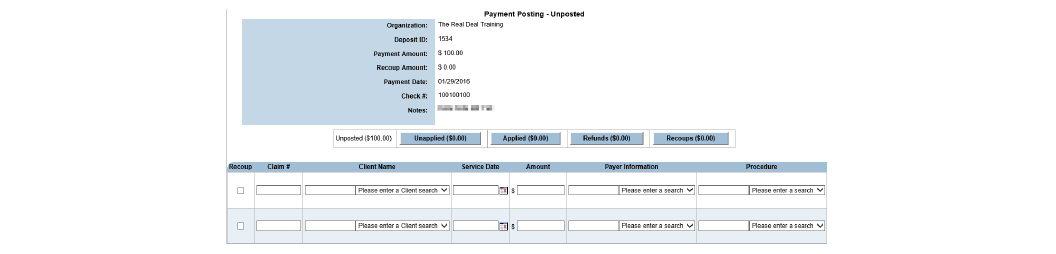
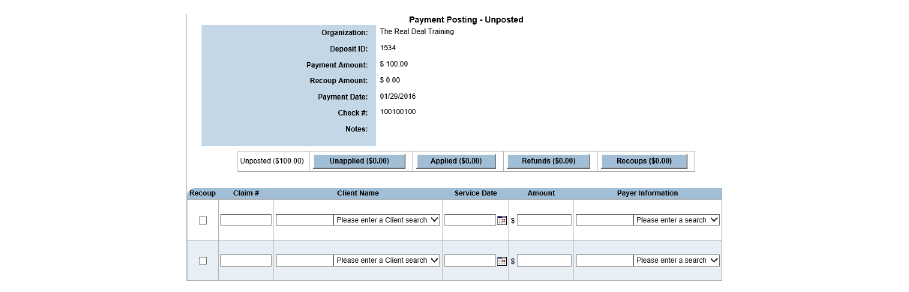
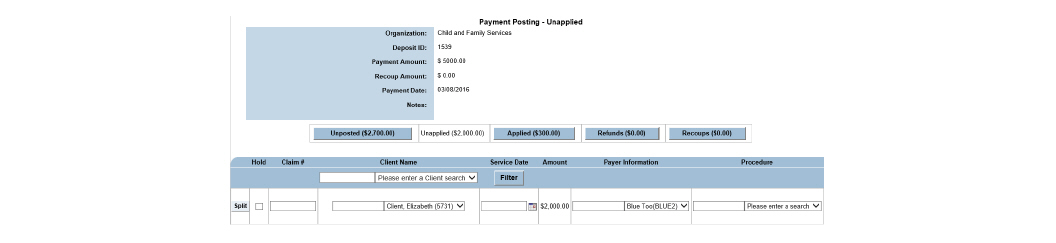
Once a deposit batch is created, the deposit amount is transferred to the Unposted tab. The Unposted tab is used to enter payments as they will appear on the Explanation of Benefits (EOB). If a payment to a claim is applied that has an unapproved claim associated with it, an error message alerts that the payment cannot be applied until it is approved. The new payment is moved to the Unapplied tab until the original payment is approved. Once it is approved, resubmit the Unapplied tab, and the second payment is applied to the claim.
|
Users with access to a client’s claims can enter the CareLogic-generated claim # when applying money from the Unposted tab. The client name, service date, payer, and procedure code are populated based on the claim information stored in the system. When entering self-pay payments for clients, see all existing claims for the client by entering the client name and selecting the client or their guarantor as the payer. After submitting the Payment Entry page, a list for all outstanding claims with balances for the client entered is provided, and the claim needing the self-pay payment entered can be selected. |
1. Navigate to Billing/AR > Show Menu > Payment Maintenance > Fill out the needed information and click Submit in the status bar.

2. Find the claim needed and click the button with its claim number.
|
The dollar amount listed in parenthesis on the Unposted tab identifies the total amount of un-posted payments within the current deposit batch. Once a dollar amount is entered in the Amount column, the amount listed in parenthesis on the Unposted tab is automatically updated. |
|
The Recoups tab is used when payers take money back (remittance) and reallocate the money to another client on the EOB. This negative cash payment is held in the Recoups tab and is recorded in the cash batch history, so it matches the remittance. |
|
The Refunds tab is used when money is returned to a client. This negative cash payment is held in the Refunds tab and is recorded in transaction history. Refunds must be approved to appear in the month end close. |
3. Fill out the needed information and click Submit in the status bar. The system attempts to match the payments to open claims. If the system successfully matches a payment to an open claim, the payment is transferred to the Applied tab. (See Addressing Claim Balances on Applied Payments.) When this occurs, the payment amount is subtracted from the Unposted tab and added to the Applied tab. If the system is only able to match the payment to a client but not to an open claim, the payment is transferred to the Unapplied tab. Once this occurs, the payment amount is automatically subtracted from the Unposted tab and added to the Unapplied tab.
|
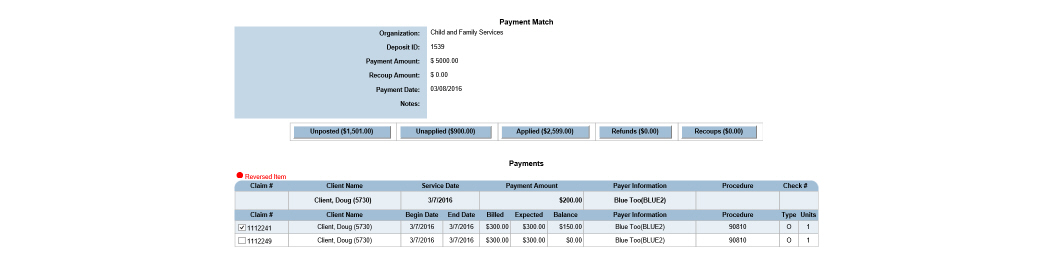
If the system finds multiple claims that match the payment entry criteria, the Payment Match page appears. |
Manually Matching Payments to Claims
When submitting un-posted or un-applied payments, the system uses entry criteria in an attempt to match the payments with open claims. If more than one claim matches the entry criteria, the system displays all of the matching claims on the Payment Match page. Select the claim to which payment should be applied. If the payment should be applied to multiple claims, select the first claim and split the payment between additional claims. (See Splitting Payments.)
1. Submit an un-posted or un-applied payment. (See Entering Payments for un-posted payments. See Working Un-applied Payments for un-applied payments.) The Payment Match page appears, listing all of the claims that match the payment entry criteria.
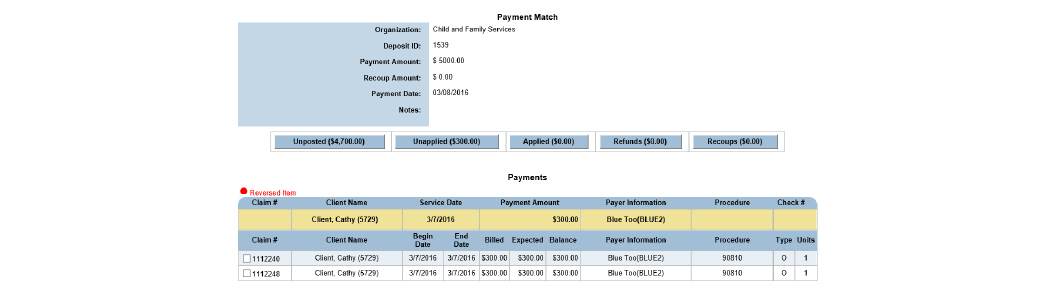
2. Select the check box of the claim needing to be matched to a payment and click Submit. The system matches the payment with the selected claim and transfers the payment details to the Applied tab. (See Addressing Claim Balances on Applied Payments.) Once this occurs, the payment amount is subtracted from the Unposted or Unapplied tab and added to the Applied tab.
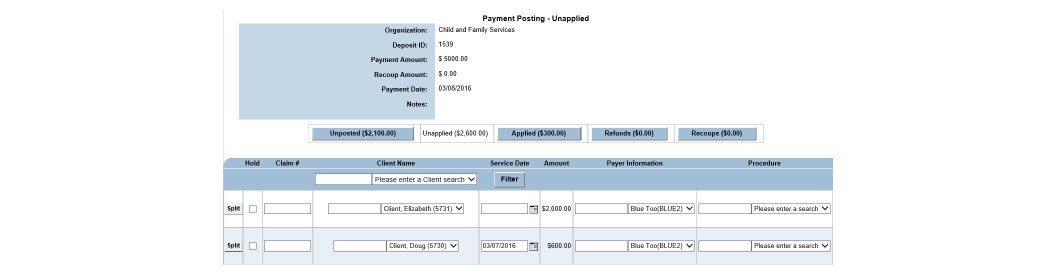
The Unapplied tab contains payments that were matched to a client, but not to an open claim. This includes manual and electronic payments. Common reasons for un-applied payments to exist include: there were not enough claim details provided when the payment was entered, or because the claim has not been generated in the system. Once the un-applied payments can be resolved, use this task to match them to open claims.
|
Un-applied payment information can be viewed for each client through the Financial Overview module (See the Client Guide.) |
1. Navigate to Billing/AR > Show Menu > Payment Maintenance > Fill out the needed information and click Submit in the status bar. Find the claim needed and click the button with its claim number. Click the Unapplied tab.
2. Enter as much information as possible about the payment and click Submit in the status bar.
- The system attempts to match the payments to open claims. If the system matches the payment to an open claim, the payment is transferred to the Applied tab. (See Addressing Claim Balances on Applied Payments.) Once this occurs, the payment amount is subtracted from the Unapplied tab and added to the Applied tab.
- If the system cannot match the payment to an open claim, the payment remains in the Unapplied tab. (See Working Un-applied Payments.) This indicates there is not a claim in the system for the payment. If necessary, this payment can be refunded back to the payer. (See Refunding Payments.)
In cases where a payment applies to multiple claims, the payment should be split. After matching the payment to the client (un-applied) or one of the claims (applied), it can be split. Once an applied payment is approved, it can no longer be split.
|
The process for splitting un- applied and applied payments is the same. The only difference is the tab from which the refund is submitted. |
1. Navigate to Billing/AR > Show Menu > Payment Maintenance > Fill out the needed information and click Submit in the status bar. Find the claim needed and click the button with its claim number. Click the Unapplied or Applied tab.
2. Locate the payment needing to be split and click the Split button.

3. Reduce the number in the Amount column by the amount needed to be split into additional claims and add it to the amount spaces below. Make sure the Amount column will add up to the original number.

4. Fill in any information that will help the system match the payment to the desired claim. Click Submit in the status bar. The system attempts to match the payment based on the claim criteria entered. If more than one match is possible, the Payment Match page appears.
5. Pick the payment that the split money should be applied to and click Submit. The split payments are recorded on the Payment Posting - Applied page.
When a payment is received in error, a refund may be necessary. CareLogic allows the refund of un-applied payments, applied payments, and approved payments. The process for refunding all payments is the same. The only difference is the tab from which the refund is submitted.
1. Navigate to Billing/AR > Show Menu > Payment Maintenance > Fill out the needed information and click Submit in the status bar. Find the claim needed and click the button with its claim number.
2. Click the Applied tab.

3. Locate the payment needing a refund and select Refund from the Payment Action column then click Submit in the status bar. A confirmation box appears.
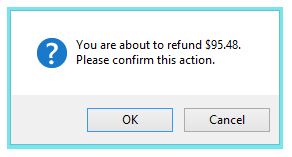
4. Select OK. The payment is transferred to the Refunds tab. Once this occurs, the payment amount is subtracted from the Applied tab and added to the Refunds tab.
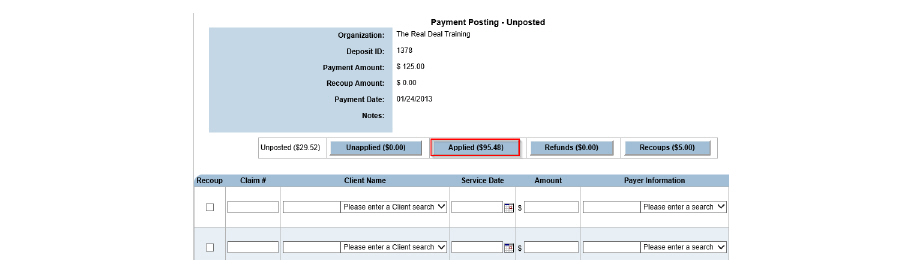
If a payment was incorrectly applied to a claim, un-post the payment. An applied payment can be un-posted as long as it has not been approved.
1. Navigate to Billing/AR > Show Menu > Payment Maintenance > Fill out the needed information and click Submit in the status bar. Find the claim needed and click the button with its claim number. Click the Applied tab.
|
The dollar amount listed in parenthesis on the Applied tab identifies the total amount of applied payments within the current deposit batch. |
2. Select Unpost in the Payment Action column for the desired claim and click Submit in the status bar. A confirmation prompt appears, indicating the dollar amount that is being attempted to un-post.
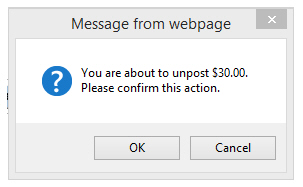
3. Click OK to confirm. Once this occurs, the payment amount is subtracted from the Applied tab and added to the Unposted tab. When the money is un-posted, all claim information disappears.
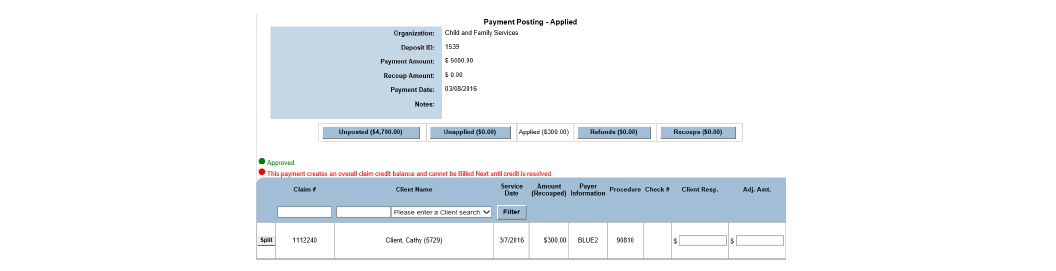
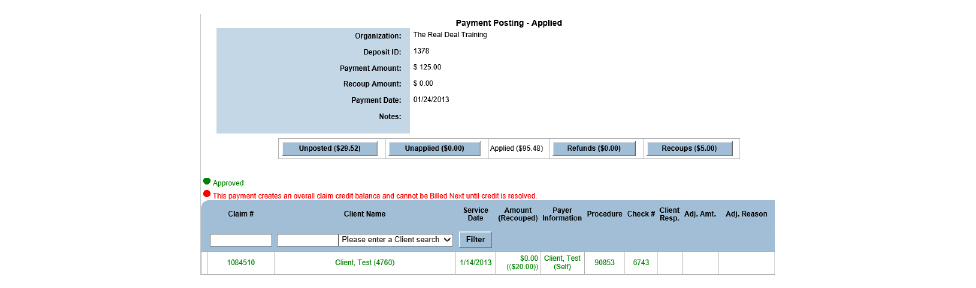
Addressing Claim Balances on Applied Payments
Once payments are successfully matched to open claims, they appear under the Applied tab. If an applied payment contains a claim balance, a next action (e.g., bill next payer, bill guarantor, etc.) must be taken.
|
Once a matched payment appears under the Applied tab, it is ready to be approved. If no further action is required, the payment can be approved through Payment Approval. (See Approving Payments.) If an applied payment with an existing balance is approved, the claim remains open with the balance. |
1. Navigate to Billing/AR > Show Menu > Payment Maintenance > Fill out the needed information and click Submit in the status bar. Find the claim needed and click the button with its claim number. Click the Applied tab.

2. If a balance amount greater than $1.00 exists, the Claim Action column is used to select the next step in the billing process. The following options are available:
- Bill Guarantor - Generates a self-pay claim for the client for the remaining balance. The new claim is sent to the guarantor that is marked to receive statements in the ECR. This option only appears for payer claims. A payer claim can bill next to a guarantor more than once. For example, if the agency assumes it will get $20 from a payer for a $30 service, and $10 is billed to the guarantor, but later the payer claim is denied, the $20 balance on the claim that was denied by the payer can still be billed.
- Re-bill Payer - Generates a new claim by making a copy of the existing claim. The new claim is sent to the same payer. This option only appears for payer claims.
- Leave Open - Leaves the claim open with a balance. Select this option when receiving a partial payment and remaining balance payment is expected in the future.
- Bill Next Payer - If the client has additional payers set up in the Client Payer module, they will be listed in the drop-down list. Select the next payer it is desired to bill. During the next Claim Engine run, a new claim will be created for the selected payer. The amount on the new claim is the payer’s contracted rate minus the payment received for the initial claim.
3. After confirming the claim balance is less than $1.00 and that all other payment details are correct, click Submit in the status bar. The Payment Posting - Applied page is refreshed and the selected next action is taken. At this point, the payments are ready to be approved.
All un-applied, applied, and approved payments that were refunded are transferred to the Refunds tab. In most cases, the next step in the process is to approve the refunds through Payment Approval. (See Approving Payments.) However, if an error is discovered with the refunded payment, it can be reversed. Once a refunded payment is reversed, it returns to its previous status (un-applied, applied, or approved).
1. Navigate to Billing/AR > Show Menu > Payment Maintenance > Fill out the needed information and click Submit in the status bar > Find the claim needed and click the button with its claim number > Click the Refunds tab.

|
The dollar amount listed in parenthesis on the Refunds tab identifies the total amount of refund payments within the current deposit batch. |
2. Locate the refund payment needing reversal and select the check box in the Reverse column. Click Submit in the status bar.
|
The Reverse check box is enabled only when the recoup has not been applied. If the recoup is applied, the Reverse check box does not appear. |
3. Select OK to confirm reversal of the selected refunded payments. The payment is transferred to its previous tab, either the Unapplied or Applied tab.

The sum of the recoups and the check amount is equal to the total payments. If the total check amount is $1500 and recoups total $500 the total payment amount would be $2000. ($2000 total payments - $500 total recoups = $1500 net check amount.) To post a recoup, a payment must first be applied to the claim and the payment must match the recoup exactly.
|
The total payments are higher than the amount of the check when there are recoups included. |
Recoups can be added into CareLogic via the payer’s 835 file being uploaded into the system. (See Uploading EDI Files.) They can also be added manually.
1. Navigate to Billing/AR > Show Menu > Payment Maintenance > fill out search criteria and click Submit.

2. Click the checkbox in the Recoup column and fill out the information required to tell the system which claim to take back. Click Submit. The recoups have been added to the payment posting.

3. Next, approve the recoup. Approving recoups is done like a normal payment, only it is negative. (See Approving Payments.)
|
Apply and approve recoups first as a general rule. The exception to the rule occurs when the claim being recouped is paid on the same remittance from which it is being taken back. If the claim and recoup are on the same deposit, the payment must be applied before it can be recouped. |
CareLogic can create electronic bills (837 files) and electronic eligibility requests (270 files) to send to clearing houses and payers. In return, payers send an electronic payment response (835 file) or an electronic eligibility response (271 file). These files are uploaded through the EDI Upload module.
After an 835 file is uploaded, the Electronic Remittance module is used to view and process the transactions in the file. (See Maintaining 835 Files.)
After a 271 file is uploaded, the Eligibility Response module can be used to review eligibility statuses and reject reasons in the file. (See the System Administration Guide.) The Eligibility Status module can be used to review individual client status eligibility. (See the Client Guide.)
1. Navigate to Billing/AR > Show Menu > EDI Upload.

2. Pick the files needing to be uploaded and click Submit.
After submitting 837 EDI files to payers, agencies are able to upload and review 277 and 999 EDI response files sent back by payers to notify of claim acknowledgement (999) and status response (277.) Agencies are able to identify errors, correct them, and resubmit corrected claims to the payer.
1. Navigate to Billing/AR > Show Menu > EDI 277 999 Upload.

2. Click Browse, pick the file and click Submit.
Transferring Approved Payments
If a payment was incorrectly applied to a claim and then approved, the Transfer Payment module is used to move the payment to the correct open claim. Money can only be transferred between approved payments. Once the transfer is complete, the payment to which the money was moved must be approved again through the Payment Approval module. (See Approving Payments.)
1. Navigate to Billing/AR > Show Menu > Payment Transfer.
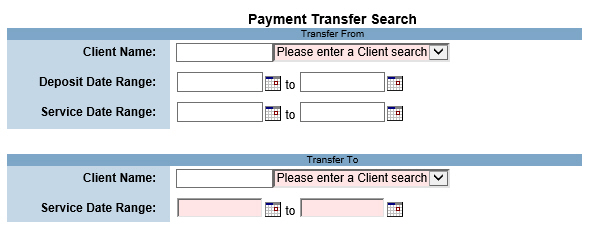
2. Fill out the needed information and click Submit. The money is moved to the selected payment. At this point, the payment must be approved. (See Approving Payments.)
Once 835 files have been uploaded into the system (see Uploading EDI Files), the Electronic Remittance module is used to view, process, and back out the data.
1. Navigate to Billing/AR > Show Menu > Electronic Remittance.

This page is used to perform the following tasks:
• Viewing the Transactions Associated With an 835 File
• 835 Duplicate Upload Resolution
Once an 835 file is processed, its data is loaded into the payment tables and can be maintained through the Payment Maintenance module. (See Payment Maintenance.)
1. Navigate to Billing/AR > Show Menu > Electronic Remittance.

2. Click the View Processed Files button in the status bar.

Viewing the Transactions Associated With an 835 File
After loading 835 files into the system (see Uploading EDI Files), their data can be reviewed before processing them. In addition to viewing the transactions associated with each 835 file, the services associated with each transaction can also be viewed. (See Viewing the Services Associated With a Transaction.) The adjustments associated with each service can also be viewed. (See Viewing the References Associated with a Service.)
1. Navigate to Billing/AR > Show Menu > Electronic Remittance.

2. Click the Transactions button for the desired 835 file.

Viewing the Services Associated With a Transaction
1. Navigate to Billing/AR > Show Menu > Electronic Remittance > Click the Transactions button for the desired 835 file > Click the Services button for the transaction whose services need to be viewed.

Viewing the References Associated with a Service
Each reference entry consists of an identifier and an identifier qualifier. The reference identifier can represent a variety of information, like a provider control number or a location number. The identifier qualifier provides a description of the identifier.
1. Navigate to Billing/AR > Show Menu > Electronic Remittance > Click the Transactions button for the desired 835 file > Click the Services button for the transaction whose services need to be viewed > Click the Info button that corresponds with the service needing its references viewed.

When an 835 file is processed, the transaction data is loaded into the payment tables and can be viewed through Payment Maintenance. (See Payment Maintenance.)
1. Navigate to Billing/AR > Show Menu > Electronic Remittance > Click the Transactions button for the desired 835 file.

2. Select the Complete button for the desired 835 file and click Submit. The Process Payment Confirmation page appears. The transaction data is loaded into the payment tables and a confirmation message appears.
|
If there has been any action taken on a file, the Backout button will be grayed out and the file will not be able to be backed out. |
1. Navigate to Billing/AR > Show Menu > Electronic Remittance.

2. Click the Backout button for the desired 835 file. Select OK to confirm and the selected 835 file is backed out of the system.
835 Duplicate Upload Resolution
In order to keep payments from being entered into the system twice, CareLogic checks the 835’s check number and will not allow a duplicate to be uploaded. (See Uploading EDI Files.) There are instances where a 835 file needs to be backed out and uploaded again. When this happens, it is possible to get a error stating that it is a duplicate.

The reason that the 835 will not upload is because the check number is the same as the first time it was entered. The problem can be managed by placing an “A” on the end of the check number.
1. Open the 835 text file. In the first several rows there will be a string of numbers that starts with TRN. This is the 835’s way of denoting a check number.

2. Add an A to the third group of figures, effectively changing the check number that CareLogic will recognize.

3. Save the text file and upload again. (See Uploading EDI Files.)

After payments have been applied to open claims and all the necessary adjustments have been made, payments will need to be approved. This step gives staff an opportunity to review payments before they are posted to the general ledger.
1. Navigate to Billing/AR > Show Menu > Payment Approval.
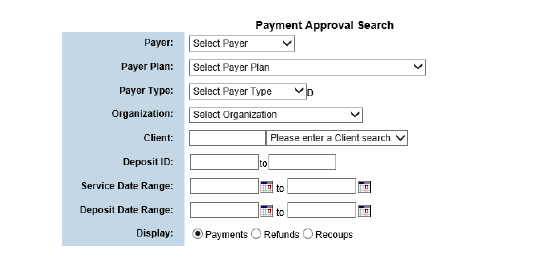
2. Fill out the needed information and click Submit in the status bar.

3. Click the Select button for the desired payment entry.

4. Fill out the needed information and click Submit in the status bar. The selected payment lines are approved and are ready to be exported to the general ledger when the accounting period is closed.
The Grant Payment module is used to record grant dollars an agency receives and track the balance as clients who use the grant money receive services.
When an agency receives a grant, it is recorded and payments are deducted from the fund as clients utilize grant dollars. The Grant Payment module is built around the existing Payment Entry and Payment Maintenance modules, though grant payments are not included in the standard Payment Maintenance Search results.
|
Each grant should have a corresponding Payer Plan that can be used as the funding source for clients who are using grant money. For example, if an agency received a grant from United Way, a Payer Plan named United Way Grant 2016 or something similar should be created that indicates the funding source for clients. |
1. Navigate to Billing/AR > Show Menu > Grant Payment.

|
Payment maintenance/Deposit Edit searches will not return results for grant payments. Grant payments are only managed in the Grant Payment module. |
This page is used to complete the following tasks:
• Applying Grant Payments to Client Claims
Each new grant requires a payer plan. (See Setting Up Payer Plans in the System Administration Guide.) Once the payer plan is set up, new grant payments can be added.
1. Navigate to Billing/AR > Show Menu > Grant Payment.

2. Click Add Grant Payment.
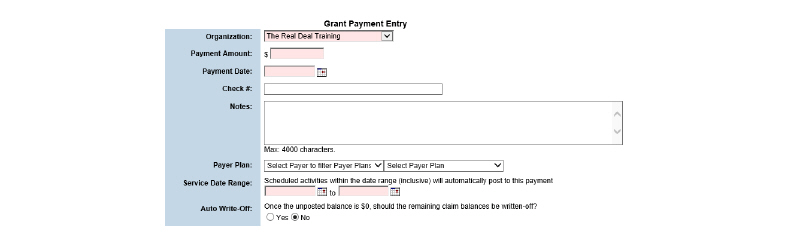
3. Fill out the needed information and click Submit in the status bar. The grant payment is recorded and saved to the Grant Payment page.
Applying Grant Payments to Client Claims
|
The Grant Payment module applies grant payments to claims that are covered by the grant funding source set up on the client’s account (the grant payer plan). However, grant payments must still be approved like standard payments through the Payment Approval module. (See Approving Payments.) |
1. Navigate to Billing/AR > Show Menu > Grant Payment > Click the Select button for the desired grant payment.

|
Payment Posting in the Grant Payment module closely mimics the process involved in Payment Maintenance functionality, excluding the Recoups and Refunds functionality since these features do not apply to grant funding. (See Payment Maintenance.) |
|
Automatic Payment Approval will only occur if it is configured correctly. |
Ground Rules:
• Only payments that bring the claim balance to zero can be automatically approved.
• Automatic Payment Approvals can be set up by organizations after they have been live for more than 90 days.
• Payment amount criteria limit the dollar values that can be auto-approved.
• The Claim Engine will look at the most specific criterion first, then check each in turn to the least specific criterion for auto-approval inclusion.
• Auto Payment Approval is n-tier compliant.
• Auto Payment Approval happens when the Claim Engine runs.
1. Navigate to Billing/AR > Show Menu > Auto Payment Approval Settings.

2. Click Add Auto Payment Approval Setting.
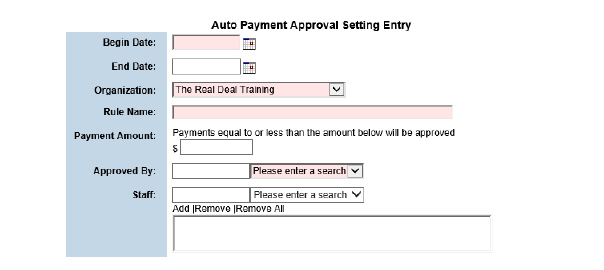
3. Fill out the needed information and click Submit. The auto payment approval setting created is listed in the Current Auto Payment Approval Settings screen.
The My Collections module is used to assign collections to staff, who in turn are responsible in following up and collecting the outstanding balances.
To configure My Collections, administrators will set up the following:
• Claims Snapshot (See Dashboard Administration in the System Administration Guide.)
• Descriptors (See Setting Up Descriptors in the System Administration Guide.)
• Privileging (See Setting Up Privilege Groups in the System Administration Guide.)
• Timely Filing Limits by Payer or Payer Plan (See Setting Up Payers and Setting Up Payer Plans in the System Administration Guide.)
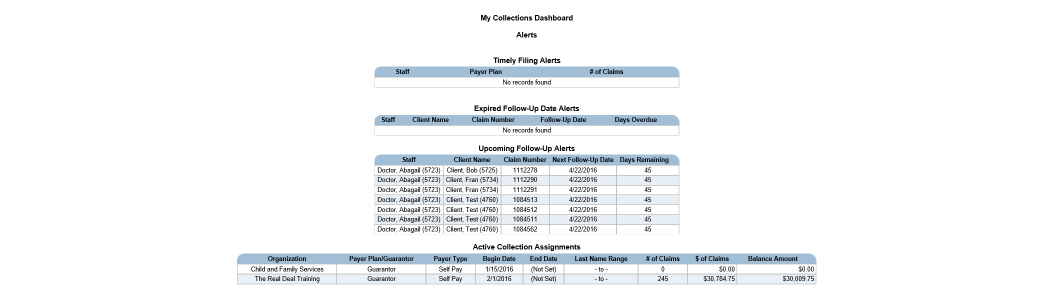
1. Navigate to Billing/AR > Show Menu > My Collections Dashboard. The Collection Assignments page appears. This page lists all of the collection assignments for the user.
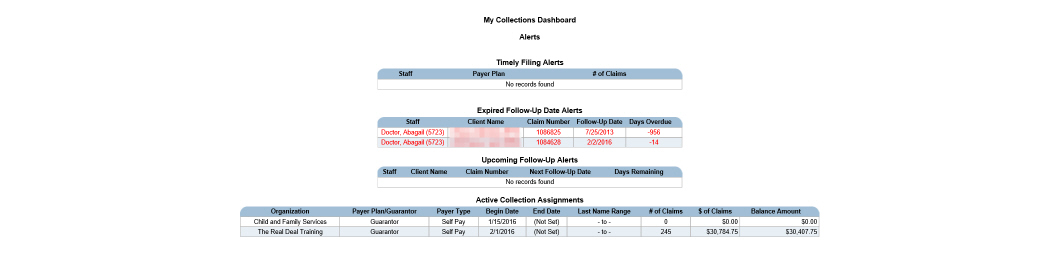
2. Click the desired Collection Assignment.

This page is used to perform the following tasks:
• Following Up on Unpaid Claims
• Viewing the History of Unpaid Claims
1. Navigate to Billing/AR > Show Menu > My Collections Dashboard > Click the Collection Assignment.

2. In the Follow-Up All column, click the check box that corresponds with the claim(s) needing follow-up. Click Submit in the button bar.

3. Fill out the needed information and click Submit in the button bar. The follow-up record is saved.
Viewing the History of Unpaid Claims
1. Navigate to Billing/AR > Show Menu > My Collections Dashboard > Pick the desired Collection Assignment. Click the desired claim.
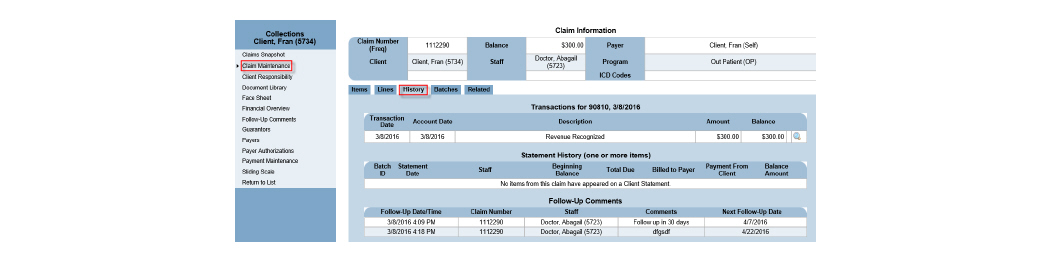
2. Click through the wizard to view the history of the claim in question.
The My Collections Supervisor Dashboard and the My Collections Dashboard allow management of work collection assignments for commercial and self-pay receivables. The My Collections Supervisor Dashboard manages collection assignments for staff, and the staff will use the My Collections Dashboard to view and work collection assignments.
1. Navigate to Billing/AR > Show Menu > My Collections Dashboard.
My Collections Supervisor Dashboard
1. Navigate to Billing/AR > Show Menu > My Collections Supervisor Dashboard.

1. Navigate to Billing/AR > Show Menu > My Collections Dashboard (or My Collections Supervisor Dashboard) > In the Active Collection Assignments column, click the desired row.

2. Click the desired claim row. The Collections wizard for that claim appears. The Collections wizard provides access to all necessary claim information without leaving the module.

Searching for Collection Assignments
1. Navigate to Billing/AR > Show Menu > My Collections Supervisor Dashboard. Click Collection Assignment.
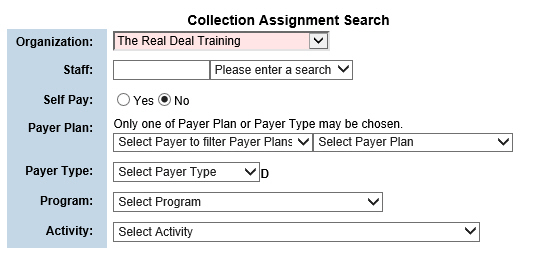
2. Fill out the needed information and click Submit. The Payer Plan Collection Assignments screen appears, displaying the search results.

|
The Delete button will be disabled if claims are attached to the assignment. |
Adding New Collection Assignments
1. Navigate to Billing/AR > Show Menu > My Collections Supervisor Dashboard > Click Add New Assignment.

2. Fill out the needed information and click Submit. The collection assignment appears in the Payer Plan Collection Assignments screen.
|
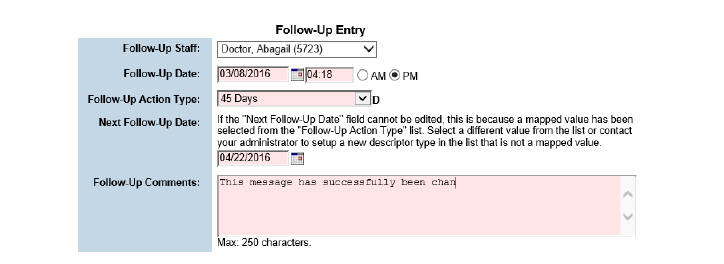
Follow-up notes will always stay with the claim history, even after the claim is zeroed out. |
1. Navigate to Billing/AR > Show Menu > My Collections Dashboard (or My Collections Supervisor Dashboard) > In the Active Collection Assignments section, click the desired row. The Claims for: screen appears. Click the desired claim row.

2. In the wizard, click Follow-Up Comments.

3. Click Add a Follow-up Comment to add a Follow-up Comment.
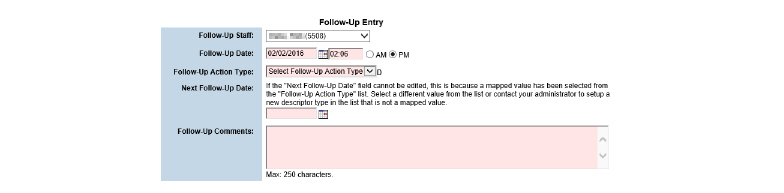
4. Fill out the needed information and click Submit. The entry appears in the list on the Follow-Up Comments screen.
Creating a Follow-Up Comment for Multiple Claims
1. Navigate to Billing/AR > Show Menu > My Collections Dashboard (or My Collections Supervisor Dashboard)
2. In the Active Collection Assignments section, click the desired assignment.

3. Mark the check boxes for claims needing comment and click Submit.

4. Fill out the needed information and click Submit. The follow-up comment created appears in the Claims for: screen.
|
Only the user who created the follow-up comment may edit it. All other users have read only privilege. |
1. Navigate to Billing/AR > Show Menu > My Collections Dashboard (or My Collections Supervisor Dashboard) > In the Active Collection Assignments section, click the desired row.

2. Click the entry that has the comment needing edits. The Collections wizard appears. Click Follow-Up Comments in the wizard menu.

3. Click the desired entry.
4. Change the desired information and click Submit.

The General Ledger uses an accrual-based accounting method, rather than a cash-based method, when creating general ledger export files. This means that revenues are recognized when they are earned, rather than when the cash is received. In other words, CareLogic keeps track of the money that the business is expecting, as well as the money the business collects. The Accounts Receivable process can be viewed as a sub-ledger to the General Ledger.
Before setting up General Ledger administration, confirm that the configurations below are set properly for the organization:
• Booking Revenue to the General Ledger
• Using Transaction Reason Mapping
• Using Default Denial/Write Off Accounts
Booking Revenue to the General Ledger
By default, all financial transactions created in the system are booked to the General Ledger using net figures. The net figure represents the contracted rates that are set up in the payer plan’s fee matrix. (See Setting Up Payer Plan Fee Matrices in the System Administration Guide.)
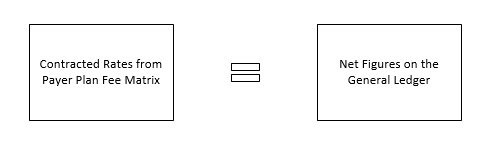
When net accounting is used, a single service will generate a claim with only one transaction. This transaction will include both the billed revenue and the payer receivables.
If desired, the system can be configured to book financial transactions to the General Ledger using gross figures. The gross figure represents standard fees that are set up for the procedure codes. (See Setting Up Procedure Codes in the System Administration Guide.)
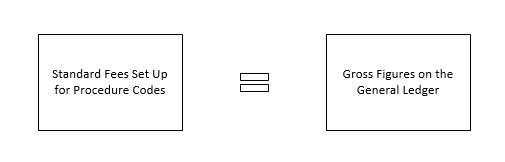
When gross accounting is used, a single service will generate a claim with two transactions. The first transaction will include the billed revenue and the payer receivables. The second transaction will be the difference between the billed amount (the standard fee that appears on the claim after the billable units are applied) and the expected amount (the contracted rate that appears on the claim after the billable units are applied).
|
The revenue booking method used should be determined during the Implementation phase. If gross tracking is desired, let the Implementation Specialist know so they can configure the system properly. |
Using Transaction Reason Mapping
By default, payment adjustments in CareLogic are not mapped to separate GL codes based on adjustment reasons.
If the functionality to map payment adjustments to separate GL codes based on adjustment reasons is needed, contact Qualifacts Customer Support to reconfigure the system. Once this configuration is enabled, the Reason Mapping button appears on the Payer GL Codes page.
Using Default Denial/Write Off Accounts
If an organization uses Transaction Reason Mapping (the configuration described in the previous section), the GL export will only include transactions that are mapped to GL codes. This means the transactions that are not mapped to a GL code by transaction reason are not closed out for the accounting period.
If the general ledger needs to be closed for all transactions, including those that are not currently mapped to a GL transaction reason mapping code, contact Qualifacts Customer Support to configure the system. When the configuration is enabled, all of the transactions that are not currently mapped will be automatically mapped to the GL code that is set up for denials/write-offs. (See Setting Up Account Types for Payers.)
System administrators are responsible for setting up General Ledger Account Codes (GL codes) that are used to track all of the financial transactions in the system. CareLogic allows the assignment of unique GL codes to organizations, payers, programs, program/organization mappings, population segments, and activities.
GL codes for payers are defined by accounting group name, such as Commercial Insurance, Medicare, and Medicaid. For each GL accounting group, a unique GL code can be assigned for billed revenue, accounts receivable, payments that were denied or written off, and transaction reason mapping. After defining the GL codes, they can be used to configure the format of the GL export file.
• Setting Up Account Types for Payers
• Setting Up Transaction Reasons for Payers
• Mapping 835 Adjustment Reasons to Transaction Reasons
• Setting Up Reason Mappings for Payers
• Assigning GL Account Types to Payers
• Assigning GL Account Types to Payer Plans
• Formatting the GL Export File
GL Codes are unique identifiers that are assigned to parts of CareLogic for reporting purposes. GL Codes are used to identify the information stored in CareLogic to an organization’s accounting software.
GL codes can be assigned to activities, organizations, payers, programs, program/organization mappings, program/activity mappings, and populations. If any of these GL code types are needed in the GL export file, complete setting up GL Codes for that sub-set. Conversely, if the information is not needed in the GL export file, it will not need to be completed for that GL code type.
For each activity code in the system, a unique GL code can be assigned. Once the activity GL assignments are defined, they can be used as format strings in the Account Numbers module to be exported with GL export file. (See Formatting the GL Export File.)
The following are descriptions of the different possible GL code types:
Activity GL Codes - Indicate activities (scheduled events that were billed) to the Account Numbers module.
Organization GL Codes - Indicate organizations (divisions of a business or consortium) to the Account Numbers module.
Payer GL Codes - Indicate payers (insurance) to the Account Numbers module. It is broken down by accounting group name, called Payer GL Account, and normally includes payer groups like Commercial, Medicare, and Medicaid. It also allows the addition of Revenue, Receivable, Denial/Write Off, Transfer, and many Reason Mapping GL Codes for each Payer GL Account.
Population GL Codes - Indicate populations (groups of clients) to the Account Numbers module and can be tied to programs and age ranges.
Program GL Codes - Indicate programs (lines of business) to the Account Numbers module.
Program Activity GL Codes - Indicate unique combinations of programs and activities to the Account Numbers module.
Program Organization GL Codes - Indicate unique combinations of programs and organizations to the Account Numbers module.
The example below is setting up GL codes for activity codes:
1. Navigate to Administration > Show Menu > GL Code Admin.

2. In the Type field, use the drop-down list to select Activity. The Activity GL Codes page appears. (If Organization is selected, the Organization GL Codes page appears, and so on.)

3. Click Add New Activity Codes in the status bar. The Activity GL Codes page changes to add mode.
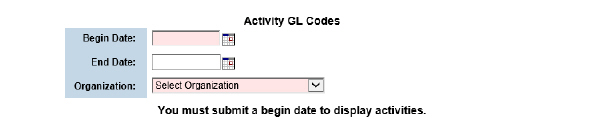
4. Fill out the needed information and click Submit in the status bar.

5. A unique GL code can be entered for each activity. This is the GL code to which all revenue associated with the service will be booked. Click Submit in the status bar. The GL codes are saved and the record is listed on the Activity GL Codes page. At this point, the activity GL codes can be used as a format string in the GL export file.
|
GL codes can be up to 20 characters in length. |
|
The Copy Forward button can be used to create a copy of the GL code assignments. If only a few assignments change after the new year, the Copy Forward button could be used to copy the existing record and then define a new date range for it. Once the new record is created, it can be updated with the activity GL code assignments. When the Copy Forward feature is used, the system automatically assigns the current system date as the end date for the record that is being copied. |
Setting Up Account Types for Payers
GL codes for payers are defined by account types, such as Commercial Insurance, Medicare, and Medicaid. For each account type, a unique GL code should be assigned for billed revenue, accounts receivable, payments that were denied or written off, and transaction reason mapping.
Once the GL account types are defined, assign them to payers. (See Assigning GL Account Types to Payers.) By default, all payer plans inherit the GL account type assigned at the payer level. If desired, unique GL can be assigned to account types to payer plans. (See Assigning GL Account Types to Payer Plans.)
After the GL account types are associated with payers and payer plans, the GL codes can be used as format strings in the GL export file. (See Setting Up Reason Mappings for Payers.)
1. Navigate to Administration > Show Menu > GL Code Admin > In the Type field, use the drop-down list to select Payer.

2. Click Add New Payer Codes in the status bar. The Payer GL Codes page changes to add mode.

3. Fill out the needed information and click Submit in the status bar. The Payer GL Codes page is refreshed.

4. Click Create a New Payer GL Code in the status bar.
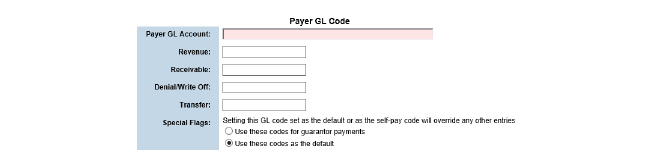
5. Fill out the needed information and click Submit in the status bar. The GL codes are saved and the record is listed on the Payer GL Codes page.
Setting Up Transaction Reasons for Payers
Transaction reasons are used to identify the types of adjustments that can be made to payments. All transaction reasons set up in this module are user-defined. Some example transaction reasons are adjustment error, contract allowance, insurance canceled, Medicaid write off, and no authorization. Once the transaction reasons are defined, set up the reason mapping by assigning unique GL codes to them.
|
After the reason mapping is complete, the transaction reasons are used to populate the Adj Reason column in Payment Posting and the Adjustment Type field in Claim Maintenance. |
1. Navigate to Administration > Show Menu > GL Code Admin.

2. Click Transaction Reasons.
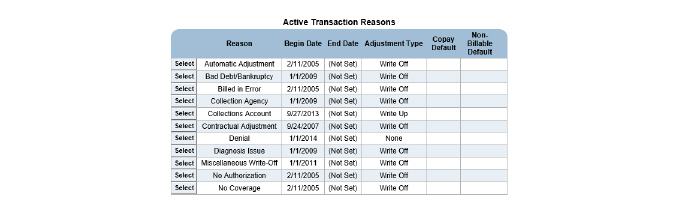
3. Click Add Transaction Reason.

4. Fill out the needed information and click Submit in the status bar. The transaction reason record is saved and listed on the Transaction Reasons page.
Mapping 835 Adjustment Reasons to Transaction Reasons
The EDI 835 Adjustment Reasons module is used to map the OA (other adjustments) adjustment group only.
|
Once the 835 adjustment reasons are mapped to the transaction reasons, set up reason mapping by assigning unique GL codes to the transaction reasons. (See Setting Up Reason Mappings for Payers.) After the reason mapping is complete, the transaction reasons are used to populate the Adj Reason column in Payment Posting and the Adjustment Type field in Claim Maintenance modules. |
1. Navigate to Billing/AR > Show Menu > EDI 835 Adjustment Reasons.

2. Click Add Instance.
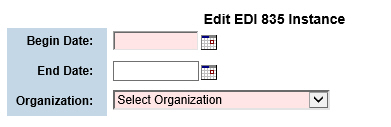
3. Fill out the needed information and click Submit in the status bar. The instance record is saved and listed on the EDI 835 Adjustment Reason Instances page.

4. Click the Matrix button for the new record. The EDI 835 Adjustment Reason Matrix page appears. This page lists all of the possible 835 OA (other adjustment) adjustment reasons.
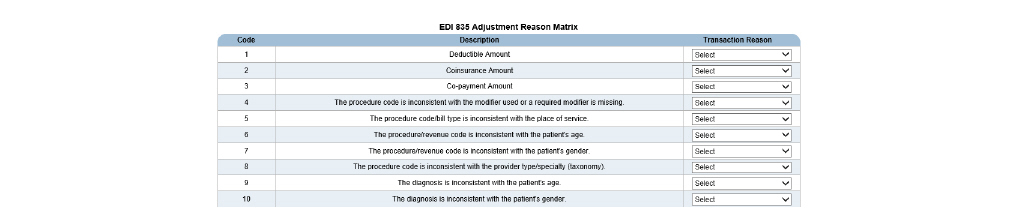
5. For each OA adjustment reason, use the drop-down list in the Transaction Reason column to select the transaction reason to which the adjustment reason should be mapped. When an 835 file contains an adjustment reason, the system will refer to this mapping record to determine which transaction reason to use.
6. Click Submit in the status bar. The 835 adjustment reason/transaction reason mapping record is saved and listed on the EDI 835 Adjustment Reason Instances page.
Setting Up Reason Mappings for Payers
After setting up transaction reasons, assign unique GL codes to them. This process allows the mapping of payment adjustments to GL codes based on adjustment reasons.
|
After the reason mapping is set up, the transaction reasons are used to populate the Adj Reason column in the Payment Entry and Claim Maintenance modules. |
1. Navigate to Administration > Show Menu > GL Code Admin > In the Type drop-down list, select Payer.

2. Click the Select button that corresponds with the payer GL code record needing transaction reason mappings definition. The selected payer GL record is displayed.

3. Click the Reason Mapping button for the desired Payer GL Code Type entry.

4. Enter the GL codes needing association with transaction reasons in the Mapped Account column and click Submit in the status bar. The GL codes are saved and the record is listed on the Payer GL Codes page. At this point, the transaction reason mapping GL codes can be used as a format string in the GL export file.
Assigning GL Account Types to Payers
After defining the GL account types for payers, they need to be assigned to payers.
1. Navigate to Administration > Show Menu > Payers.

2. Click the Billing Config button for the desired payer.

3. Click Add Billing Config.
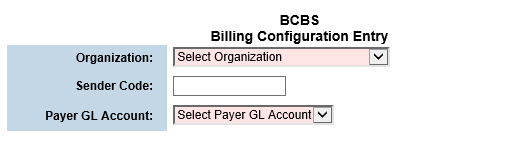
|
Each time an electronic claim is submitted to the selected payer, the Sender Code will be included. |
|
When a Payer GL Account is assigned, all of the related GL codes that were set up for revenue, receivables, and write offs are automatically assigned to the payer plan. The payer GL accounts are set up in the GL Code Admin module. |
4. Fill out the needed information and click Submit in the status bar. The billing configuration record for the selected payer is saved and listed on the Billing Configurations page.
Assigning GL Account Types to Payer Plans
By default, each payer plan inherits the GL account type that was selected at the payer level. If desired, a different GL account type can be assigned to payer plans. If payer plans are assigned to different GL Account Types than their payers, billed revenue, accounts receivable, payments that were denied or written off, and transaction reason mappings associated with the payer plan will be booked to different GL accounts than the payer.
1. Navigate to Administration > Show Menu > Payers > Click the Payer Plans button for the desired payer.

2. Click the Billing Config button for the desired payer plan.
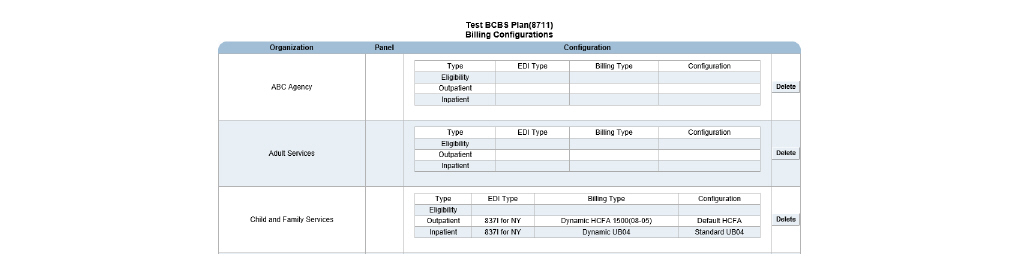
3. Click Add Billing Config in the status bar.

4. In the Payer GL Account field, use the drop-down list to select the General Ledger account needing to be assigned to the payer plan.
|
When a GL account is signed, all of the related GL codes set up for revenue, receivables, and write offs are assigned to the payer plan. The payer GL accounts are set up in the GL Code Admin module. |
5. Fill out the needed information and click Submit. The billing configuration record for the selected payer plan is saved and listed on the Billing Configurations page.
The Account Numbers module is used to configure the format of the account numbers in the GL export file. For each account type, a corresponding format string can be defined. The format string consists of the GL codes that have been set up for organizations, programs, program/organization mappings, activities, population segments, billable revenue, accounts receivables, write-off/denials, transfers, and transaction reason mappings. (See Setting Up GL Codes.)
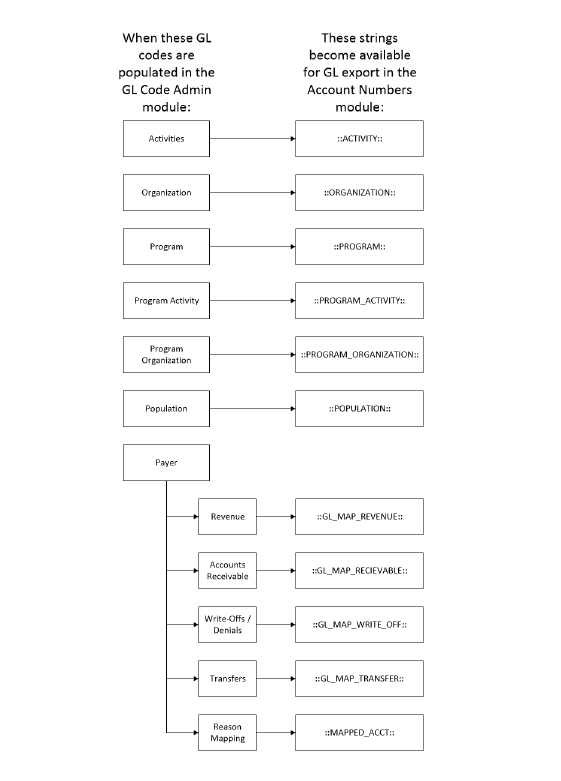
When the GL export is run, the financial transactions that fall within the user-defined date range are exported to a file in the format defined in the Account Numbers module.
1. Navigate to Administration > Show Menu > Account Numbers.
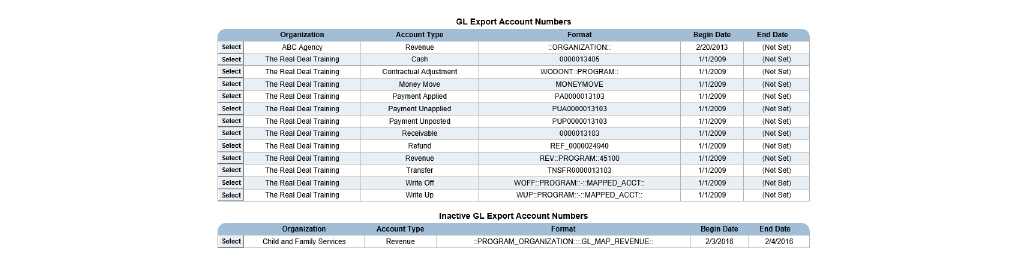
2. Click the Add Account Number button.
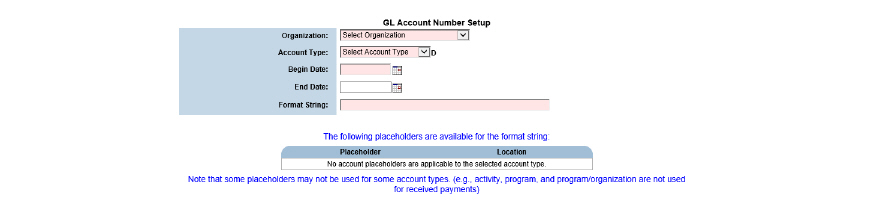
3. Depending on the Organization and Account Type fields chosen, the available Placeholders that can be used in the Format String field populate at the bottom of the page. The Format String field is used to define a format for the selected account type. When combining strings, two colons (::) are used as a separator. The following format strings are available:
- ORGANIZATION - Tracks organization information in the GL export file.
- PROGRAM - Tracks program information in the GL export file.
- PROGRAM_ORGANIZATION - Tracks program/organization information in the GL export file.
- ACTIVITY - Tracks activity information in the GL export file.
- GL_MAP_REVENUE - Tracks a payer’s billable revenue in the GL export file.
- GL_MAP_RECEIVABLE - Tracks a payer’s accounts receivable information in the GL export file.
- GL_MAP_WRITE_OFF - Tracks a payer’s write-off/denial information in the GL export file.
- MAPPED_ACCT - Tracks transaction reason mapping in the GL export file.
- POPULATION - Tracks client population segments in the GL export file.
|
In addition to the format strings listed above, literal strings and delimiters can also be used. For example, if an agency wanted to include the literal string “Cash” in all account numbers that are related to Cash accounts, that string can be entered in the Format String field. If a delimited character, such as a hyphen (-) or a comma (,) needs to be included, insert them in between separators (::-:: or ::,::). |
4. Click Submit in the status bar. The format of the organization and account type is saved and listed on the GL Export Account Numbers page.
Typically, accounting periods are closed on a monthly basis. However, CareLogic gives organizations the flexibility to define accounting period date ranges themselves.
• Prerequisite to Closing an Accounting Period
• Creating the General Ledger Export File
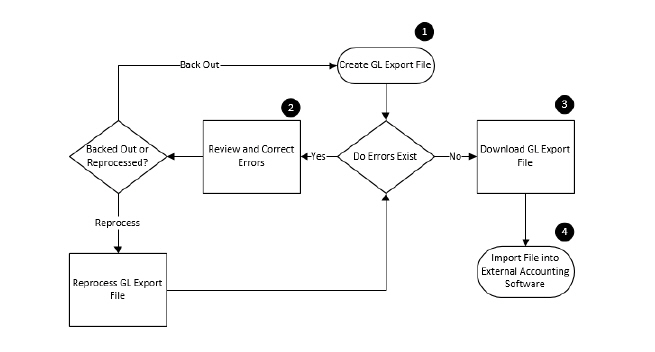
1. Create GL Export File - The GL Export module is used to close an accounting period. When the GL Export runs, the system creates a file that contains all of the financial transactions for the defined date range.
2. Errors Exist - If the system encounters errors when generating the GL export file, transactions associated with the errors are not included in the export file. Some example errors are the GL code mapping was not set up for the payer or the reason mapping was not set up for the payer. If errors exist:
- Review Errors - If the accounting period contains errors, click the Errors button to open a spreadsheet file with a list of all errors for the GL export file created.
- Correct Errors - Contact the necessary staff members to correct errors.
- Reprocess GL Export File - After all errors have been corrected, click the Reprocess button to back out the GL export file and recreate the same file again, this time without errors.
- Back Out File - Use the Backout button if the accounting period closing needs to be backed out for any reason. Once the file is backed out, the account period closing file is removed from the system and the transactions that were a part of the closing can be modified.
3. Download File - Once the GL export file is created without any errors, it can be downloaded in the following formats:
- GL Interface - For each GL code, the summary file lists the account type and the debit receivable or credit receivable amount.
- GL Interface (CSV) - CSV (comma separated value) files can be opened in any text editor. For each GL code, the summary file lists the account type and the debit receivable or credit receivable amount.
- GL Detail - For each GL code, the detail file lists the accounting period begin and end dates, the post date, the debit account, the debit receivable amount, the credit account, the credit receivable amount, the transaction type, the transaction reason, the transaction ID, the reversal transaction ID, the organization, the client name and ID, the account date, the claim ID, the deposit ID, the provider, the payer name, the program, the procedure code, and the activity code.
- GL Detail (CSV) - CSV (comma separated value) files can be opened in any text editor. For each GL code, the detail file lists the accounting period begin and end dates, the post date, the debit account, the debit receivable amount, the credit account, the credit receivable amount, the transaction type, the transaction reason, the transaction ID, the reversal transaction ID, the organization, the client name and ID, the account date, the claim ID, the deposit ID, the provider, the payer name, the program, the procedure code, and the activity code.
4. Import File - After downloading the GL file, it can be imported into an external accounting software system.
Prerequisite to Closing an Accounting Period
Prior to closing an accounting period, verify that as many transactions are complete as
possible. Perform the following actions:
• Running the Activities No Status Report
• Running the Failed Activities Report
• Running the Failed Claims Report
• Running the Claim Approval Report
• Running the Cash Sheet Report
• Running the Write-Offs Report
Ancillary charges, such as transportation costs and fees for returned checks, are entered into the system as Manual Claims. (See Entering Non-Activity Invoices (Manual Claims)) The system processes ancillary charges differently from billable services because they are not based on activity codes, and they have not been scheduled.
Once a manual claim is created, it is automatically moved into Claim Approval. All manual claims must be approved before they can be sent for billing.
|
If a manual claim is reversed, it disappears. |
1. Navigate to Billing/AR > Show Menu > Manual Claim.
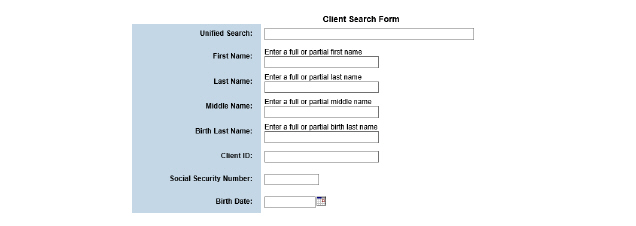
2. Fill out the needed information and click Submit in the status bar.

3. Click the client needing a manual claim.

4. Fill out the needed information and click Submit in the status bar. The non-activity invoice is created and moved into Claim Approval.
Running the Activities No Status Report
This report, which is based on the date range of the accounting period, includes information about activities in the system that do not have a status.
1. Navigate to Client > Show Menu > Utilization Management Reports.

2. Select the Activities: No Status report.
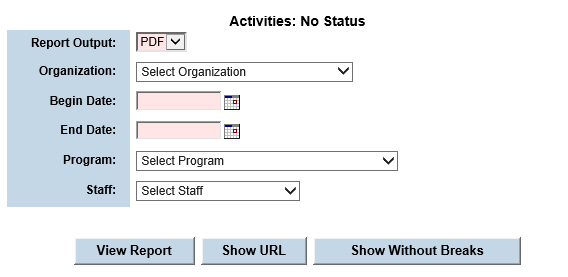
3. Fill out the needed information and click View Report. The report is generated based on the parameters defined. A new browser window opens and displays the report.

Running the Failed Activities Report
This report, that is based on the date range of the accounting period, includes a list of activities for a user-defined date range. The information in the report is sorted by error code.
1. Navigate to Billing/AR > Show Menu > Billing Reports.
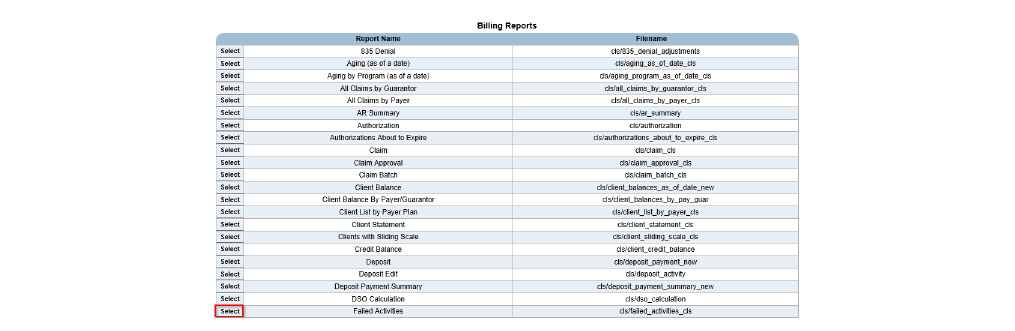
2. Select the Failed Activities report.
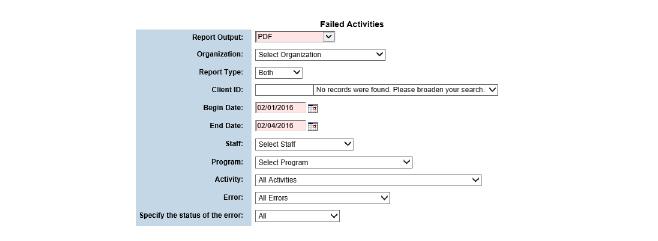
3. Fill out the needed information and click Submit in the status bar. The report is generated based on the parameters defined. A new browser window opens and displays the report.

Running the Failed Claims Report
This report, that is based on the date range of the accounting period, includes a list of failed
claims for a user-defined date range. The information in this report is sorted by payer plan.
1. Navigate to Billing/AR > Show Menu > Billing Reports > Select the Failed Claims report.

2. Fill out the needed information and click Submit. The report is generated based on the defined parameters.
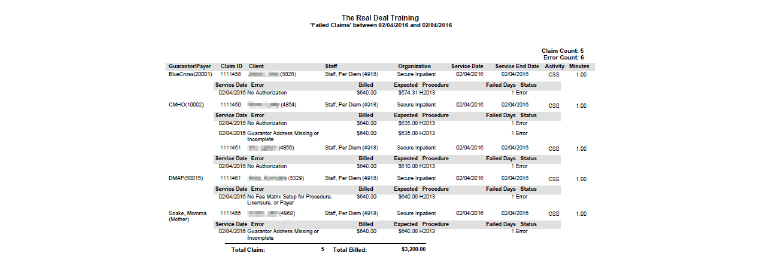
Running the Claim Approval Report
This report, based on the date range of the accounting period, includes a list of claims that are pending approval. This report allows claims to be reviewed before they are sent out to payers.
|
If this report includes claims awaiting approval, contact the necessary staff member to approve the claims. After the claims are approved, they can be included in the account period closing. |
1. Navigate to Billing/AR > Show Menu > Billing Reports.
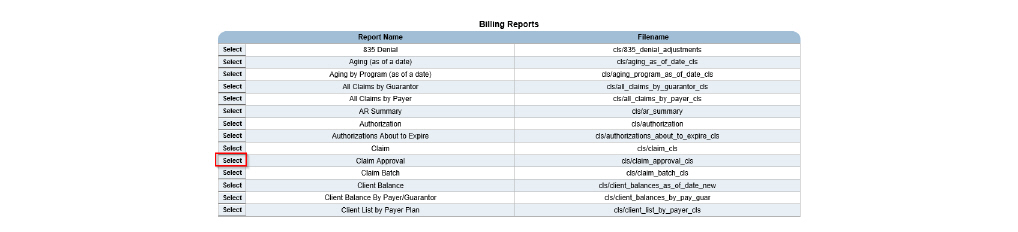
2. Select the Claim Approval report.

3. Fill out the needed information and click Submit in the status bar. The report is generated based on the parameters defined.
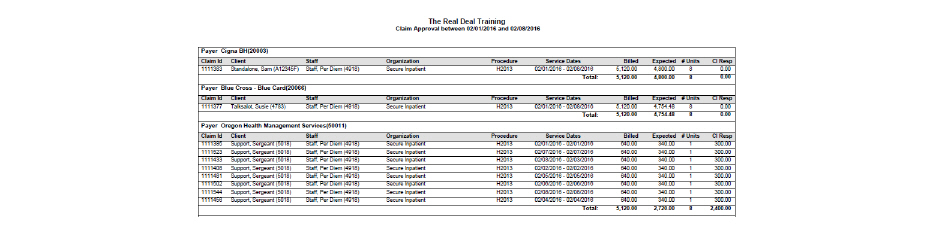
This report includes detailed information about the cash sheet for a user-defined date.
1. Navigate to Front Desk > Show Menu > Front Desk Reports.

2. Select the Cash Sheet report.
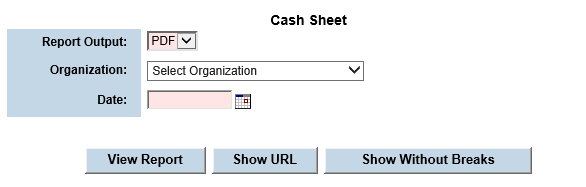
3. Fill out the needed information and click Submit in the status bar. The report is generated based on the parameters defined.
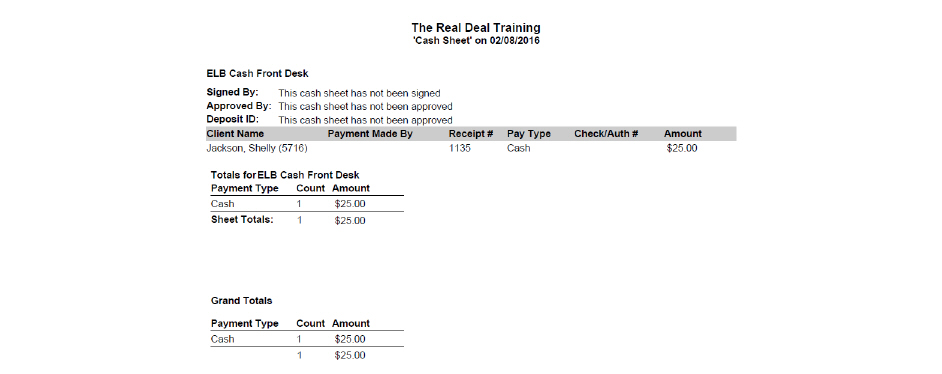
This report includes information about the deposits that were entered into the system during a user-defined date range.
1. Navigate to Billing/AR > Show Menu > Billing Reports.
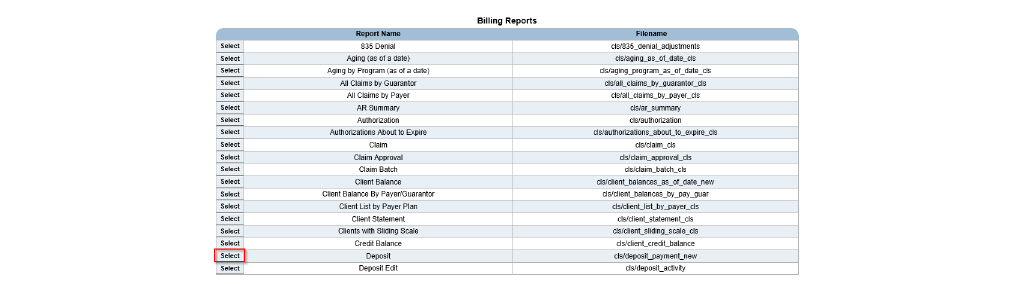
2. Select the Deposit report.
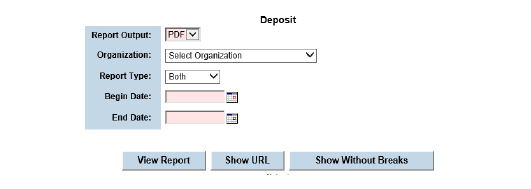
3. Fill out the needed information and click Submit. The report is generated based on the parameters defined.
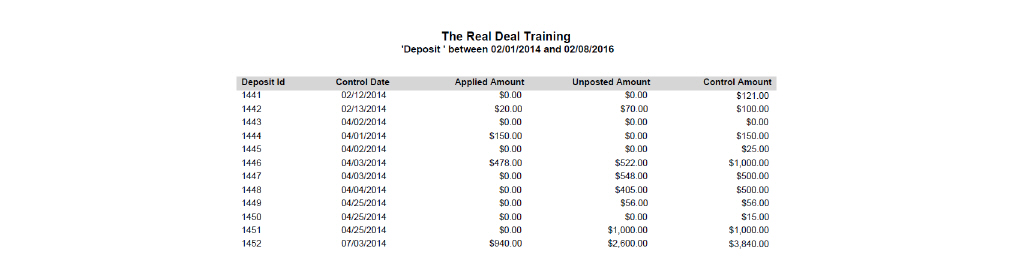
This report includes a list of revenue records during a user-defined date range. It can be generated in either summary or detail format.
1. Navigate to Billing/AR > Show Menu > Billing Reports.
2. Select the Revenue report.
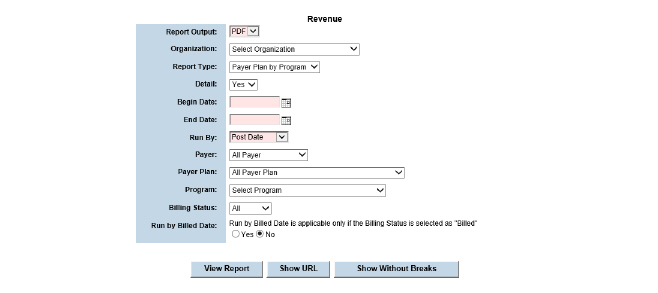
3. Fill out the needed information and click Submit in the status bar. The report is generated based on the parameters defined.
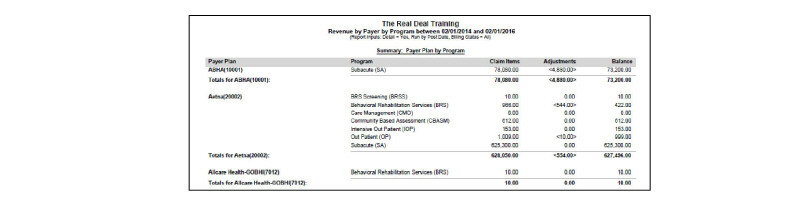
This report includes a list of claim write offs that occurred during a user-defined date range.
1. Navigate to Billing/AR > Show Menu > Billing Reports.
2. Select the Write Offs/Write Ups report.
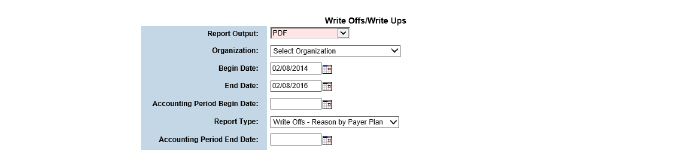
3. Fill out the needed information and click Submit in the status bar. The report is generated based on the parameters defined.
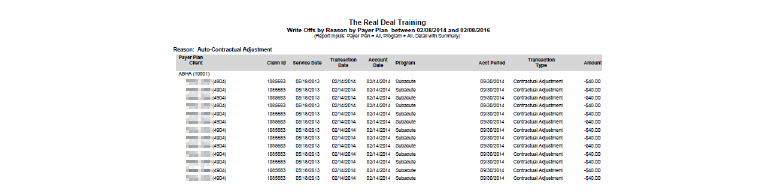
Creating the General Ledger Export File
After verifying that as many transactions as possible are complete, the GL Export module is ready to be used to close an accounting period. Typically, the GL Export is run on a monthly basis. When the GL Export runs, the system creates a file that contains all of the financial transactions that fall within a defined accounting period.
1. Navigate to Billing/AR > Show Menu > GL Export.

2. Click the Create New GL Export button.
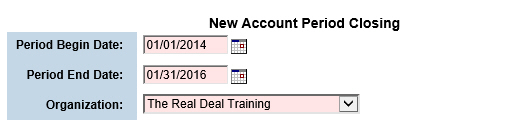
|
In some cases, services are delivered and payments are received in the same accounting period. However, payment adjustments or claim approvals may not occur within the same accounting period. In order to confirm that all transactions in the system are exported to the General Ledger, it is recommended that default date set in the Period Begin Date field be left at the default, two years in the past. This allows the clean-up of transactions that were created in prior months. |
3. Fill out the needed information and click Submit in the status bar. A record for the accounting period is created and listed on the Records Sent to GL page.
|
If the system encounters errors when generating the GL export file, the transactions associated with the errors are not included in the export file. All errors that are found during the GL export process can be accessed by clicking the Errors button that corresponds with the GL export file created. |
|
If the accounting period closing contains errors, correct the errors, and then recreate the GL export file by clicking the Reprocess button that corresponds with the GL export file created. |
|
If the accounting period was created in error, use the Backout button to undo it. |
|
After verifying the accuracy of the data in the accounting period, click the Lock button. Once an accounting period is locked, it cannot be backed out. The Backout button is removed for the selected accounting period.The Lock and Unlock feature is available only to users who have the appropriate privilege levels. Unlocking must be performed by a user with the appropriate privilege level. |
Once the GL export file is created without any errors, it can be downloaded in any of the following formats:
• Downloading GL Interface Files
Downloading GL Interface Files
For each GL code, the summary file lists the account type and the debit receivable or credit receivable amount. After downloading this file, it can be imported into an external accounting software system.
|
The data in the GL export file is formatted according to the configurations defined in the Account Numbers module. (See Formatting the GL Export File.) |
1. Navigate to Billing/AR > Show Menu > GL Export > Click the GL Interface button for the desired GL file. A browser pop-up prompts to save the GL Interface as an excel file.
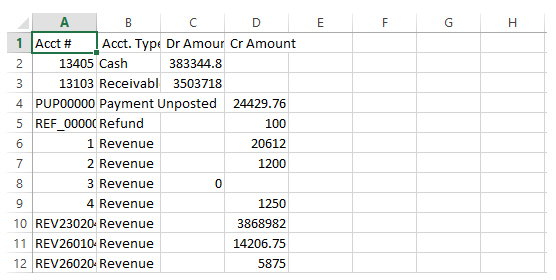
For each GL code, the detail file lists the reference type, the payer name, the transaction type, the service date, and the debit receivable or credit receivable amount. After downloading this file, it can be imported into an external accounting software system.
|
The data in the GL export file is formatted according to the configurations defined in the Account Numbers module. (See Formatting the GL Export File.) |
1. Navigate to Billing/AR > Show Menu > GL Export > Click the GL Detail button for the desired GL file. A browser pop-up prompts to save the GL Detail as an excel file.
