The Front Desk Schedule is used to manage client appointments, collect co-payments, and schedule clients’ next appointments. The Front Desk Schedule is linked directly to the Schedule module. All changes made in the Front Desk Schedule affect the corresponding components in the Schedule module, and vice versa.
This chapter includes the following topics:
• Components of the Front Desk Schedule
• Verifying a Client’s Demographic Information
• Check a Client’s Payer Eligibility
• Entering a Client Due Amount
• Marking the Status of Front Desk Appointments
• Set Up Additional Appointment Statuses
• Scheduling a Client’s Next Appointment
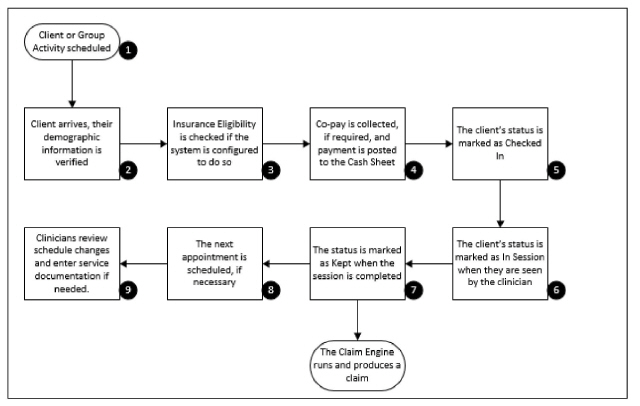
1. A client or group activity is scheduled either through the Front Desk Schedule or the Schedule module.
2. When the client arrives for the appointment, their demographic information is verified.
3. If the system is configured for real-time eligibility, it is confirmed that the client is currently covered under their insurance policy.
4. If a client co-pay is required, the co-pay is collected and the payment is posted to the Cash Sheet.
5. The client is marked as “Checked In” when they are ready to see the clinician.
6. The appointment status is marked as “In Session” when the client meets with the clinician. This allows the clinician to start documentation, but still update the start and stop time as needed.
7. After the client completes the session, the appointment status is marked as “Kept.”
8. If necessary, the client’s next appointment is scheduled.
9. Clinicians access their schedule to review changes made by front desk staff members. If required by the activity, clinicians will enter the service documents related to the activity.
|
Once an activity is marked as Kept, it is processed during the nightly run of the Claim Engine. |
Components of the Front Desk Schedule
1. Navigate to Front Desk.
By default the Front Desk Schedule lists all of the activities with a status of None, Checked In, and In Session that are scheduled for the organization and date. To view all activities of any status, click Show Entire Front Desk.
The Front Desk Schedule page is divided into the following sections:
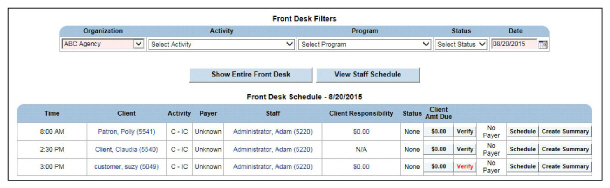
Front Desk Filters contains the filter parameters that determine the activities that are displayed on the Front Desk Schedule.

|
The Front Desk Schedule view is based on the primary organization set up in the employee record. The organization view can be changed using the Organization drop-down in the Front Desk Filters. |
Change the parameters in Front Desk Filters and click Submit to filter the schedule.
By default, the Front Desk Schedule displays the appointments that are scheduled for today at the current user’s default location.

Verifying a Client’s Demographic Information
Basic information about the client, such as physical address, mailing address, and contact telephone numbers need to be verified, and updated if necessary. Each time a client comes in for an appointment, the client’s demographic information can be updated.
1. Navigate to Front Desk > Verify button of the desired client.
|
The text of the Verify button is red if demographics and contact information have not been verified within 90 days. |
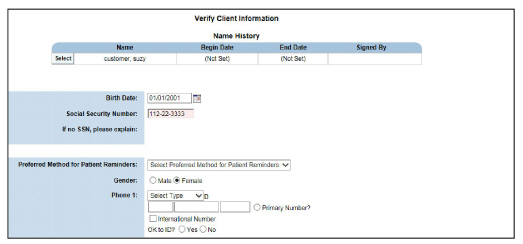
2. After updating the client’s demographic information, click Submit in the status bar. If the text of the Verify button was red, the text changes to black.
Check a Client’s Payer Eligibility
If the system is set up to use the real-time eligibility feature, it can verify a client’s eligibility with the primary payer. If the client is self-pay only, the Check Eligibility button is replaced with the text No Payer.
|
This feature must be configured to use. Contact Qualifacts for assistance. |
1. Navigate to Front Desk > Check Eligibility for the desired client. The eligibility request is transmitted and processed.
2. Results of the eligibility check can be found by clicking the Transfers navigation bar icon.

The Client Amt Due column on the Front Desk Schedule indicates the amount for which the client is responsible. If the client is required to pay a co-pay, sliding scale amount, or standard fee for the scheduled service, this button is used to post the client balance amount to the Cash Sheet.
Client Amounts Due are listed with three possible indicators:
• (c) - Indicates the amount being collected is for a client co-pay.
• (s) - Indicates the amount being collected is for an uninsured client with a sliding scale fee.
• (f) - Indicates the amount being collected is for a client responsibility of the standard fee for the scheduled service.
1. Navigate to Front Desk > Client Amt Due.
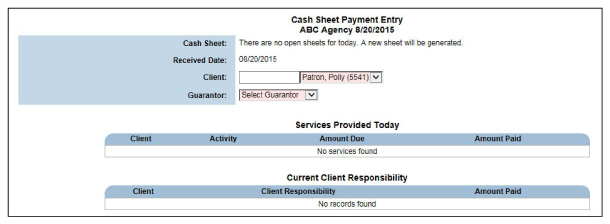
2. Fill out the information and click Submit in the status bar.
|
The Cash Sheet Payment Entry will reset the Verify button’s 90-day counter. |
Marking the Status of Front Desk Appointments
1. Navigate to Front Desk > Status button for the desired client.
|
If the appointment is scheduled for a future date, the status cannot be marked as Checked In, In Session, or Kept. |
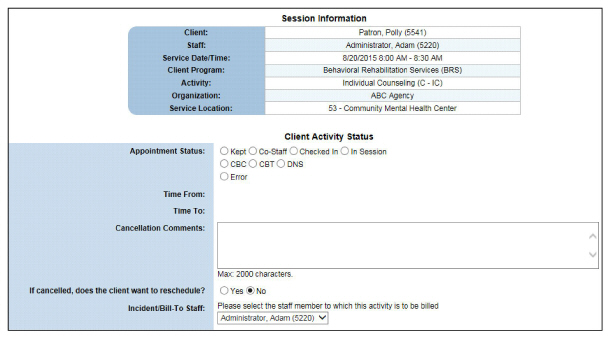
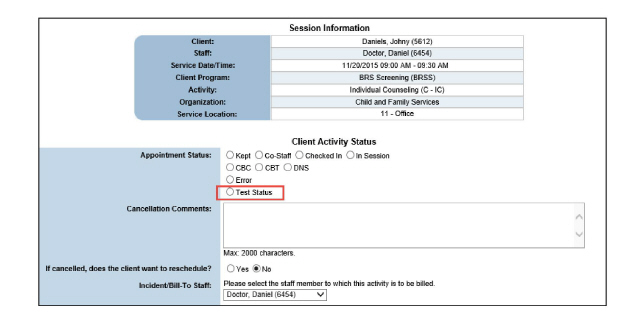
2. In the Appointment Status field, select one of the following radio buttons:
• Kept - The client and clinician met for the appointment. After selecting this status, the clinician must complete any required service documents for the appointment. The Kept status is not typically marked by the front desk staff from the Front Desk but rather by the clinician from the Schedule module.
|
The Kept radio button can be restricted by privilege level. Staff without the privilege cannot select the Kept status. Contact Qualifacts for assistance. |
• Co-Staff - Multiple staff members provide services for an activity. When a staff member marks a client as Co-Staff, they will not have service documentation to complete. The staff member who marks the appointment Kept will be responsible for documents.
• Checked In - The client has checked in.
• In Session - The client is meeting with the treatment professional.
• CBC - The appointment was canceled by the client.
• CBT - The appointment was canceled by the therapist.
• DNS - The client did not show for the appointment.
• Error - The appointment was scheduled in error. Service documentation does not have to be entered. The time interval on the clinician’s schedule becomes available so another appointment can be scheduled.
3. Fill out the applicable information and click Submit in the status bar.
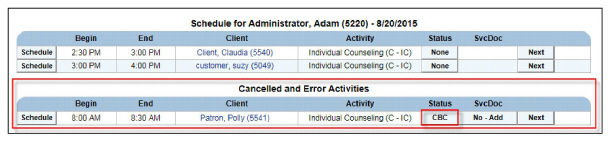
• If the appointment status was marked as Kept or Checked In, the Status column on the Front Desk Schedule is updated.
• If the appointment status was marked as CBC, CBT, DNS, or Error, the appointment is removed from the Front Desk Schedule and displayed at the bottom of the Schedule page.
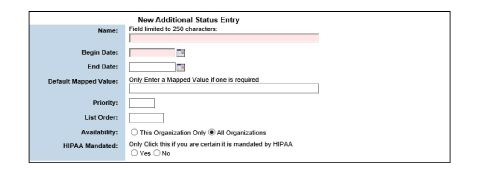
Set Up Additional Appointment Statuses
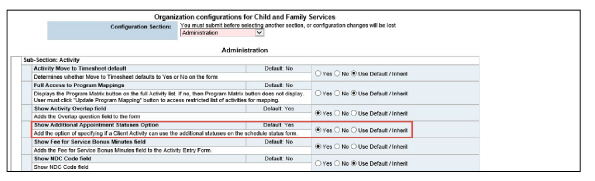
If appointment statuses other than the defaults are needed in the CareLogic system, a system administrator can add more options by following the instructions below:
1. To set up organization configuration for additional appointment statuses, navigate to Administration > Show Menu > Organizations > Configure > Administration > Sub-Section: Activity > Show Additional Appointment Statuses Option > Set to Yes if it is not already selected.
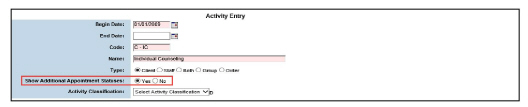
2. To set an activity to accept additional appointment status options, navigate to Administration > Show Menu > Activities > Click the activity that requires a new status > Set the Show Additional Appointment Statuses field to Yes if it is not already selected.
3. Create a descriptor called Appointment Status. Navigate to Administration > Show Menu > Descriptors > Add New Type > The title in the Type field must be Appointment Status.

4. Fill out the needed information and click Submit.
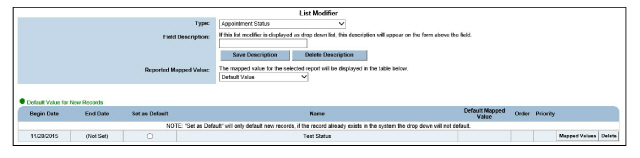
• Click Add New Additional Status to add additional options, if more than one status option is needed.
5. Schedule the activity that was set to accept additional status options. Navigate to Schedule > Show Menu > New Client Activity > Schedule the activity that was set to show additional appointment statuses > Submit > Click the button in the Status column for the activity schedule. The additional appointment statuses appear as options.
Scheduling a Client’s Next Appointment
1. Navigate to Front Desk > Schedule button for the desired client. The Schedule Next Appointment page allows the appointment criteria to be entered and then will perform a search for available appointment times.
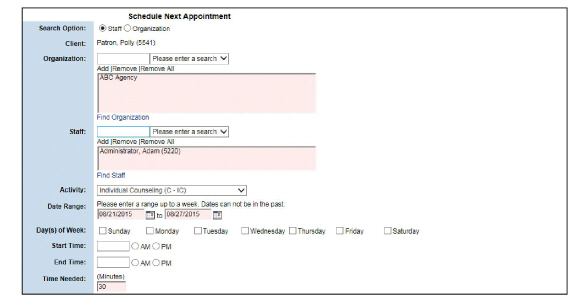
2. Fill out the information and click Submit in the status bar. The Available Times page appears, which lists all of the available appointment times that match the search criteria.

3. Select an appointment date and time. The Schedule a Client Activity page appears.
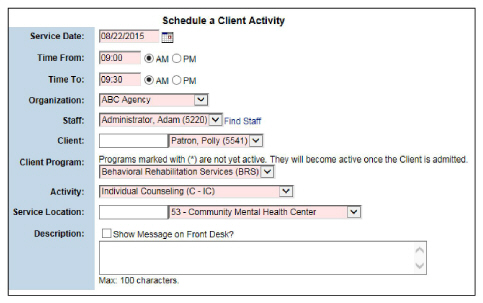
4. Fill out the information and click Submit to save and close the page. The client activity is listed on the Front Desk Schedule.
The Cash Sheet and Financial Overview
The Cash Sheet is used to enter payments into the system. Each day, a Cash Sheet is created by each location of the organization. Once all of the payments have been applied to it, an electronic signature must be entered to close it. (See the Billing and Accounts Receivable Guide.)
This chapter includes the following topics:
• Posting Client Responsibility to the Cash Sheet
• Un-posting Payments from a Cash Sheet
• Transferring Payments to a Different Cash Sheet
• Printing Receipts from the Cash Sheet
• Look Up Financial Overview from the Front Desk
• Print Statements from Financial Overview
1. Navigate to Front Desk > Show Menu > Cash Sheet.
|
If there are open cash sheets from previous days, they are listed at the bottom of the page. The Open Cash Sheets section includes all cash sheets from the current organization and all of its child organizations. It displays the total number and the total amount associated with open cash sheets. Open cash sheets cannot be approved and processed until they have been signed. |
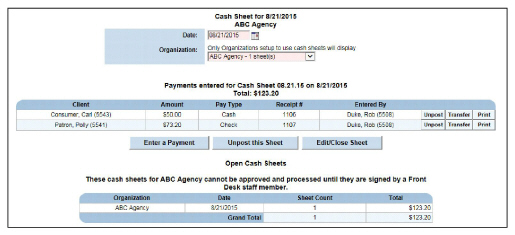
2. Use the Date and Organization fields to filter the cash sheets and click Submit in the status bar. Cash sheets that match the search criteria are displayed.
Each day, a Cash Sheet should be created for each location that collects payments. The front desk staff uses the Cash Sheet to enter the payments they receive.
1. Navigate to Front Desk > Show Menu > Cash Sheet > Open New Cash Sheet
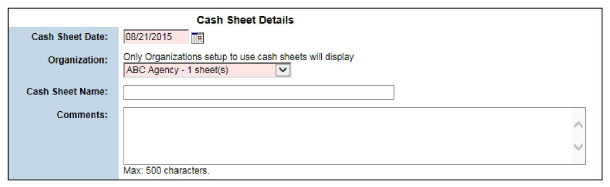
2. Fill out the required information and click Submit in the status bar. The record is saved and listed on the Cash Sheet page, by location.
Posting Client Responsibility to the Cash Sheet
All payments must be added before a Cash Sheet is closed.
|
These instructions are for entering payments directly to the Cash Sheet. Payments can also be added to the Cash Sheet by clicking the button in the client’s Client Amt Due column on the Front Desk Schedule. |
1. Navigate to Front Desk > Show Menu > Cash Sheet > Enter a Payment.
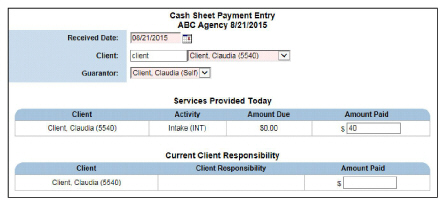
2. Fill out the needed information and click Submit in the status bar. The payment is saved and a receipt number is assigned to the payment. On the Cash Sheet page, the Cash Sheet can be accessed to view the payment receipt number or print a receipt for the client.
Un-posting Payments from a Cash Sheet
|
The abilities to edit and un-post Cash Sheets are privileges. If a user has not been assigned the privileges to do so, they won’t see the buttons needed. |
|
When a payment is un-posted from the Cash Sheet, the payment is permanently deleted. If the payment is later re-entered, it will be associated with a different receipt number. If a payment is re-entered, notify the customer of the new receipt number. |
1. Navigate to Front Desk > Show Menu > Cash Sheet > Unpost.
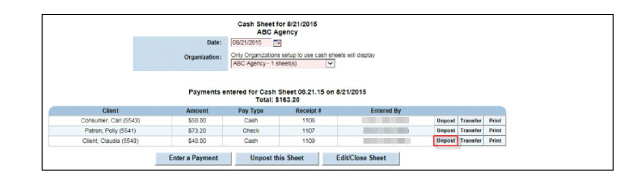
2. Confirm deletion and click OK. The payment is un-posted from the system and removed from the cash sheet.
Transferring Payments to a Different Cash Sheet
It is possible to transfer a single payment from its current Cash Sheet location to a different Cash Sheet location on the same day. Payments cannot be transferred between Cash Sheets for different days.
1. Navigate to Front Desk > Show Menu > Cash Sheet > Transfer.
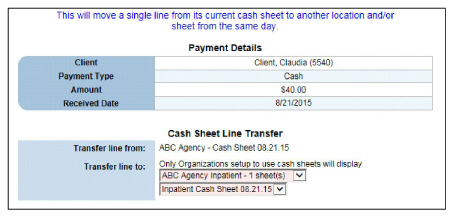
2. Use the Transfer Line To fields to select the Cash Sheet location the payment will be transferred to and click Submit in the status bar. The payment is transferred to the selected cash sheet.
Printing Receipts from the Cash Sheet
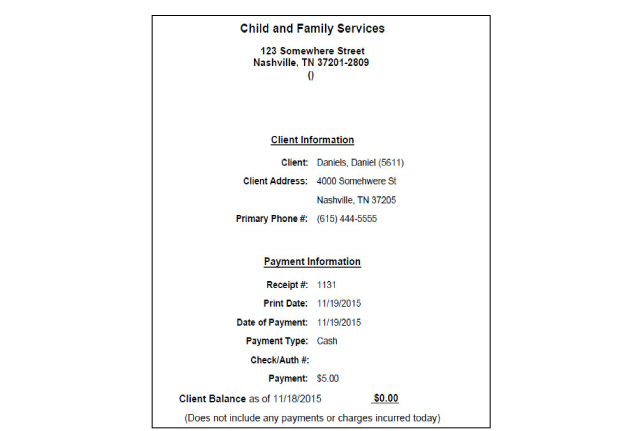
Once cash sheet receipts are generated, Adobe Acrobat Reader can be used to view and print it as a receipt.
1. Navigate to Front Desk > Show Menu > Cash Sheet > Print button that corresponds with the payment desired. A new window opens, displaying the selected cash sheet report in PDF format. This may be printed if the client requires a hard copy.
After applying all of the day’s payments to the Cash Sheet, it must be closed by electronic signature.
|
The Cash Sheet should not be closed until all payments for the day have been entered. Once the Cash Sheet is closed, additional payments cannot be entered. If additional payments exist for a closed Cash Sheet, they must be applied to the next day’s Cash Sheet. |
1. Navigate to Front Desk > Show Menu > Cash Sheet > Edit/Close Sheet.
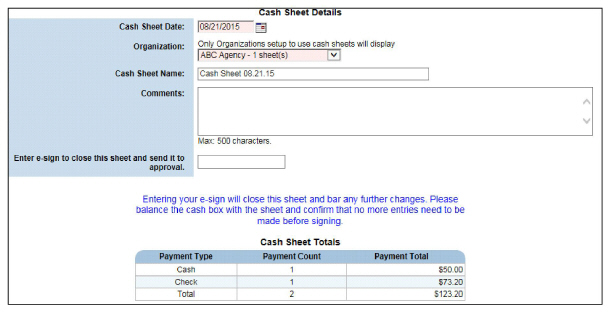
|
It is recommended that the cash drawer is balanced with the Cash Sheet before entering an electronic signature, to confirm that all of the day’s payments have been entered. Once the Cash Sheet is signed, it is closed and no further changes can be made. |
2. In the Electronic Signature field, enter a valid electronic signature to close the Cash Sheet and click Submit in the status bar. The selected cash sheet is closed.
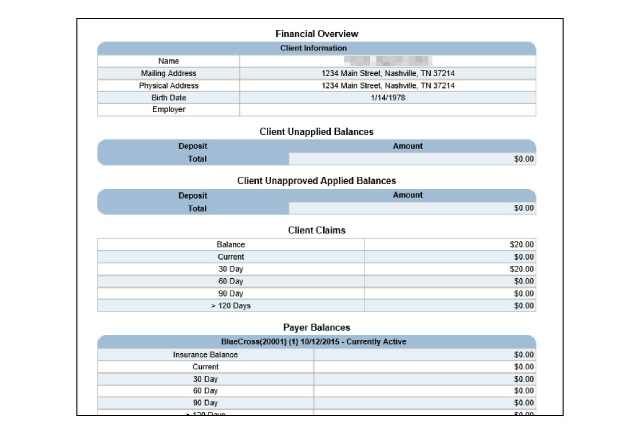
Look Up Financial Overview from the Front Desk
1. Navigate to Front Desk.
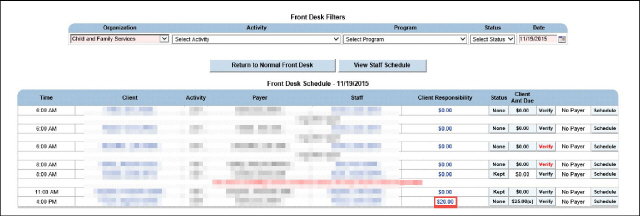
2. Click the link for the desired client under the Client Responsibility column.
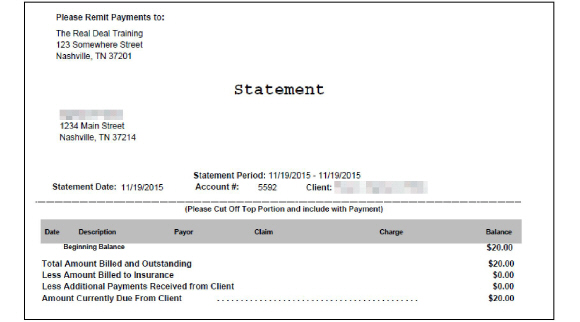
Print Statements from Financial Overview
1. Navigate to Front Desk > Click the link under the Client Responsibility column > Client Statement.
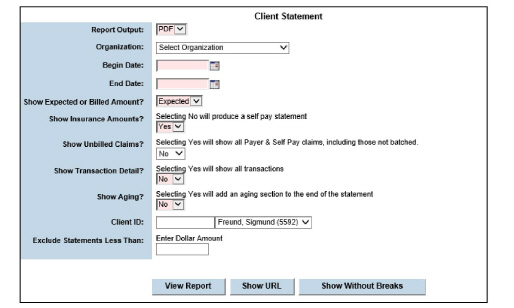
2. Fill out the needed information and click View Report. A printable PDF statement appears.
The Bed Whiteboard provides a view of the bed occupancies by location. It can also be used to change the length of a client’s stay in a bed, add notes about a bed, view the history of a bed, and swap beds.
|
The Bed Whiteboard module is typically used by organizations that provide inpatient services. |
This chapter includes the following topics:
• Accessing the Bed Whiteboard
• Changing an Occupant’s Length of Stay in a Bed
• Viewing the History of a Bed
1. Navigate to Front Desk > Show Menu > Bed Whiteboard.
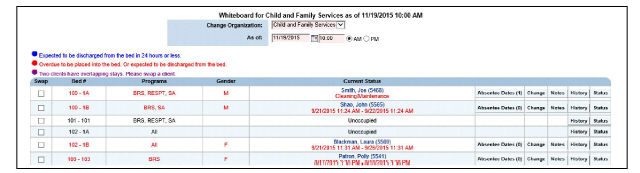
2. Use the fields provided and click Submit in the status bar to filter bed information. The Whiteboard page is refreshed to display the bed whiteboard for the selected organization, date, and time.
Changing an Occupant’s Length of Stay in a Bed
1. Navigate to Front Desk > Show Menu > Bed Whiteboard > Change.
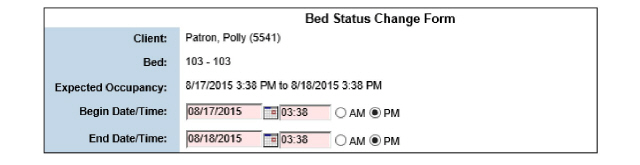
2. Fill out the required information and click Submit in the status bar. The bed status is updated and listed on the Whiteboard page.
1. Navigate to Front Desk > Show Menu > Bed Whiteboard > Notes.

2. Fill out the required fields and click Submit in the status bar. The note is saved and listed in the Notes History section of the page. Notes follow the client even if they are moved to another bed.
1. Navigate to Front Desk > Show Menu > Bed Whiteboard > History.

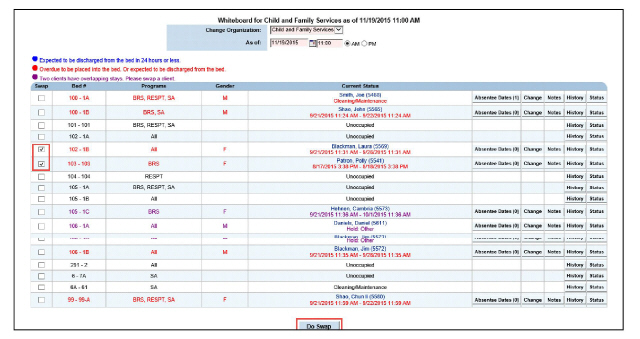
1. Navigate to Front Desk > Show Menu > Bed Whiteboard. In the Swap column, select the check boxes of the beds that need to be traded and click the Do Swap button. The Whiteboard page is refreshed and the selected beds are switched.
|
No more than two beds can be swapped at a time. |
1. Navigate to Front Desk > Show Menu > Bed Whiteboard > Status button. The Bed Status page displays the status history of the selected bed. Bed Status is a Descriptor list and can be customized to an agency’s business needs. (See the System Administration Guide.)
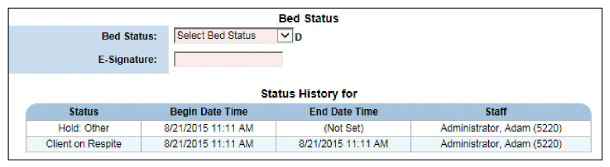
2. Enter the required information and click Submit in the status bar. The Bed Status is saved and listed on the Bed Whiteboard page.