
Introduction
Point of Entry (POE) is used to enter new clients into the system. This is done through completion of the POE Wizard. It collects basic information about the client, including demographic information, client guarantors, client payers, payer authorizations, and client responsibility.
Once the POE Wizard is complete, and the client is admitted into the system, their data can be accessed and modified in the ECR (Electronic Clinical Record) module. The ECR is used to view and manage a client's data once they are admitted into the system. The POE module is used only to gather initial client data and then admit clients into the system.
This section includes the following topics:
• Creating a Tracking Log for Intakes
The following diagram shows the process flow for the Point of Entry module:
1. Contacted by Client - Clients generally make contact with a treatment facility through a referral source or by calling directly.
2. Client Search - The POE module is used to admit new clients into the system. A client search is performed in order to confirm that a client does not already exist in the system.
• If the client is found in the system as active, the POE Wizard does not need to be completed. Instead, the ECR module can be used to add the client to a new program if needed, then the Schedule module should be used to schedule new services for the client.
• If the client is not found in the system, use the POE Wizard to add the client (Step 3).
• If the client is found in the system as inactive, use the POE Wizard to create a new intake/referral for the client (Step 3).
3. POE Wizard - The POE Wizard is used to collect information about the client like demographics, guarantors, payers, and payer authorizations.
|
The POE Wizard can be customized to meet the specific needs of any organization. If desired, a service document can be set up to appear in the POE Wizard. |
4. Admit to Program - There are three ways to admit a new client to a program:
• Schedule Appointment - Assign the client to a treatment program while scheduling an appointment. Once an appointment is marked as Kept, the client is assigned to a staff member's caseload.
• Assign to Caseload - Assign the client to a treatment program while placing them on a staff member's caseload. This is particularly useful if the clinician is adding the client to their own caseload or if one clinician provides all services in a program, like music or art therapy.
• Bed Search - For inpatient or residential services, assign the client to a treatment program using the bed search. Once a bed is located, the client is admitted to the bed and an appointment is scheduled. Once the appointment is marked as Kept, the client is assigned to the caseload of the default per diem staff member. (Contact Qualifacts for assistance setting up this configuration.)
Creating a Tracking Log for Intakes
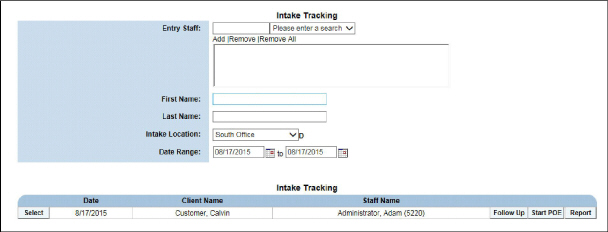
The Intake Tracking module provides a basic tracking log for referral calls and walk-ins. This module is useful for referrals that are not admitted for treatment. By logging referrals into the Intake Tracking module, they are kept separate from the POE Wizard, which is used to admit clients.
The Intake Tracking module allows copying of records to the POE Wizard for admission when needed.
To access the Intake Tracking module:
1. Navigate to Point of Entry > Show Menu > Intake Tracking.
By default, the Intake Tracking list (the bottom section) displays the intake tracking records created on the current system date. Use the search fields provided in the Intake Tracking search (the top section for access to past intake tracking records.)
2. Enter the desired search criteria and click Submit, the results will be displayed in the Intake Tracking list.
Intake Tracking is used to perform the following tasks:
• Accessing Past Intake Tracking Records
• Entering New Intake Tracking Records
• Updating Intake Tracking Records
• Following Up On Intake Tracking Records
• Creating POE Records from Intake Tracking Records
• Viewing Individual Intake Tracking Reports
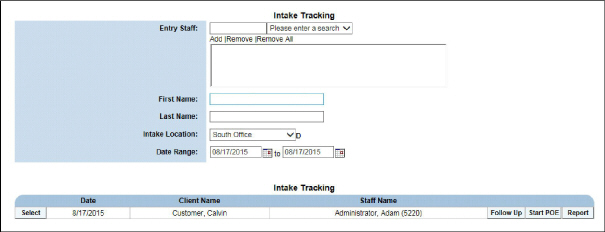
Accessing Past Intake Tracking Records
Intake Tracking can be useful in scenarios where the organization has a high demand for services. A client may not always be able to be admitted at the time of first contact. Reviewing past Intake Tracking records helps view a client's history of contact with the organization, even if they have never been admitted.
Scenario: ABC Agency has a potential client, Allen, who calls and asks to be enrolled into the Music Therapy program there. Unfortunately, the program at ABC is currently full, so Allen is referred to another program at another agency. Intake Tracking permits a record of the phone call with Allen to exist in CareLogic that captures Allen's information as well as the referral to another agency. If Allen were to call in again for availability for the same program or for availability of any of ABC Agency's programs, the information from the original call would already be in the system. If Allen was able to be admitted to a therapy program, a Point of Entry record could be started right from Allen's Intake Tracking record.
1. Navigate to Point of Entry > Show Menu > Intake Tracking.
|
By default, Intake Tracking displays records created on the current system date but the date range can be changed to reflect entries in the past. |
2. Enter the search criteria and click Submit in the status bar. Records that match the search criteria are displayed in the Intake Tracking list.
Entering New Intake Tracking Records
1. Navigate to Point of Entry > Show Menu > Intake Tracking > Add Intake Tracking.
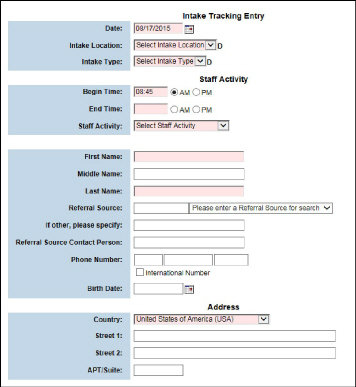
2. Fill out the applicable fields and click Submit in the status bar. An electronic signature will be required to submit the entry. The intake tracking record is saved and listed on the Intake Tracking list.
Updating Intake Tracking Records
Intake Tracking records cannot be updated after they have been signed. (See Creating POE Records from Intake Tracking Records). If signed, a Follow Up is necessary to modify the Intake Tracking. (See Following Up On Intake Tracking Records.) Once it has been converted, the intake tracking record changes to read-only mode, and information must be updated through the Point of Entry Wizard.
To update intake tracking records:
1. Navigate to Point of Entry > Show Menu > Intake Tracking > Enter search parameters and click Submit.
2. In the Intake Tracking list, locate the tracking record desired and click the Select button. The Intake Tracking Entry page appears.
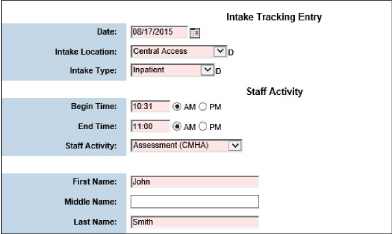
3. Update fields as needed. They can only be updated if the entry remains unsigned. After making the desired updates, click Submit in the status bar. The intake tracking record is saved and listed on the Intake Tracking list.
Following Up On Intake Tracking Records
1. Navigate to Point of Entry > Show Menu > Intake Tracking > Enter search parameters and click Submit.
2. In the Intake Tracking list, locate the tracking record desired and click the Follow Up button. The Follow Up page appears.

3. Click Add Follow Up. Editable fields appear.
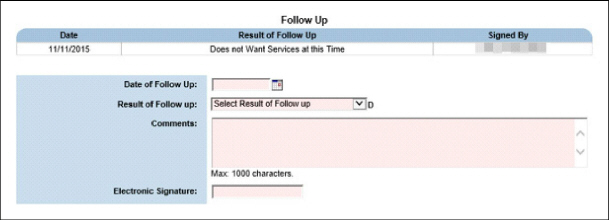
4. Fill out the required information and click Submit. The Follow Up is saved as part of the Intake Tracking record.
Creating POE Records from Intake Tracking Records
Clients needing admission for treatment need their intake tracking records converted to POE records. Once the new POE record is created, it can be maintained through the POE Wizard.
When converting an intake tracking record to a POE record, the system performs a duplicate client search.
1. Navigate to Point of Entry > Show Menu > Intake Tracking.
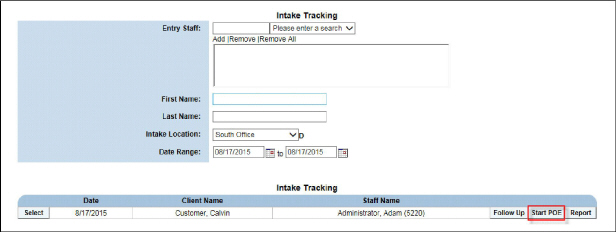
2. Locate the client needing admission and click the Start POE button. The system attempts to locate a client record that matches the intake tracking record by performing a search on Name, Birthday, and Social Security number, if provided.
|
When a client search is performed, the system uses a search feature that will include literal matches and phonetic matches (those with similar pronunciations). |
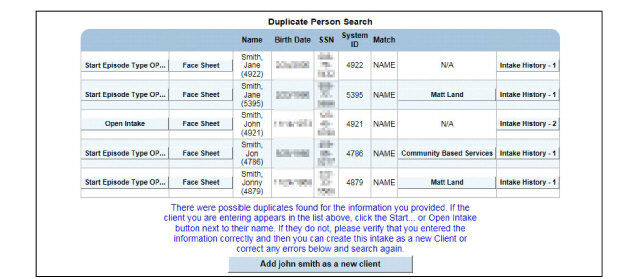
• If no matches are found, click the Add as a New Client button.

• If the system finds a record that matches the search criteria, the Duplicate Person Search page appears. This page contains at least one of the following buttons:
- Open Intake - Appears if the system finds a match for a client who has an active Point of Entry record but has not been admitted into the system. It will open the client's Point of Entry record.
- New Admission - Appears if the system finds a match for a client. It will create a new episode of care for the client.
- Face Sheet - Appears if the system finds a match for the client. It will show more information about the client record.
- Intake History - Appears if the system finds a match for a client who has been previously admitted into the system. The number of past intake episodes for the client is indicated on the button. It will allow the user to view the client's Point of Entry record.
3. The Intake Tracking record is converted to a POE record, and the Client Demographics page appears. (See Entering Demographic Information.)
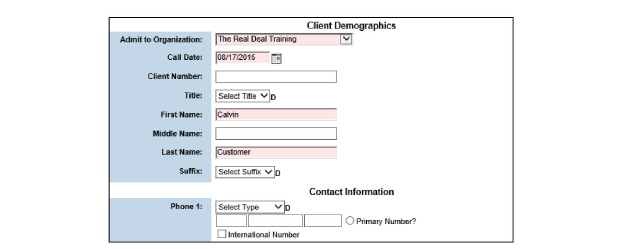
4. After completing and clicking Submit, the page is refreshed and the Point of Entry Wizard menu appears. At this point, the POE Wizard can be completed and appointments scheduled.
|
Once the intake tracking record is converted into a POE record, it can no longer be updated through the Intake Tracking module. Also, the Start POE button changes to a Go to POE button. Updates should be made through the POE Wizard from this point until the client is scheduled, placed on a caseload, or assigned a bed. After POE is complete, the client information is accessed through the ECR. |
Viewing Individual Intake Tracking Reports
The Intake Tracking Report can be generated once an intake tracking record is created:
1. Navigate to Point of Entry > Show Menu > Intake Tracking.
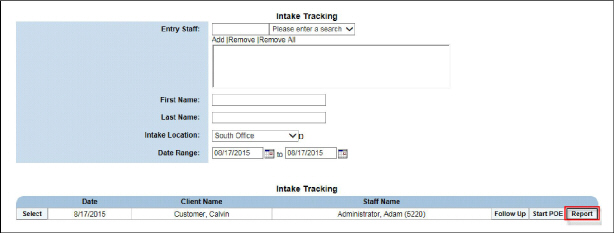
2. Locate the record needed for generating the report in the Intake Tracking list and click the Report button. A new browser window opens and displays the report in PDF format. If desired, the report can be printed.
Creating Point of Entry Records
The POE Wizard is used to capture basic information about the client, such as demographic information, guarantors, payers, payer authorizations, and co-pay information. After the information is completed, the client could be scheduled for an appointment, placed on a caseload, or assigned to a bed.
|
The POE Wizard can be customized to meet the specific needs of any organization. If desired, the POE Wizard can be configured to include ECR menu links or service documents. Contact Qualifacts Support for assistance. |
This section includes the following topics:
• Starting the Point of Entry Wizard
• Entering Demographic Information
• Maintaining Client Guarantors
• Maintaining Client Co-Pay Information
Starting the Point of Entry Wizard
The POE Wizard is used to create a Client Record (chart) and enroll that client in a program or schedule an appointment.
1. Navigate to Point of Entry. The Client Name Information page appears. This page is used to search the client database to see if a record already exists for the client. The more search criteria entered on this page, the more accurate the search results will be.
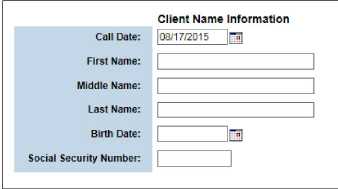
2. Once data is entered, click Submit in the status bar. The system attempts to locate an existing client record that matches the search criteria by looking across all available organizations.
• If no matches are found, confirm that the information entered in the search fields is accurate.
• If the system finds a record that matches the search criteria, the Duplicate Person Search page appears.
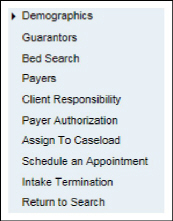
3. Click the Add as a New Client button. The Client Demographics page appears. (See Entering Demographic Information.) After completing Client Demographics and clicking Submit, the page is refreshed, and the Point of Entry Wizard menu appears similar to the example shown below:
A new POE record is started when the Add as a New Client button is clicked. It is not necessary to perform a new POE for clients who are already active in the system. New programs can be added from within the client's ECR. If a new POE record needs to be created for an active client, the client should first be discharged from the system, then a new POE record can be created.
Entering Demographic Information
The Demographics module is used to enter basic information about the client into the system.
1. Navigate to the Point of Entry Wizard menu > Demographics. The Client Demographics page appears.
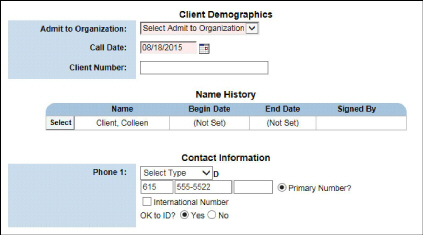
2. Enter the information and click Submit in the status bar. The client's demographic information is saved and the next page in the wizard appears.
|
Once the Client Demographics page is submitted, the ECR is created. The system assigns the client a unique client ID, which is used throughout the system. |
The guarantor is the policy subscriber on the client's insurance plan. The guarantor is responsible for paying the portion of the bill that is not covered by the payer. When sending out bills, the system allows billing of both payers and guarantors.
By default, every client in the system is set up as their own guarantor. Additional guarantor records can be created for the client's spouse, parent, guardian, or an organization. If the client is covered by an insurance plan, the payer should be set up after setting up the guarantors. (See Maintaining Client Payers.) The payer records are linked to the guarantor records by the policy subscriber's name.
1. Navigate to the Point of Entry Wizard menu > Guarantors. The Guarantors page appears.
|
Once a payer is set up for the client, the guarantor record cannot be deleted. (See Maintaining Client Payers.) If a payer is set up, the Delete button is replaced with Payers Attached. |

This page is used to perform the following tasks:
• Adding Additional Client Guarantors
• Updating Guarantor Name History
• Updating a Guarantor's Address Information
• Updating a Guarantor's Contact Information
• Updating a Guarantor's Active Date Range
Adding Additional Client Guarantors
1. Navigate to the Point of Entry Wizard menu > Guarantors > Add a Guarantor.
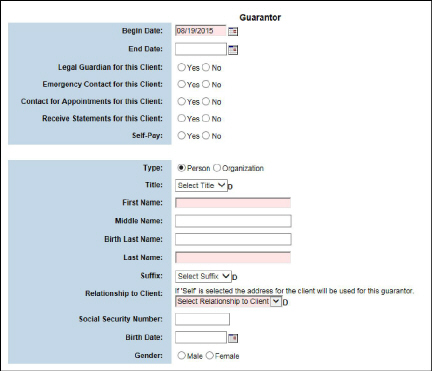
2. Fill out the page and click Submit in the status bar. The guarantor record is saved and listed on the Guarantors page.
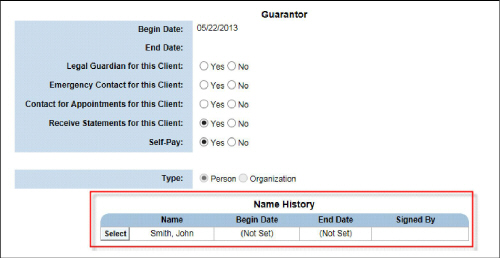
Updating Guarantor Name History
When a guarantor's name changes (marriage, divorce, adoption, etc.), their name can be updated in the system and the name change can be tracked.
1. Navigate to Point of Entry Wizard menu > Guarantors.
2. Click the Select button that corresponds with the guarantor record needing an update. The Guarantor page appears. In the Name History section, a list of guarantor names for the client is displayed.
3. To update the guarantor's name history, click the Select button that corresponds with the most recent guarantor name. The Name History page appears, displaying the current guarantor name information as read-only text and a New Name section that allows client record updates. If an inactive guarantor name is selected, a read-only text display of that entry will appear.
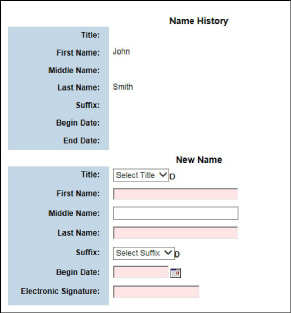
4. Fill out the information and click Submit in the status bar. The client name change is saved to the system and displayed on the Guarantors page under Name History.
Updating a Guarantor's Address Information
In order to bill a guarantor for services, a mailing address needs to be included in the guarantor record. When the Claim Engine runs, it will generate an error if a self-pay guarantor's mailing address is missing or incomplete.
1. Navigate to Point of Entry Wizard menu > Guarantors.

2. Click the Address button of the guarantor whose address needs updating. The Current Contact Information page appears.
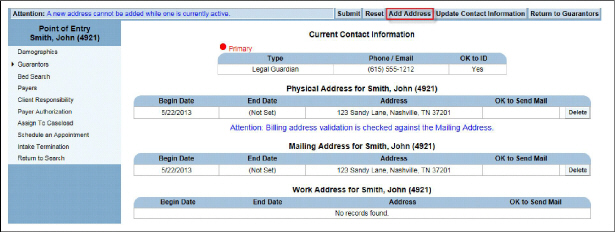
3. Click Add Address in the status bar. The Add Address Type page appears.
4. Use the drop-down list to select the type of address. The possible address types are Physical, Mailing, and Work. This drop-down list only includes the address types that are not currently set up for the guarantor.
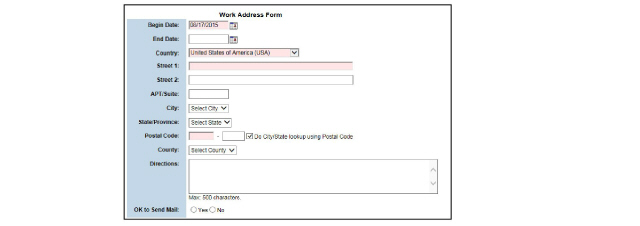
5. Fill out the form and click Submit in the status bar. The address record is saved and listed on the Address page.
Updating a Guarantor's Contact Information
1. Navigate to Point of Entry Wizard menu > Guarantors.
2. Click the Address button of the guarantor whose contact information needs updating. The Current Contact Information page appears.
3. Click Update Contact Information in the status bar. The Current Contact Information page appears.
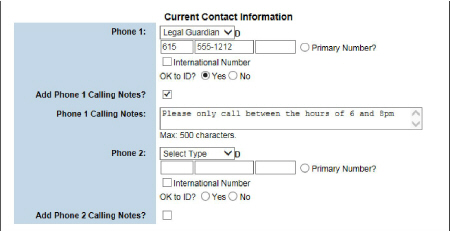
4. Update the needed information and click Submit in the status bar. The contact record is saved and listed on the Address page.
Updating a Guarantor's Active Date Range
This task is used to track the date history of a guarantor's active date range. Each time a guarantor's active date range is modified, the system records the name of the staff member who made the change and the date the change was made.
1. Navigate to Point of Entry Wizard menu > Guarantors.
2. Click the Date Change button on the guarantor record whose date range needs updates. The Guarantor Coverage Date Change page appears.

3. Update and click Submit in the status bar. The guarantor record is updated and will become inactive on the end date.
|
Client guarantor information can be updated using the following process, except for the active date range. (See Updating a Guarantor's Active Date Range for information about its update.) |
1. Navigate to Point of Entry Wizard menu > Guarantors.
2. Click the Select button that corresponds with the guarantor records needing updating. The Guarantor page appears.

3. After making the desired edits, click Submit in the status bar. The updated guarantor record is saved and listed on the Guarantors page.
Guarantor records that are not associated with active payers can be deleted. If a guarantor record is associated with an active payer, it cannot be deleted. Once a guarantor is associated with a payer, the Delete button on the Guarantors page is replaced by a Payers Attached button.
1. Navigate to Point of Entry Wizard menu > Guarantors.
2. Click the Delete button that corresponds to the guarantor record needing deletion. A confirmation pop-up appears.
3. Select OK to confirm deletion of the guarantor. The selected guarantor is deleted from the system.
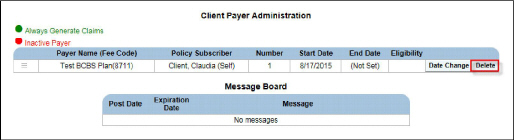
The client's insurance provider is known as a payer. In addition to setting up the name of the payer, information about the payer plan needs to be set up as well.
Unless a client is set up as self-pay on the Guarantor page, they must have an active payer set up in the system in order to bill for services. (See Adding Additional Client Guarantors.)
1. Navigate to Point of Entry Wizard menu > Payers.

This page is used to perform the following tasks:
• Updating a Payer's Active Date Range
Each client is required to have an active payer, or can be marked as self-pay on the Guarantors page. (See Adding Additional Client Guarantors.) If multiple payers are set up, the payers can be prioritized to allow for waterfall billing.
|
The Select button on the Client Payer Administration page can be used to update payer information once a client payer is added to the system. |
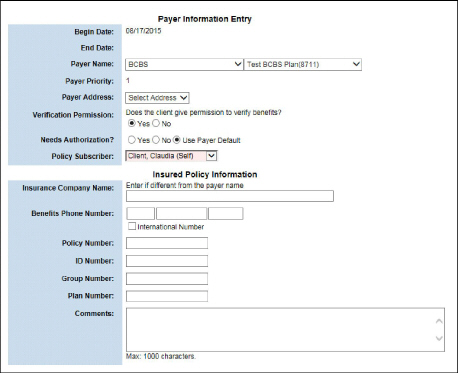
1. Navigate to Point of Entry Wizard menu > Payers > Add a Client Payer button. The Payer Information Entry page appears.
|
Verification Permission has to be marked as yes or else the record cannot be saved. Also, Payer Address must be populated or it will result in a failed claim. |
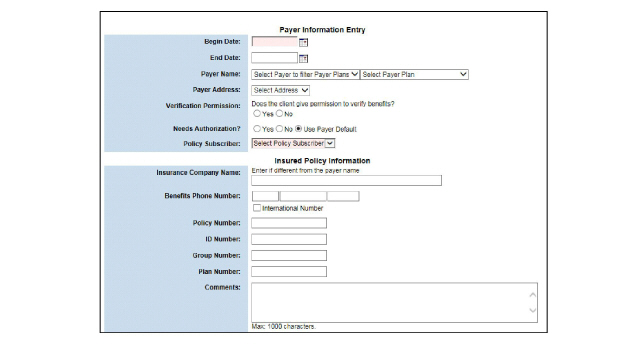
2. Fill out the required information and click Submit in the status bar. The payer record is saved and listed on the Client Payer Administration page.
Once a client's payer plan has been added to the system, users have the option to update the payer information.
1. Navigate to Point of Entry Wizard menu > Payers.
2. Click the Payer name or Policy Subscriber that corresponds with the payer plan needing updates. The Payer Information Entry page appears.
3. After making the desired edits, click Submit in the status bar. The updated client payer record is saved and listed on the Client Payer Administration page.
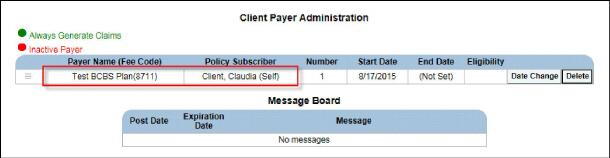
Payer messages can be added throughout the system, to communicate information to users. Messages can be added through the Message Board for other parts of the system. This occurrence of the Message Board is the only place for messages offered during POE.
1. Navigate to Point of Entry Wizard menu > Payers > Add Message.
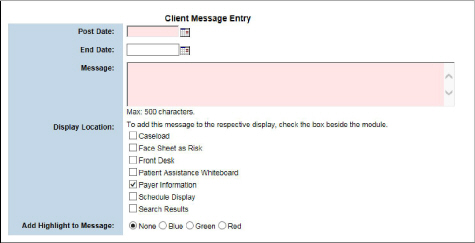
2. Fill out the applicable sections of the form and click Submit in the status bar. The client message is saved and listed in the Message Board section of the Client Payer Administration page.
Updating a Payer's Active Date Range
In order to update a payer plan's date range, the date range must cover all of the open and closed claims that have been created for the client.
1. Navigate to Point of Entry Wizard menu > Payers.
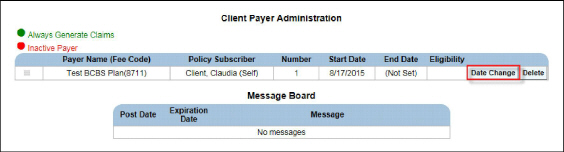
2. Click the Date Change button. The Change Client Payer Plan Dates page appears.
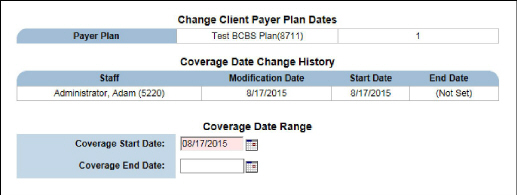
3. Enter the dates and click Submit in the status bar. The selected payer plan is updated and becomes inactive on the end date defined.
Payer plans that are associated with claims cannot be deleted. Only payer plans that have not been used in the system can be deleted.
|
If a payer plan was entered incorrectly, the billing department will need to back out all claims for that client and payer plan. |
1. Navigate to Point of Entry Wizard menu > Payers.
2. Click the Delete button that corresponds with the payer plan wanted. A confirmation pop-up appears.
3. Select OK to confirm deletion of the selected payer plan.
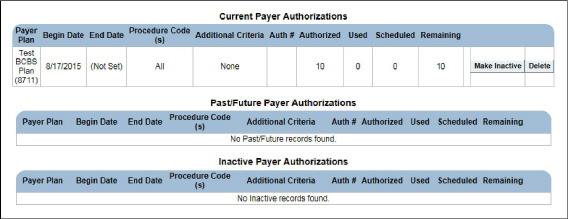
Some payer plans require authorization before providing services to clients. If a payer plan requires an authorization, the authorization number needs to be included on the claim or the payment may be denied.
1. Navigate to the Point of Entry Wizard menu > Payer Authorization. The Payer Authorizations page appears.
|
Depending on the client's payer plan, an authorization may be required before billing for services can occur. |
2. Click the Add Authorization button. The Payer Authorization Information page appears.
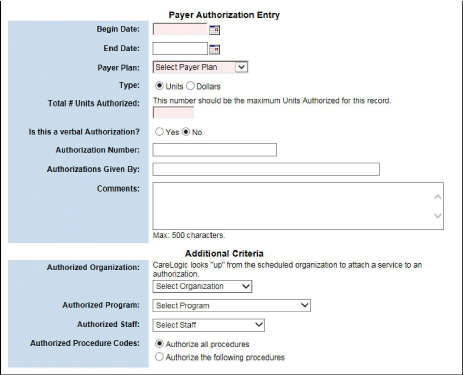
|
The Payer Plan name in previously entered authorizations cannot be modified. The staff member who created the authorization and the date it was entered cannot be modified either. If the previously entered authorization was modified before being attached to a claim, the name of the staff and the date of that modification is displayed as read-only text. |
|
Once a payer authorization record is submitted, the Claim Engine will use it to generate successful claims, as long as the service date falls within its date range, and billable units are available. If either of these conditions is not met, the Claim Engine will generate an error and move the claim into Failed Claims. |
3. Fill out the information and click Submit in the status bar. The payer authorization record is saved and listed on the Payer Authorization Information page.
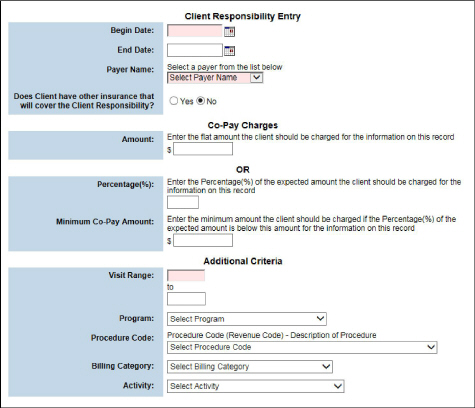
Maintaining Client Co-Pay Information
The co-pay amount is determined by the client's payer. A co-pay amount can be based on a specific dollar amount or a percentage of the bill.
1. Navigate to the Point of Entry Wizard menu > Client Responsibility. The Active Client Responsibility page appears.

This page is used to perform the following tasks:
1. Navigate to the Point of Entry Wizard menu > Client Responsibility > Add Client Responsibility button. The Client Responsibility Entry page appears.
|
If needed, the Visit Range can start with 0. |
2. Fill out the information including co-pay and click Submit in the status bar. The co-pay record is saved and listed on the Active Client Responsibility page.
1. Navigate to the Point of Entry Wizard menu > Client Responsibility.

2. Click the record desired. The Client Responsibility Entry page appears.

3. After making the desired edits, click Submit in the status bar. The updated co-pay record is saved and listed on the Active Client Responsibility page.
1. Navigate to the Point of Entry Wizard menu > Client Responsibility.
2. Click the Delete button that corresponds with the desired co-pay record. A confirmation pop-up appears.
3. Select OK to confirm the selected co-pay record should be deleted. The selected co-pay record is deleted from the system.
|
The Bed Search module is used to admit clients into inpatient/outpatient and residential programs. If a client is being treated in an outpatient program, they should be scheduled for an appointment or assigned to a caseload. |
The Bed Search module is used to assign clients to open beds. Once a client is assigned to a bed, they are scheduled for an activity and assigned to the caseload of the default per diem staff member.
1. Navigate to the Point of Entry Wizard menu > Bed Search. The Open Bed Search page appears. This page is used to enter search criteria to locate an open bed for the client.

2. Enter the information and click Submit in the status bar. The system searches for open beds that match the search criteria and displays the results on the Bed Search Results page.
|
Beds and their identifiers are set up by the system administrator before they can be displayed here. |
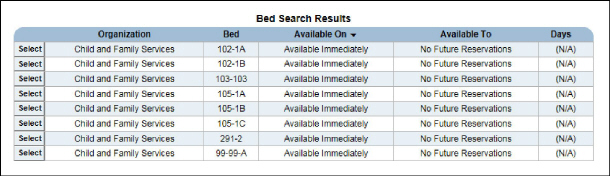
3. Click the Select button that corresponds with the desired bed. The Residential Admission page appears. This page is used to reserve the bed for the selected client.
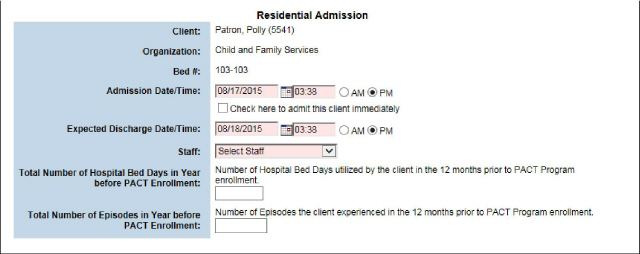
|
If the Check here to admit this client immediately box is checked, the Admission Date/Time field is hidden and the client will be admitted to the bed immediately. Otherwise, the entry of time and date are required and can be set in the past or future. |
4. Enter the information and click Submit in the status bar. The Intake Assignment page appears, which confirms that the client has been successfully assigned to a bed. This page provides a summary of the intake assignment.

|
Once the appointment is marked as Kept, the client is assigned to the treatment program and the caseload of the default per diem staff member, and a staff relationship is set up in the ECR module. |
The first step of scheduling intake assessments is to define the client's scheduling preferences, including the treatment program, the preferred organization, and the preferred staff member. After the client's scheduling preferences are entered, the system returns the available appointment times based on staff schedule blocking and the client's scheduling preferences.
Access the Schedule Appointment Module
1. Navigate to the Point of Entry Wizard menu > Schedule an Appointment. The POE Scheduling Preferences page appears.
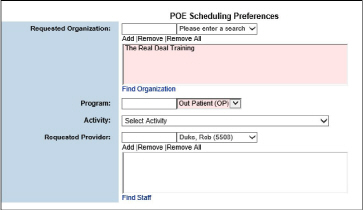
|
To bypass intake activity, click the Assign Client to Caseload button in the status bar. It is important to understand that this button does not require scheduling of an intake activity. Instead, it only allows enrollment of the client into a treatment program and assigning the client to a staff member's caseload. (See Assigning Clients Directly to a Staff Member's Caseload for more.) |
The POE Scheduling Preferences page is used to perform the following tasks:
• Schedule an Intake Assessment
• Assign a Client Directly to Staff Member's Schedule
• Assigning Clients Directly to a Staff Member's Caseload
1. Navigate to the Point of Entry Wizard menu > Schedule an Appointment.
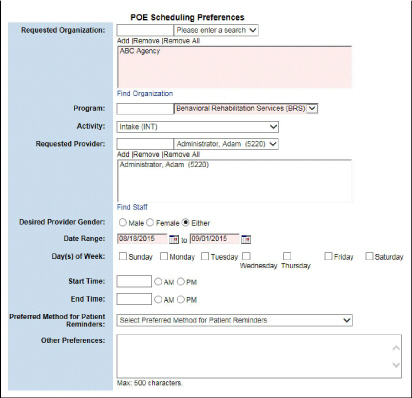
|
If the client is already active in another episode type, only the programs outside of the ones they are currently enrolled will exist in the Program dropdown. Availability of programs is also based on Org/Program mappings. |
2. Fill out needed information and click Submit in the status bar. The Available Intake Times page lists the available times that match the client's scheduling preferences.
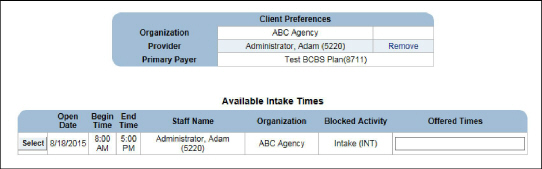
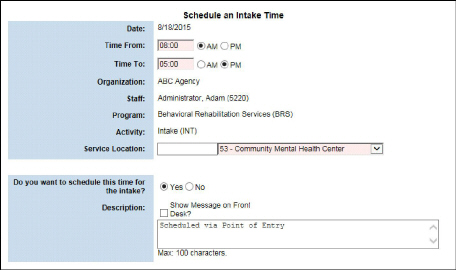
3. Select one of the available appointments. The Schedule an Intake Time page appears.
|
The Assign Client Directly to Schedule link can be clicked to schedule an appointment with a staff member who did not block off time for intake assessments. (See Assign a Client Directly to Staff Member's Schedule for more information.) |
4. Fill out the information and click Submit. A confirmation appears.

5. Once the status of the appointment is marked as Kept, the client is added to the staff member's caseload and a staff relationship record is set up in the ECR module.
|
If a scheduling error is encountered, see the Schedule Guide for instructions about resolving scheduling errors and confirming scheduling conflicts. |
Assign a Client Directly to Staff Member's Schedule
An appointment can be scheduled with any staff member if the results of the Available Intake Times page do not match the client's scheduling preferences.
1. Navigate to the Point of Entry Wizard menu > Schedule an Appointment > Submit. The Available Intake Times page appears. This page lists the available intake appointment times that match the client's scheduling preferences.

2. Click the Assign Client Directly to Schedule link. The Direct Caseload/Schedule Assignment page appears.
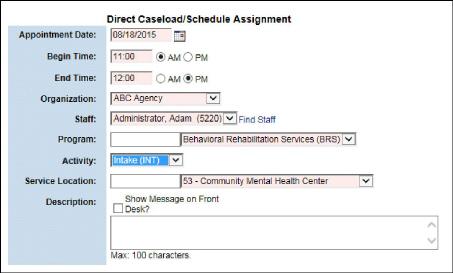
3. Fill out the information and click Submit in the status bar. If there are validation issues, the following screen will appear. The issue can be overridden or the Find Staff button can be used to search for additional staff.
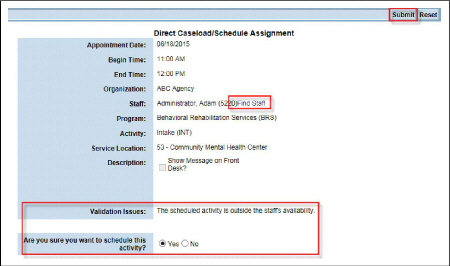
4. Once issues are resolved, confirmation that the client has been scheduled for an appointment appears. When the status of the appointment is marked as Kept, the client is added to the staff member's caseload and a staff relationship record is set up in the ECR module.

|
If a scheduling error is encountered, see the Schedule Guide for instructions about resolving scheduling errors and confirming scheduling conflicts. |
Assigning Clients Directly to a Staff Member's Caseload
Assigning the client directly to a staff member's caseload involves enrolling the client in a treatment program without scheduling services. Once this process is complete, the client's POE record is complete.
1. Navigate to the Point of Entry Wizard menu > Schedule an Appointment > Assign Client to Caseload. The Direct Caseload Assignment page appears.
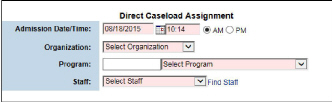
|
Some systems have an Assign to Caseload button in the Point of Entry Wizard. This will bring the user directly to this screen. |
|
If the client who is being assigned directly to the caseload is active in another episode of care, only the programs not currently associated with their episode display in the Program field. |
|
If a client moves from an un-enrolled status to an active status, the client must be discharged from their current program and begin a new episode of care with an active status. |
2. Fill out the information and click Submit in the status bar. The data on the form is saved and the client is enrolled in the selected treatment program and assigned to the selected staff member's caseload. At this point, the client's POE record is complete and their data is moved to the ECR module. The Schedule module will need to be used to schedule an appointment for the client.
Once a POE record is terminated, the staff relationship is also deleted.
1. Navigate to the Point of Entry Wizard menu > Intake Termination. The Point of Entry TSO page appears.
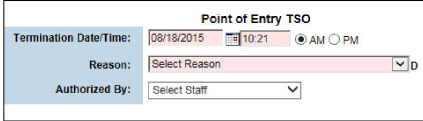
2. Fill out the information and click Submit in the status bar. The selected POE record is terminated, the client is discharged from the facility, and the staff relationship that was set up is deleted.
The ZIP code proximity search functionality, while available for use by any size agency, supports large agencies with centralized scheduling and geographically dispersed locations to ensure clients get the closest access to care. Point of Entry is used to search for intake appointments and next available appointments using Schedule Next based on the organizations closest to the client's ZIP code and program within a given radius. The client's addresses are listed in a drop-down, or the user can enter a ZIP code not listed in the client address drop-down to perform the proximity search.
|
Proximity Search functionality is not a default configuration, contact Qualifacts Support to turn on the ZIP code proximity search capability. |
The following topics are covered in this section:
• Set the Latitude and Longitude of Organizations
• Point of Entry (POE) ZIP Code Proximity Search
• Schedule Next ZIP Code Proximity Search
Set the Latitude and Longitude of Organizations
1. Navigate to Administration > Show Menu > Organizations. The Organization List screen appears.
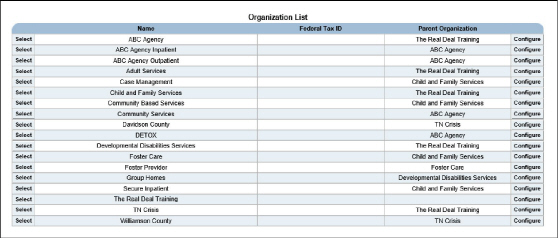
2. Locate the desired organization and click Select. The Organization Information screen appears.
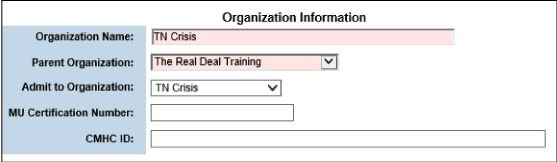
3. In the Physical Address section, record the Latitude and Longitude in their fields and click Submit.
Point of Entry (POE) ZIP Code Proximity Search
1. Navigate to the Point of Entry Wizard menu > Schedule an Appointment. The POE Scheduling Preferences screen appears.
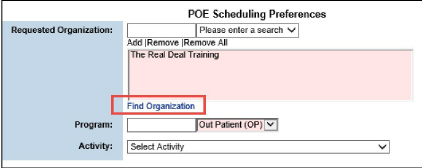
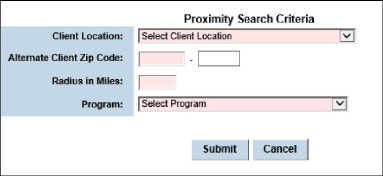
2. In the Requested Organization section, click Find Organization. The Proximity Search Criteria screen appears.
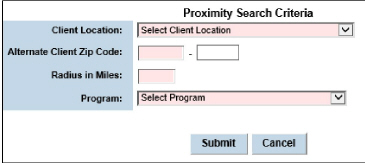
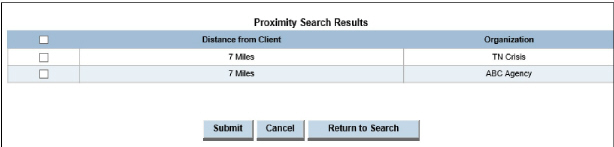
3. Select the client's address from the Client Location drop-down or use a zip code for the proximity search. Fill out Radius and Program and click Submit. The Proximity Search Results screen appears with the Distance from Client and Organization(s) listed.
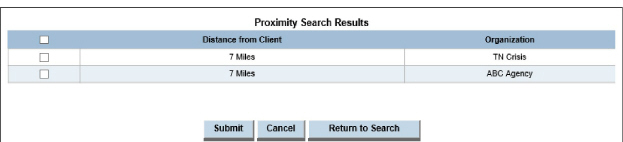
4. Check the box of the organization desired and click Submit. The Proximity Search Results screen closes and the organizations selected appear in the Requested Organization section of POE Scheduling Preferences.
5. In the Date Range section, enter the beginning and end dates for the range desired. Click Submit. The Available Intake Times screen appears. The Distance from Client column indicates how far each organization is from the client's address or ZIP code.
Schedule Next ZIP Code Proximity Search
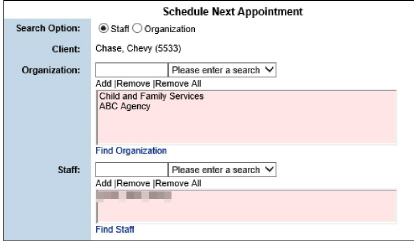
1. Navigate to the Schedule, then click the Next button for the desired client. The Schedule Next Appointment screen appears.

2. In the Organization section, click the Find Organization link. The Proximity Search Criteria screen appears.
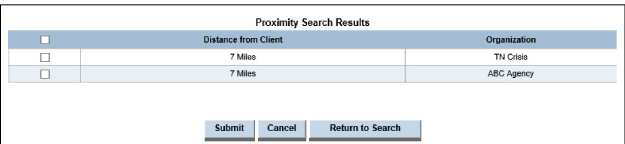
3. Select the client's address from the Client Location drop-down or use a zip code for the proximity search. Fill out Radius in Miles and Program and click Submit. The Proximity Search Results screen appears with the Distance from Client and Organization(s) listed.
4. Check the box of the organization desired and click Submit. The Proximity Search Results screen closes and the organizations selected appear in the Requested Organization section of Schedule Next Appointment.
5. Click Submit to continue the scheduling process normally.
Maintaining Point of Entry Records
This section includes the following topics:
• Searching for Point of Entry Records
• Maintaining Incomplete Point of Entry Records
• Accessing the Scheduled Point of Entry List
Searching for Point of Entry Records
The POE Search includes the clients that have been admitted into the system as well as those with an incomplete POE status.
1. Navigate to Point of Entry > Show Menu > POE Search. The POE Search page appears. The more criteria entered, the more narrow the search results will be.

2. Click Submit in the status bar. The POE Search Results page appears. It lists POE records that match the search results.

3. Click the Select button that corresponds with the desired POE record. The selected record is opened in the POE Wizard and the Client Demographics page appears. (See Entering Demographic Information.)
Maintaining Incomplete Point of Entry Records
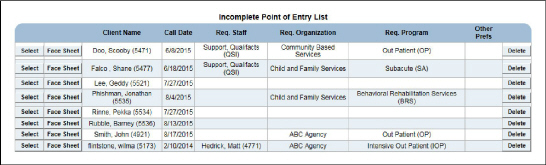
When POE records have been started through the POE Wizard, but the clients in them have not been admitted, the records are considered incomplete. In order to complete them, the client must be scheduled for an appointment, assigned to a caseload, or assigned to a bed. The Incomplete Point of Entry list provides a convenient reference for the intake staff.
1. Navigate to Point of Entry > Show Menu > Incomplete POE. The Incomplete Point of Entry List appears, which lists the incomplete POE records in the system.
Accessing the Scheduled Point of Entry List
Once a client has been scheduled for an activity, or assigned to a caseload or bed, no changes to the POE record can be made through the POE Wizard.
1. Navigate to Point of Entry > Show Menu > Scheduled POE. The Scheduled Point of Entry List page appears, which lists the POE records that have been scheduled.
