
System Administration
This section includes the following topics:
• Restrict IP Addresses Administration
• Setting Up Group Bonus Configurations
• Setting Up Fee For Service Mapping
• Using the Clinical Audit Log
• Setting Up the Client Responsibility Matrix
• Setting Up Per Diem Schedules
Restrict IP Addresses Administration
Administrators have the ability to restrict access to CareLogic based on the IP address from which the user is originating.
|
If no IP addresses are entered or no restriction records are active, remote access restrictions will not be in effect. |
|
Staff with their remote access override set to Yes will not be affected by IP restrictions. |
1. Navigate to Administration > Show Menu > Remote Access. The IP Address List appears.
2. Click the Add an IP Address button. The Remote Access IP Address Information page appears.
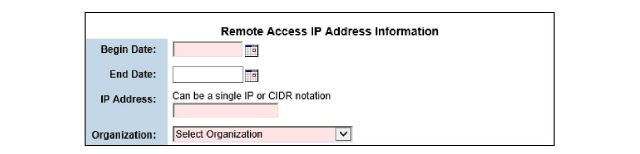
3. Fill out required fields, add the IP address, and click Submit. The IP Address is added to the Active IP Address list.

|
Be very careful that the IP Address entered is correct and not the IP for the organization. It is possible to cause the entire system to be inaccessible if an incorrect IP is entered. |
The Session Management feature is used to monitor and track ongoing staff sessions. Only users with administrator privileges have the ability to terminate active sessions. The Terminate button is disabled for a user’s own active session, a user cannot terminate their own session.
1. Navigate to Administration > Show Menu > Session Management. The Active Sessions page appears.

2. Use the filter at the top of the page to narrow the search.
3. Click the corresponding Terminate button for the staff session needing to end. A confirmation message appears.

4. Click Yes to confirm, and click Submit in the status bar. The active session is terminated.
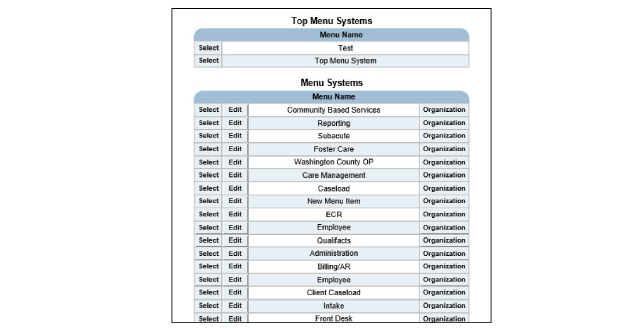
The menu management system is used to configure the CareLogic navigation bar and options that are available when the Show Menu arrow in the status bar is clicked. The menu management system consists of the following five levels:
• Top Menu Systems - Used to configure the top-level menu systems that appear in the navigation bar.
• Menu Systems - Used to configure the menu systems.
• Button Systems - Used to configure the buttons on the right side of the navigation bar.
• Wizards - Used to configure the main wizards that appear in the system: Point of Entry, Staff, Payer Plan, Payer Collections, and Guarantor Collections.
• Tabbed Forms - Used to configure the tabbed forms that appear in the system: Payment Entry and Claim Maintenance.
Prior to configuring the menu management system, system administrators should be aware of the following information:
• Privileges should be defined for each menu item. By default, there are no privileges assigned to the menu items.
• Administrators are considered super users and can see all menu items. In order to confirm menu option items, administrators should set up a lower-level user account and log in to the system using this account.
• There is more than one way to access certain areas of the system. Administrators should consider this fact when setting up privileges in order to maintain its integrity.
For each menu level, the menu management system is used to perform the following tasks:
• Setting Up Menu Items by Organization
• Defining Privilege Levels for Menu Items
• Changing the Order of Menu Items
Setup for Top-Level Menu systems differs from lower levels.
Add a Top-Level Menu System
1. Navigate to Administration > Show Menu > Menu Management. The Menu Management page appears.
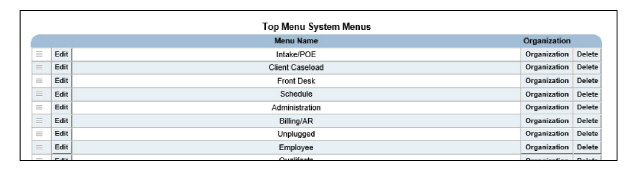
2. Click Select on Top Menu System. The Top Menu System Menus will appear.
3. Click Add an Entry in the status bar. The Edit Menu Entry page appears.
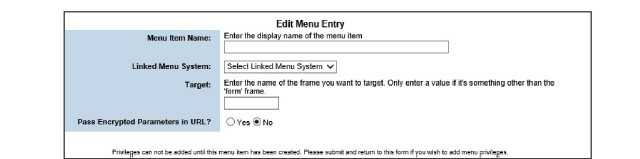
4. Fill out the needed information and click Submit.
Add a Lower-Level Menu System
1. Navigate to Administration > Show Menu > Menu Management. The Menu Management System appears.
2. Click the Add a System button in the status bar. The Menu System Administration page appears.
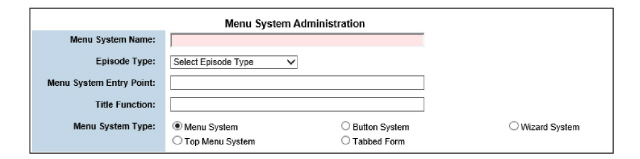
3. Fill out the needed information and click Submit.
1. Navigate to Administration > Show Menu > Menu Management. The Menu Management System appears. Each item within the menu management system contains a Select button which is used to drill-down into the item.
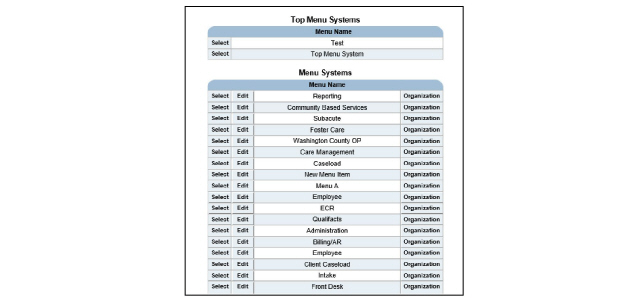
2. Click the Select button of the menu system desired. The selected item is opened and the corresponding page appears. In the following example, the Select button for the Schedule menu system was selected and the Schedule System Menus page appears.

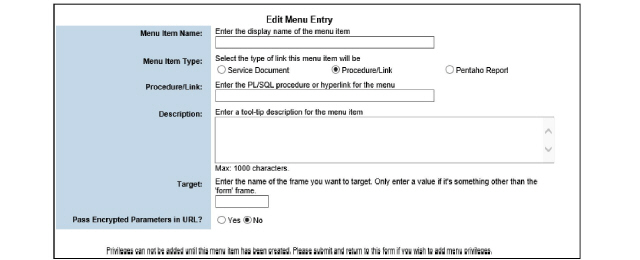
1. Navigate to Administration > Show Menu > Menu Management > Drill down through the menu and sub-menus until the desired menu destination is open and click Add an Entry. The Edit Menu Entry page appears.

2. Complete the needed information and click Submit. The item is added to the menu.

Some practices have an external website they wish to link to CareLogic. To maintain HIPAA security, CareLogic requires an encrypted link to non-CareLogic sites. External links will open in a new window, keeping CareLogic active.
1. Navigate to Administration > Show Menu > Menu Management > Drill down through the menu and sub-menus until the desired menu destination is open and click Add an Entry. The Edit Menu Entry page appears.
2. Complete the needed information and click Submit. The item is added to the menu.

3. Click the Edit button for the menu entry just created. On the Edit Menu Entry page, in the Pass Encrypted Parameters URL field, select Yes. Three new fields will be displayed.
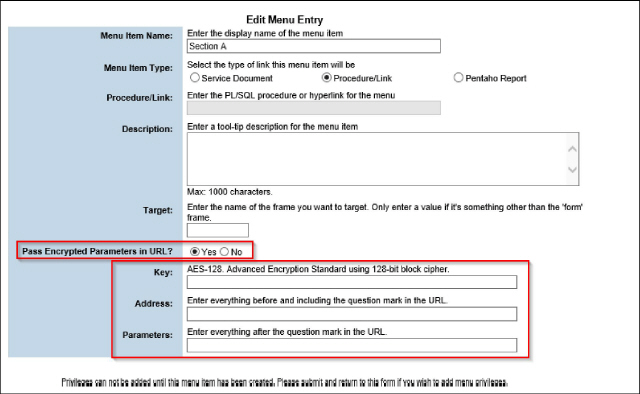
4. Fill out the extra fields and click Submit.
1. Navigate to Administration > Show Menu > Menu Management. The Menu Management System appears. Each item within the menu management system contains a Select button which is used to drill-down into the item.
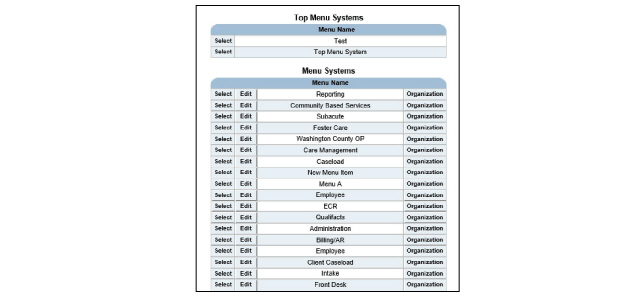
2. Click the Select button of the menu system desired. The selected item is opened and the corresponding page appears. In the following example, the Select button for the Schedule menu system was selected and the Schedule System Menus page appears.

3. Click the Edit button of the menu item needing edits. The Edit Menu Entry page appears.
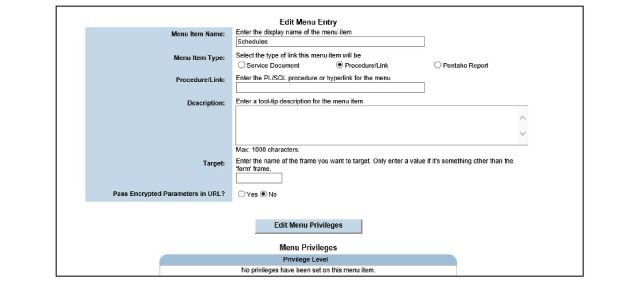
4. Fill out the needed information and click Submit in the status bar. The updated menu item is saved and listed on the previous page.
Setting Up Menu Items by Organization
The menu management system gives an organization the flexibility to have a unique menu system that is specific to its workflow.
|
By default, parent organizations can see the configurations of child organizations, but the child organization cannot see the configurations of parent organizations. |
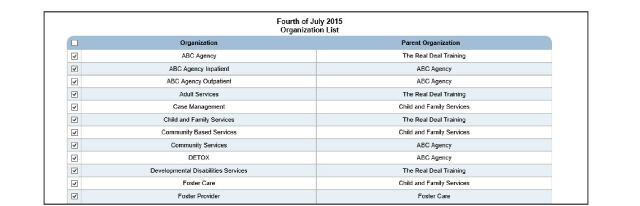
1. Navigate to Administration > Show Menu > Menu Management > Drill down into the menu system, wizard, or tabbed form to be set up by organization and click its Organization button. The Menu Organization List page appears for the selected item.

2. Check the boxes of the organizations needing association with the menu and click Submit in the status bar. The menu item organization matrix record is saved.
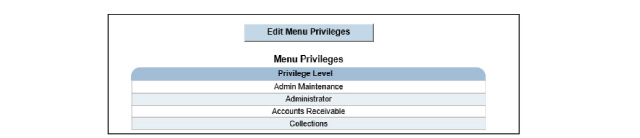
Defining Privilege Levels for Menu Items
Once a privilege level is defined for a menu item, individual staff members assigned to the privilege level are granted access according to that level.
1. Navigate to Administration > Show Menu > Menu Management > Drill down into the menu item needing privilege levels and click its Edit button. The Edit Menu Entry page appears.
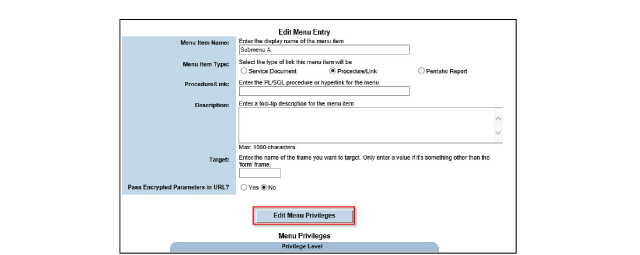
2. Click the Edit Menu Privileges button. The Add Privilege Level page appears.
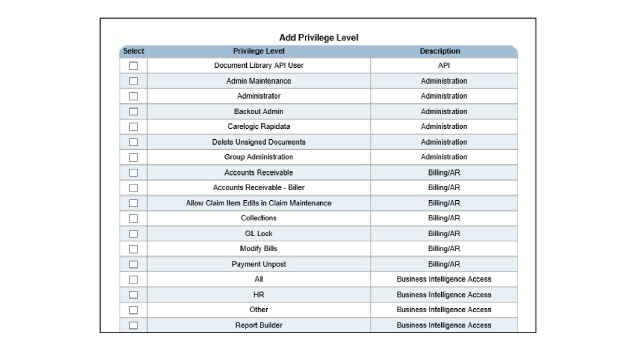
3. Select the privilege levels needing access to the selected menu item and click Submit in the status bar. The privilege levels selected are saved and listed on the Edit Menu Entry page.
Changing the Order of Menu Items
1. Navigate to Administration > Show Menu > Menu Management > Drill down to the menu item needing a change in its order.

2. Hover over the location button until the four-arrow icon is displayed, then drag the menu item to its new place.


1. Navigate to Administration > Show Menu > Menu Management > Drill down to the menu item needing deletion and click its Delete button. A confirmation prompt appears.
2. Click OK to delete the selected menu item. The deleted menu item is removed from the CareLogic system.
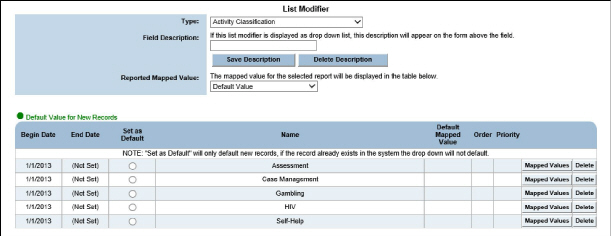
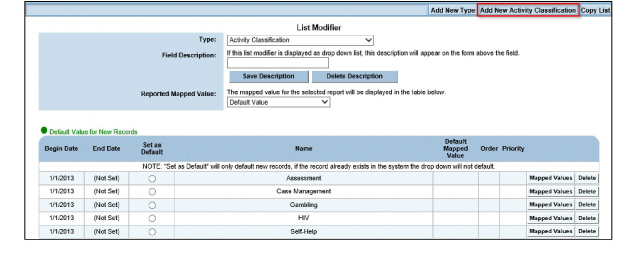
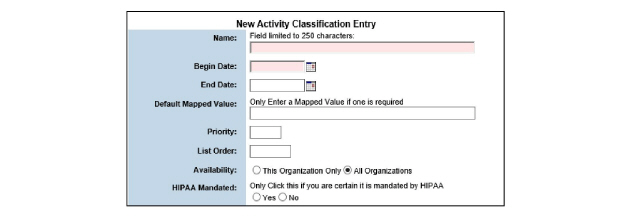
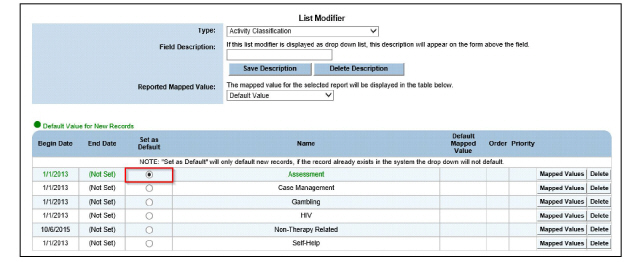
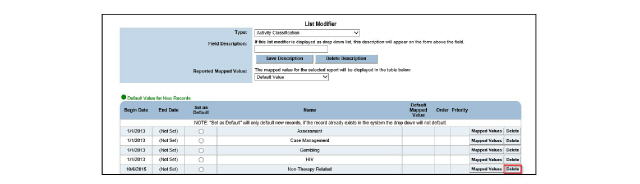
The List Modifier page is used to maintain descriptor fields, sometimes called list modifiers. Descriptor fields are recognizable to administrators only. Administrators see a D at the end of descriptor fields. When the D is hovered over, a descriptor is displayed. The descriptor is the name by which the field is identified in the List Modifier page.
The List Modifier page is used to perform the following tasks:
• Set a Descriptor as the Default
1. Navigate to Administration > Show Menu > Descriptors. The List Modifier page appears.

2. In the Type field, use the drop-down list to select the list type desired. The List Modifier page is refreshed and the selected list type appears.
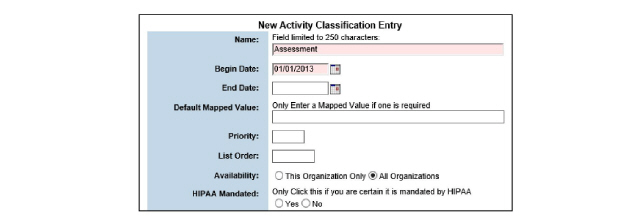
1. Navigate to Administration > Show Menu > Descriptors > Add New Type. The New Entry page appears.
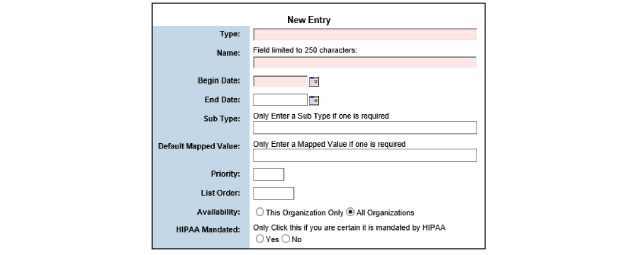
2. Fill out the needed information and click Submit. The List Modifier page appears. The new descriptor will now appear in the List Modifier Type dropdown.
1. Navigate to Administration > Show Menu > Descriptors > Use the drop-down list to select the Type desired. The List Modifier page appears displaying the Type selected.
2. Click the Add New (Descriptor) button. The New (Descriptor) Entry page appears.
|
The Add New (Descriptor) button name will change based on the list type selected. Do not confuse it with the Add New Type button, which will create a new type. |
3. Fill out the needed information and click Submit in the status bar. The new descriptor is saved and listed on the List Modifier page.
Set a Descriptor as the Default
Only one descriptor may be set as the default selection.
1. Navigate to Administration > Show Menu > Descriptors > Use the drop-down list to select the list modifier type that contains the descriptor needing to be set as the default.
2. In the Set as Default column, click the radio button for the desired descriptor. The selected descriptor is highlighted in green, which indicates it is the default selection.
|
The copy feature will not copy into an existing type. It will only copy as it creates a new type. |
1. Navigate to Administration > Show Menu > Descriptors > Copy List. The List Copy page appears.

2. Fill out the needed information and click Submit. A new type is created and descriptors populated from the type selected. Descriptors can be edited or removed as needed for the new type.
1. Navigate to Administration > Show Menu > Descriptors > Use the drop-down list to select the list modifier type that contains the descriptor needing editing.
2. Click the descriptor needing edits. The New (Descriptor) Entry page appears.
3. Make desired changes. Click Submit to save. The selected descriptor is updated.
1. Navigate to Administration > Show Menu > Descriptors > Use the drop-down list to select the list modifier type that contains the descriptor needing deletion.
2. Click the Delete button for the list modifier descriptor desired. A confirmation page appears.
3. Select OK to confirm deletion. The selected list modifier descriptor is deleted. It will no longer appear as a drop-down list descriptor for the selected list modifier type.
1. Navigate to Administration > Show Menu > Privilege Groups. The Privilege Level Groups page appears.
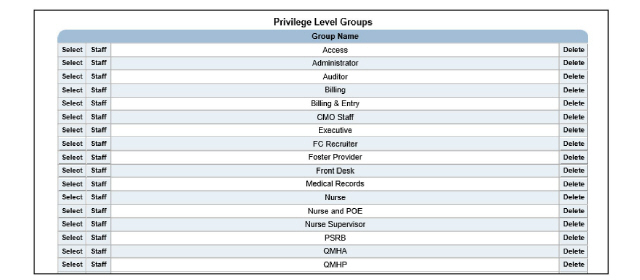
2. Click the Add Privilege Group button in the status bar. The Privilege Level Group Entry page appears.
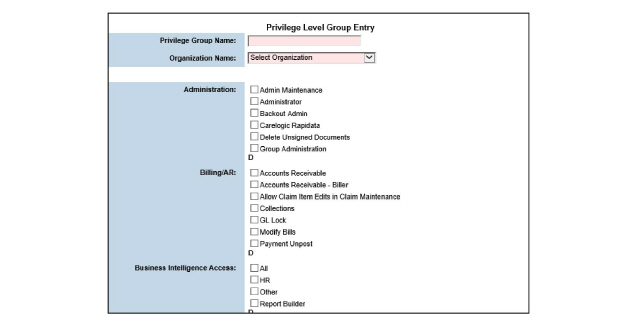
3. Fill out the needed information and click Submit in the status bar. The new privilege group is created and listed on the Privilege Level Groups page.
The main dashboard displayed on login is simply called Dashboard in Dashboard Administration. The Face Sheet, Patient Portal, and Claims Snapshot are also considered “dashboards.”
Once default Dashboard settings have been configured, they apply to every new user. Individual users can override the default settings for their personal Dashboard page by clicking the Configure On button from their personal dashboard.
1. Navigate to Administration > Show Menu > Dashboard Administration. The Dashboard Administration wizard appears.
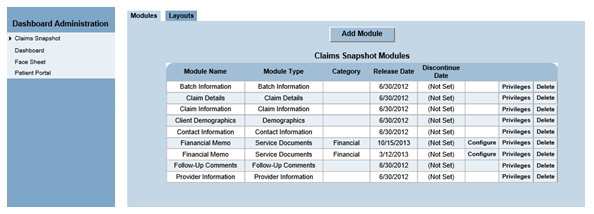
2. The configurable dashboards in the system are represented in the wizard. Click the dashboard needing configuration. The Modules page appears for the selected dashboard.
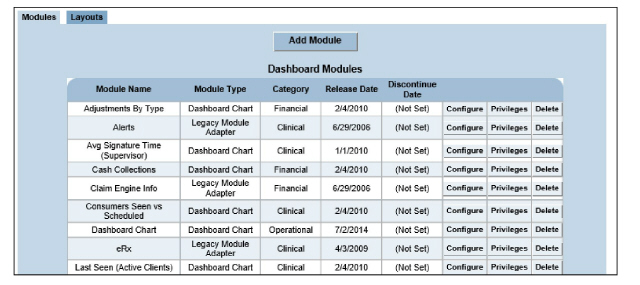
This page is used for the following tasks:
• Configuring Dashboard Modules
• Privileging Dashboard Modules
1. Navigate to Administration > Show Menu > Dashboard Administration > Pick the dashboard needing an update > Add Module. The (Dashboard) Module Form appears.
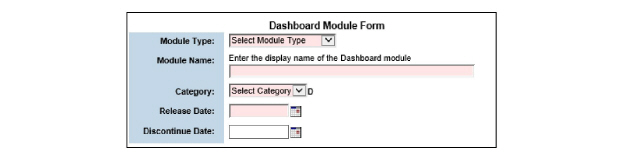
2. Fill out the needed information and click Submit in the status bar. The module is added to the Dashboard Modules page.
1. Navigate to Administration > Show Menu > Dashboard Administration > Pick the dashboard needing an update > Click the desired module. The (Dashboard) Module Form appears.
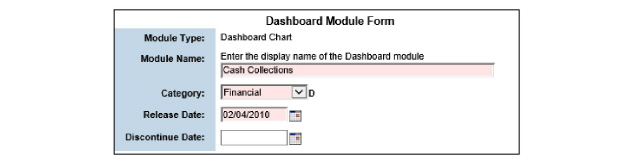
2. Make desired changes and click Submit. The changes are saved and reflected on the Modules page.
1. Navigate to Administration > Show Menu > Dashboard Administration > Pick the dashboard needing an update > Click the Configure button for the desired module. The Configure (Name) Module page appears.

2. Fill out the needed information and click Submit.
Privilege levels may be set to limit who can view certain parts of the Face Sheet. By default, Uses Privileges is set to No, allowing all users to view the module. Privileges do not need to be set unless a restriction is desired.
1. Navigate to Administration > Show Menu > Dashboard Administration > Pick the dashboard needing an update > Click the Privileges button for the desired module. The Privileges page appears.

2. Check Yes in Uses Privileges, select desired privilege levels and click Submit. The privileges are saved.
1. Navigate to Administration > Show Menu > Dashboard Administration > Pick the dashboard needing an update > Click the Delete button for the desired module. A confirmation window will appear.
2. Click OK to confirm deletion. The module is removed from Dashboard Administration and from any layouts in which it was included.
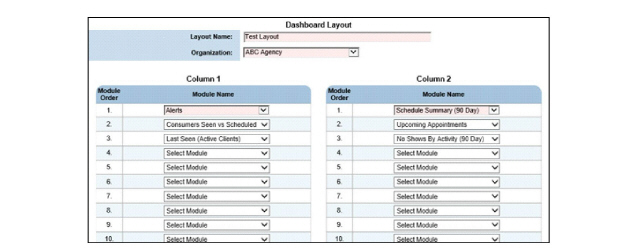
1. Navigate to Administration > Show Menu > Dashboard Administration > Pick the dashboard needing an update > Click the Layouts tab in the upper left hand corner of the page. The Dashboard Layouts page appears.
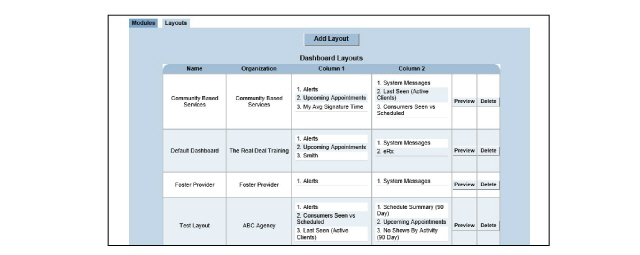
2. Click Add Layout. The Dashboard Layout page appears.
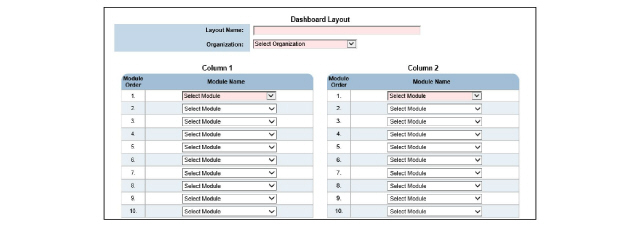
3. Select modules desired and arrange them in the two columns provided. The order modules are added here are representative of the visual display that will be seen on the actual dashboard. Click Submit. The new layout is listed on the Dashboard Layouts page.
1. Navigate to Administration > Show Menu > Dashboard Administration > Pick the dashboard needing an update > Click the Layouts tab in the upper left hand corner of the page. The Dashboard Layouts page appears.
2. Click the desired layout. The Dashboard Layout page appears.
3. Make desired changes and click Submit. Associated dashboards will be displayed with the changed layout.
1. Navigate to Administration > Show Menu > Dashboard Administration > Pick the dashboard needing an update > Click the Layouts tab in the upper left hand corner of the page. The Dashboard Layouts page appears.
2. Click the Delete button for the desired layout. A confirmation window will appear.
3. Confirm deletion. The layout is removed from Dashboard Layouts.
System messages appear on staff members’ Dashboard pages. System messages provide a convenient way of communicating company information to staff members.
1. Navigate to Administration > Show Menu > System Messages. The System Messages page appears.
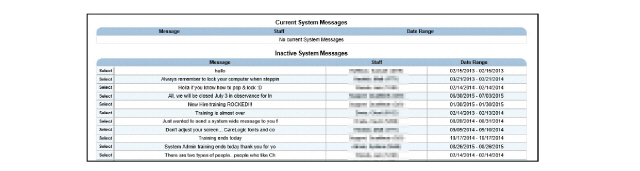
2. Click New Message in the status bar. The System-Wide Message Form appears.
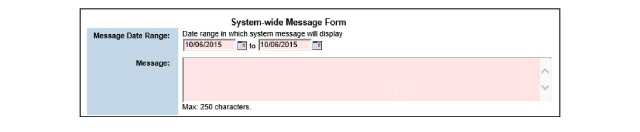
3. Fill out the form and click Submit. The message will appear in the System Messages portion of the dashboard.
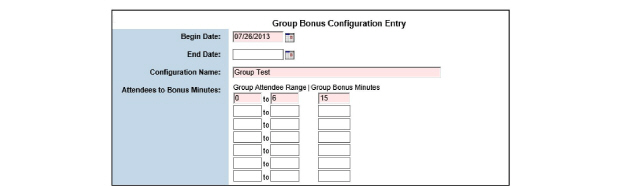
Setting Up Group Bonus Configurations
Group bonus minutes add time to a session depending on the amount of people in the group, because the group will need that time to accommodate the extra people. Group bonus minutes are awarded based on the number of group attendees. This section describes how to allow bonus minutes to be configured and tied to groups based on the number of group attendees.
1. Navigate to Administration > Show Menu > Group Bonus Configuration. The Fee For Service Group Bonus Configuration page appears.

This page is used to complete the following tasks:
• Adding Group Bonus Configurations
• Updating Group Bonus Configurations
• Deleting Group Bonus Configurations
Adding Group Bonus Configurations
1. Navigate to Administration > Show Menu > Group Bonus Configuration > Add Configuration in the status bar. The Group Bonus Configuration Entry page appears.
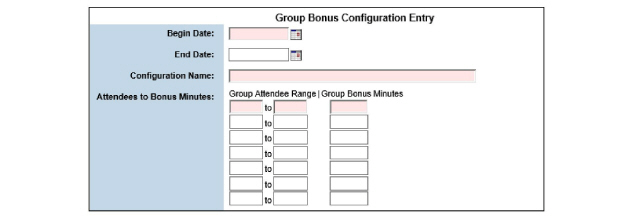
2. Fill out the needed information and click Submit in the status bar.
Updating Group Bonus Configurations
1. Navigate to Administration > Show Menu > Group Bonus Configuration > Click the Select button for the group bonus configuration record needing edits. The Group Bonus Configuration Entry page changes to edit mode.
2. After making the desired edits, click Submit in the status bar. The group bonus configuration record is updated and listed on the Fee For Service Group Bonus Configurations page.
Deleting Group Bonus Configurations
1. Navigate to Administration > Show Menu > Group Bonus Configuration > Click the Delete button for the desired record. The Delete Group Bonus Configuration confirmation page appears.

2. Select Yes to confirm deletion and click Submit in the status bar. The selected record is removed from the system and is no longer displayed.
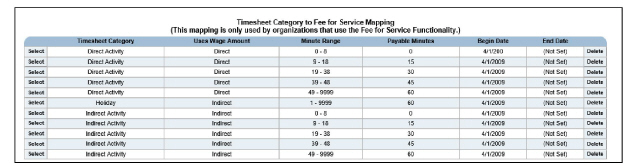
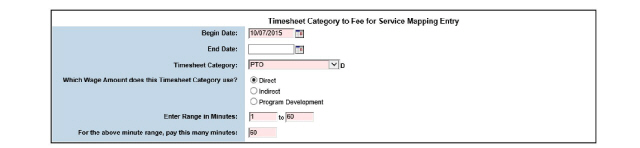
Setting Up Fee For Service Mapping
Activities measured in Unit/Hours require a timesheet category that is mapped to a range of minutes and a fee for service wage amount. They are used to calculate the dollar value of the total payable minutes using the mapped wage amount type.
1. Navigate to Administration > Show Menu > Fee for Service Mapping. The Timesheet Category to Fee for Service Mapping page appears.
This page is used to complete the following tasks:
• Adding Fee For Service Mappings
• Updating Fee For Service Mappings
• Deleting Fee For Service Mappings
Adding Fee For Service Mappings
|
The Timesheet Category descriptor must be populated in order to add Fee for Service Mappings. |
1. Navigate to Administration > Show Menu > Fee for Service Mapping > Click Add Mapping in the status bar. The Timesheet Category to Fee for Service Mapping Entry page appears.
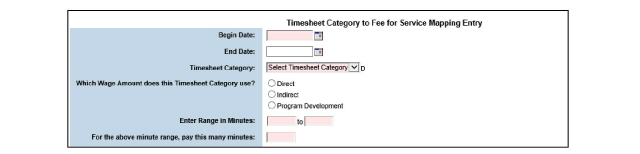
2. Fill out the needed information and click Submit in the status bar. The fee for service mapping is saved to the system and listed on the Timesheet Category to Fee for Service Mapping page.
Updating Fee For Service Mappings
1. Navigate to Administration > Show Menu > Fee for Service Mapping > Click the Select button for the fee for service mapping needing edits. The Timesheet Category to Fee for Service Mapping Entry page changes to edit mode.
2. After making the desired edits, click Submit in the status bar. The fee for service mapping is updated and listed on the Timesheet Category to Fee For Service Mapping Entry page.
Deleting Fee For Service Mappings
1. Navigate to Administration > Show Menu > Fee for Service Mapping > Click the Delete button for the fee for service mapping needing deletion. A delete confirmation page appears.

2. Select Yes to confirm deletion.
3. Click Submit in the status bar. The selected mapping is removed from the system and no longer displayed on the Timesheet Category to Fee For Service Mappings page.
|
The Audit Log can only be used to search the last 90 days of activity for a client’s record. Attempting to enter a Begin Date older than the previous 90 days results in a pop-up message the earliest date the search can begin. Client record activity older than 90 days is archived. |
1. Navigate to Administration > Show Menu > Audit Log. The Audit Log page appears.
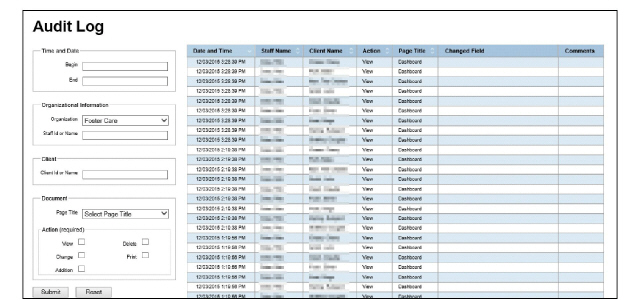
2. Fill out the filter information and click Submit. The screen refreshes with the requested information. The Audit Log results page can be exported as a spreadsheet by clicking the Export to Excel button in the status bar.
Setting Up the Client Responsibility Matrix
The Client Responsibility Matrix allows the definition of standard co-pay dollar amounts or co-insurance percentage amounts based on individual procedure codes.
1. Navigate to Administration > Show Menu > Client Responsibility Matrix. The Client Responsibility Matrix page appears.

This module is used to perform the following tasks:
• Adding Client Responsibility Matrices
• Updating Client Responsibility Matrices
• Associating Payer Plans with Client Responsibility Matrices
• Deleting Client Responsibility Matrices
Adding Client Responsibility Matrices
1. Navigate to Administration > Show Menu > Client Responsibility Matrix > Add Client Responsibility Matrix in the status bar. The Client Responsibility Matrix Entry page appears.
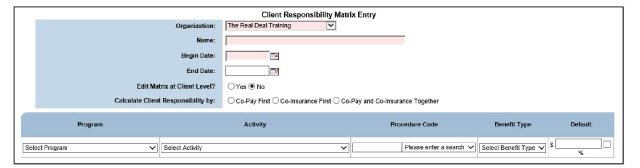
2. Fill out the needed information and click Submit in the status bar. The matrix is saved to the system and listed on the Client Responsibility Matrix page.
Updating Client Responsibility Matrices
1. Navigate to Administration > Show Menu > Client Responsibility Matrix > Click the Client Responsibility Matrix needing an update. The Client Responsibility Matrix Entry page appears.
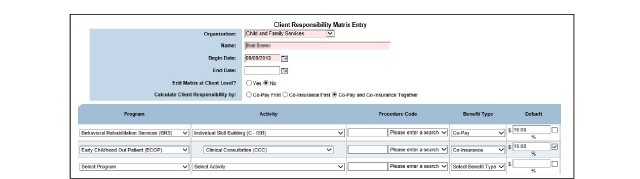
2. Update the values on this page as desired and click Submit in the status bar. The updated record is saved and listed on the Client Responsibility Matrix page.
Associating Payer Plans with Client Responsibility Matrices
1. Navigate to Administration > Show Menu > Client Responsibility Matrix > Click the Payer Plans button for the Client Responsibility Matrix that needs to be associated with a payer plan. The Payer Plan Entry page appears.
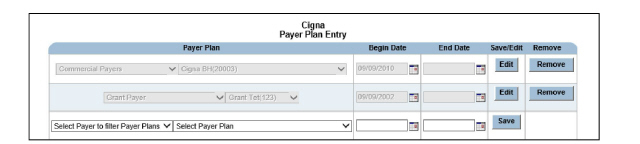
2. Fill out the needed information and click the Save button to associate the selected payer plan to the Client Responsibility Matrix record. A new row appears to allow the association of the matrix record with additional payer plans.
|
If a previously entered payer plan needs to be deleted, click the Remove button to cancel the entry for that row. The Remove button only appears for payer plans not currently tied to client records. |
Deleting Client Responsibility Matrices
1. Navigate to Administration > Show Menu > Client Responsibility Matrix > Click the Delete button for the matrix record needing deletion. A delete confirmation page appears.
2. Select OK to confirm deletion. The record is deleted and removed from the Client Responsibility Matrix page.
When setting up basic per diem programs and activities in CareLogic, no distinction is made between weekdays and weekends. The Per Diem Schedule allows the exclusion of specific days of the week for billing.
For example, if per diem charges are related to school-based services, it may be that an agency would only bill for Monday through Friday and would like to exclude Saturdays and Sundays. The Per Diem Schedule allows the system to only bill for weekdays and to exclude any weekends.
1. Navigate to Administration > Show Menu > Per Diem Schedule. The Per Diem Schedule page appears.

This module is used to perform the following tasks.
• End Dating Per Diem Schedules and Removing Non-Billed Days
• Adding Non-Billed Days to a Per Diem Schedule
1. Navigate to Administration > Show Menu > Per Diem Schedule > Add Per Diem Schedule in the status bar. The Per Diem Schedule page appears.

2. Fill out the needed information and click Submit in the status bar. The per diem schedule is saved and listed on the Per Diem Schedule page.
End Dating Per Diem Schedules and Removing Non-Billed Days
1. Navigate to Administration > Show Menu > Per Diem Schedule > Click the Select button for the per diem schedule needing an end date.
2. Locate the per diem schedule needing an end date and click its Select button. The Per Diem Schedule page appears. Only End Date and Non-Billed Days Name can be modified or removed.
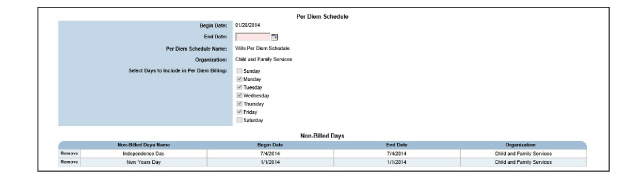
3. Update the values on this page as desired and click Submit in the status bar. The updated record is saved and listed on the Per Diem Schedule page.
Adding Non-Billed Days to a Per Diem Schedule
1. Navigate to Administration > Show Menu > Per Diem Schedule > Add Non-Billed Day in the status bar. The Non-Billed Days page appears.
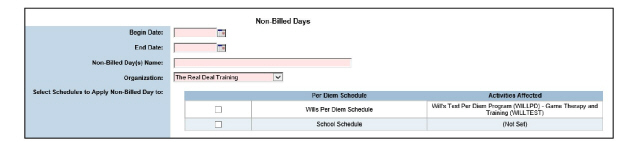
2. Fill out the needed information and click Submit in the status bar. The schedule is saved and listed on the Per Diem Schedule page.
1. Navigate to Administration > Show Menu > Per Diem Schedule > Click the Delete button for the per diem schedule needing deletion. A delete confirmation page appears.

2. Select Yes to confirm deletion.
3. Click Submit in the status bar. The per diem schedule is deleted and removed from the Per Diem Schedule page.
HL-7 is an international standard for data exchange between computer systems, and CareLogic offers the ability to export data using an HL-7 batching process that can be set up to run on a nightly basis or can be run manually as needed.
|
The HL-7 Batch option is used to batch immunization records to be submitted to immunization registries. |
The batch option is also used to batch syndromic surveillance for clinical information that is shared and used to drive decisions about health policy and health education.
|
The HL-7 Batch page does not display any batches by default. Enter search parameters at the top of the page and click Submit in the status bar to display HL-7 batch files. |
1. Navigate to Administration > Show Menu > HL7 Batch. The HL7 Batches page appears.
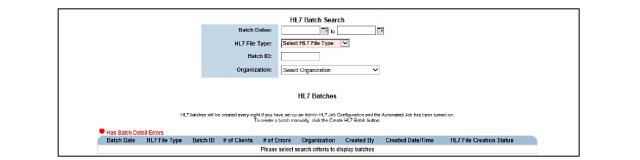
This page is used to complete the following tasks:
• Adding HL-7 Automated Job Configuration
• Manually Creating HL-7 Batches
• Accessing Records Included in HL-7 Batches
Adding HL-7 Automated Job Configuration
The HL-7 Automated Job Configuration allows creation of a daily HL-7 batch file that captures new clients and client changes since the previous batch run. There is no need for an agency to manually create HL-7 batches on a daily basis if an automated batch configuration has been set up.
1. Navigate to Administration > Show Menu > HL7 Automated Job Configuration. The HL7 Automated Job Configurations page appears.

2. Click Add HL7 Configuration in the status bar. The HL7 Job Configuration Entry page appears.
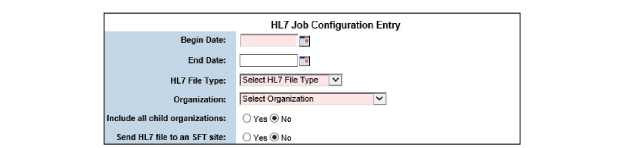
3. Fill out the needed information and click Submit in the status bar. The HL-7 Automated Job Configuration is saved to the system and listed on the HL7 Automated Job Configurations page and begins running on a nightly basis as of the Begin Date entered in the job configuration setup.

Manually Creating HL-7 Batches
1. Navigate to Administration > Show Menu > HL7 Batch > Create HL7 Batch. The Manual HL7 Batch Creation page appears.

2. Fill out the needed information and click Submit in the status bar. The HL-7 batch is created and listed on the HL-7 Batch page.
Accessing Records Included in HL-7 Batches
1. Navigate to Administration > Show Menu > HL7 Batch > Pick the HL7 File Type and click Submit > Click the Select button for the desired HL-7 batch. The HL7 Batch Detail page appears, listing client records included in the HL7 batch file.

1. Navigate to Administration > Show Menu > HL7 Batch > Pick the HL7 File Type and click Submit > Click the Download HL7 button for the batch needing to be downloaded. A browser pop-up prompts to save the HL-7 batch file.
1. Navigate to Administration > Show Menu > HL7 Batch > Pick the HL7 File Type and click Submit > Click the Delete button for the batch file needing deletion. A delete confirmation page appears.

2. Select Yes to confirm deletion and click Submit in the status bar. The selected batch file is removed from the system and is no longer displayed on the HL-7 Batch page. Any records associated with that batch file are now eligible to be batched as part of the next HL-7 batching process.
CareLogic allows providers to export their CareLogic schedules to Outlook, Google Calendar, or iCal calendars to view scheduled appointments when not logged into CareLogic.
Before users begin exporting their iCal feeds to second party calendars, the format of exported appointments should be set up to secure client and staff information.
At least one format string needs to be included in the Subject and Location fields.
|
The iCalendar feed is only a one-way transmission of schedule information. The CareLogic schedule can be displayed in second party calendars, but second party calendar appointments do not flow back into CareLogic. |
1. Navigate to Administration > Show Menu > iCalendar. The iCalendar page appears, displaying the default settings for the organization’s iCal feed.
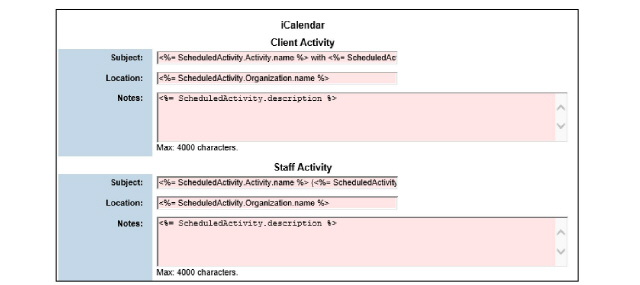
2. To remove information that is included in the iCal feed by default, highlight the text, and push Delete on the keyboard.
|
For example, if the client’s first name is not wanted in the iCal feed, highlight <%= ScheduledActivity.Client.firstName %> and delete it from the Subject field. |
3. To add information to the feed, copy and paste the information strings below into the Subject or Location fields of the calendar.
Activity Name: <%= ScheduledActivity.Activity.name %>
Activity Code: <%= ScheduledActivity.Activity.code %>
Activity Count: <%= ScheduledActivity.count %>
Activity Description: <%= ScheduledActivity.description %>
Activity Status: <%= ScheduledActivity.status %>.
Client Full Name: <%= ScheduledActivity.Client.fullName %>
Client First Initial: <%= ScheduledActivity.Client.firstInitial %>
Client Middle Initial: <%= ScheduledActivity.Client.middleInitial %>
Client Last Initial: <%= ScheduledActivity.Client.lastInitial %>
Client First Name: <%= ScheduledActivity.Client.firstName %>
Client Middle Name: <%= ScheduledActivity.Client.middleName %>
Client Last Name: <%= ScheduledActivity.Client.lastName %>
Client Number: <%= ScheduledActivity.Client.clientNumber %>
Client ID: <%= ScheduledActivity.Client.clientId %>
Client Primary Phone #: <%= ScheduledActivity.Client.primaryPhone %>
Organization Name: <%= ScheduledActivity.Organization.name %>
Organization Short Name: <%= ScheduledActivity.Organization.shortName %>
Organization Code: <%= ScheduledActivity.Organization.code %>
The default iCal feed for client appointments appears in the format of the following example:
Subject: “Individual Therapy with Lisa (Kept)”
Location: “CareLogic University”
If it is preferred to not include the client’s first name in the export information, it can be replaced with the client’s ID number.
Highlight the string <%= ScheduledActivity.Client.firstName %> and delete it from the Subject field. Then, replace the deleted format string with the Client ID string <%= ScheduledActivity.Client.clientId %>.
The new iCal feed format would appear in the following manner:
Subject: “Individual Therapy with 2569871 (Kept)”
Location: “CareLogic University”
1. Navigate to Administration > Show Menu > Holiday Administration. The Holiday Administration screen appears.

2. Click Add Holiday. The Schedule a Holiday screen appears.

3. Fill out the needed information and click Submit. The Holiday Administration screen reappears, and the holiday is listed.

4. To assign the holiday to the organization, click Organization. The holiday’s Organization List screen appears.
5. Mark the organizations’ checkboxes that will observe this holiday and click Submit. The Holiday Administration screen reappears.
6. To apply this holiday to per diem schedules, click Per Diem. The Apply [holiday] to Per Diem Schedules screen appears.

7. If this holiday will be non-billable, mark the Non-Billable? checkbox.
8. Click Submit. Changes are saved on the Holiday Administration page.
This chapter is used to set up the administration modules for employees. The following topics are included in this chapter:
1. Navigate to Administration > Show Menu > Staff Benefits. The Benefit Type List page appears.

2. Click the Select button for the benefit type needing set up. The Benefit Carrier List appears.

3. Click the Add (type) Benefit Carrier button in the status bar. The (type) Benefit Rate Entry page appears for the selected benefit.

4. Fill out the needed information and click Submit in the status bar. The Rate Entry page appears.
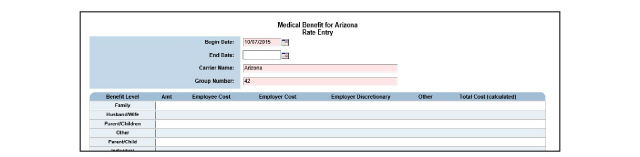
5. In the Benefit Level column, click the button of the benefit level desired. The Rate Entry page appears.

6. Fill out the needed information and click Submit in the status bar. The rate entry information is saved and listed on the Rate Entry page.
The process of assigning employees to training instances involves the following steps:
• Setting Up Training Instances
• Assigning Employees to Training Instances
1. Navigate to Administration > Show Menu > Staff Training. The Training Administration page appears.

This page is used to perform the following tasks:
1. Navigate to Administration > Show Menu > Staff Training > Add Training. The Training Entry page appears.
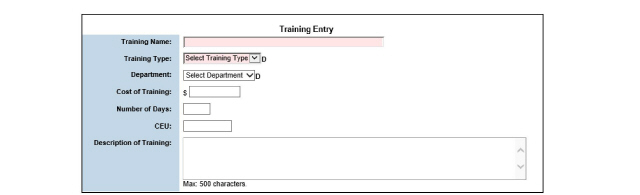
2. Fill out the needed information and click Submit in the status bar. The training record is saved and listed on the Training Administration page.
1. Navigate to Administration > Show Menu > Staff Training > Click the Select button for the training record desired. The Training Entry page appears.
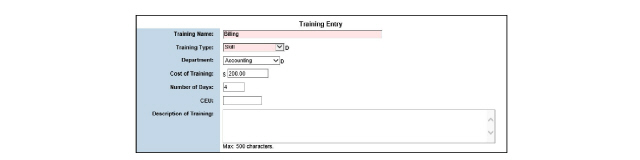
2. After making the desired edits, click Submit in the status bar. The updated training record is saved and listed on the Training Administration page.
If an instance has been created based on the training record, it cannot be deleted.
1. Navigate to Administration > Show Menu > Staff Training > Click the Delete button for the training record needing deletion. The Delete Training Entry page appears.

2. Select Yes to confirm deletion.
3. Click Submit in the status bar. The selected training record is removed from the system.
After setting up training records, the individual training instances should be set up. Each training instance record includes the date for which the training is scheduled.
1. Navigate to Administration > Show Menu > Staff Training > Click the Instance button for the training record needing an instance. The Training Instance page appears.

This page is used to perform the following tasks:
• Adding Training Instance Records
• Updating Training Instance Records
• Deleting Training Instance Records
Adding Training Instance Records
1. Navigate to Administration > Show Menu > Staff Training > Click the Instance button for the training record needing an instance > Add Training Instance. The Training Instance Entry page appears.

2. Fill out the needed information and click Submit in the status bar. The training instance record is saved and listed on the Training Instance page.

Updating Training Instance Records
1. Navigate to Administration > Show Menu > Staff Training > Click the Instance button for the training record needing an instance update > Click the Select button for the training instance record needing an update. The Training Instance Entry page appears.

2. After making the desired edits, click Submit in the status bar. The updated training instance record is saved and listed on the Training Instance page.
Deleting Training Instance Records
If an instance record has employees assigned to it, the record cannot be deleted.
1. Navigate to Administration > Show Menu > Staff Training > Click the Instance button for the training record needing an instance > Click the Delete button for the training instance record needing deletion. The Delete Training Instance page appears.

2. Select Yes to confirm deletion.
3. Click Submit in the status bar. The selected training instance record is deleted from the system.
Assigning Employees to Training Instances
1. Navigate to Administration > Show Menu > Staff Training > Click the Instance for the training record needing an instance > Click the Employee button for the training instance record needing employees assigned. The Employee Attendees page appears.
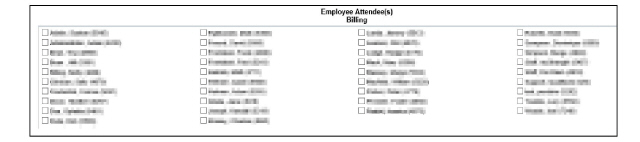
2. Select the check boxes beside the names of the employees being assigned to the training instance and click Submit in the status bar. The selected employees are assigned to the training instance.
The Pay for Performance feature calculates staff pay based on completed services.
A Payer Rate Grid menu link should be set up to access the Payer Rate Grid. The menu link is admin_payer_rate$.list. (Refer to Menu Management System for details.)
Payer Rate Grid
1. Navigate to Administration > Show Menu > Payer Rate Grid. The Payer Rate Grid list will be displayed.

2. Click Add Payer Rate Grid. Payer Rate Grid Entry will be displayed.

3. Fill out the needed information and click Submit.
Payer Rate Grid Payer Plans
Payer Plans can be associated with a Payer Rate Grid.
1. Navigate to Administration > Show Menu > Payer Rate Grid > Click Payer Plan for the desired grid entry. The Payer Plan Entry page appears.
|
A Payer Rate Grid entry needs to be completed before payer plans can be associated with it. If the grid entry has been designated as default, no payer plans can be associated. |

2. Fill out the needed information and click Submit.
This chapter is used to set up the clinical-related administration modules. The following topics are included in this chapter:
• Beds
• Referring Physician Configurations
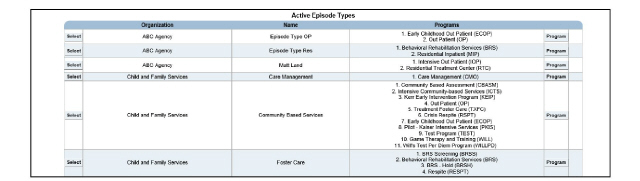
The Episode Type option is used to assign programs with begin and end dates to episode types. This enables the user to see a client record for specific episodes of care, as opposed to the entire clinical record of the client. Each episode type can also be associated with a menu system, so each type has its own menu links specific to its need.
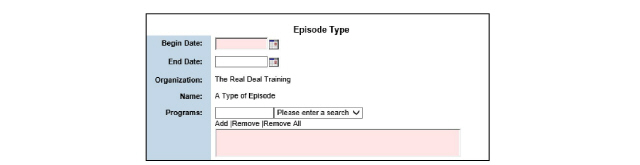
1. Navigate to Administration > Show Menu > Episode Types. The Active Episode Types page appears.
|
The Delete button only appears if no client has been admitted to a program within the episode type. Once a client is admitted to one or more of these programs, the episode type can no longer be deleted. |
This page is used to perform the following tasks:
• Update Episode of Care Types Names
• Update Programs Associated With Episode of Care Types
• Delete Episode of Care Types
1. Navigate to Administration > Show Menu > Episode Types > Add Episode Type. The Episode Type data entry page appears.
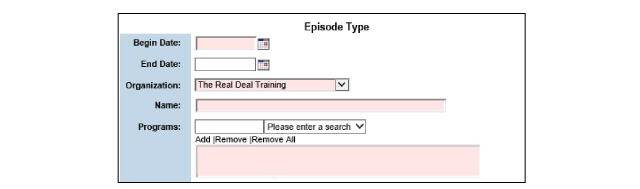
2. Fill out the needed information and click Submit in the status bar. The episode type record is saved to the system and listed on the Active Episode Types page.
Update Episode of Care Types Names
1. Navigate to Administration > Show Menu > Episode Types > Click the Select button for the episode type desired. The Episode Type data entry page appears.

2. Make any necessary changes to the episode type name associated with the episode type and click Submit in the status bar. The episode type record is saved on the system.
Update Programs Associated With Episode of Care Types
1. Navigate to Administration > Show Menu > Episode Types > Click the Program button for the episode type needing an update. The Active Programs page appears.

This page is used to complete the following tasks:
• Change Dates for Programs Associated with Episode of Care Types
• Add Programs to Existing Episodes of Care Types
Change Dates for Programs Associated with Episode of Care Types
It is possible to change the dates around programs that are already associated with an episode type. For example, if the detox program should be moved from the Inpatient to the Substance Abuse episode type, end date the detox program in the Inpatient episode type and add the detox program to the Substance Abuse episode. It needs to have a begin date that is after the end date of the detox program set in the Inpatient episode type.
1. Navigate to Administration > Show Menu > Episode Types > Click the Program button for the episode type needing an update > Click the Select button for the program desired. The Program date entry page appears.

2. Make any necessary changes to the program dates and click Submit in the status bar. The program date changes are saved to the system.
Add Programs to Existing Episodes of Care Types
1. Navigate to Administration > Show Menu > Episode Types > Click the Program button for the episode type needing an update > Add Programs. The Episode Type data entry page appears.
2. Fill out the needed information and click Submit in the status bar. The episode type record is saved to the system and listed on the Active Episode Types page.
|
The Delete button only appears if no client has been admitted to a program within the episode type. Once a client is admitted to one or more of these programs, the episode type can no longer be deleted. |
1. Navigate to Administration > Show Menu > Episode Types > Click the Program button for the episode type needing an update > Click the Delete button for the episode type desired. A delete confirmation page appears.

2. Select Yes to confirm deletion.
3. Click Submit in the status bar. The selected episode type is deleted from the system.
The Supervisory Group Admin module is used to set up and maintain Admin, Clinical, Group Approval Staff, and Incident To supervisor groups.
Admin and Clinical supervisor groups can be assigned to individual staff members in the Employee module. (See the Employee Guide.)
Supervisor groups can also be used to filter the Next Staff to Sign drop-down list on the Signatures page of service documents. (See the Client Guide.)
The Group Approval Staff field lists the staff members who will approve or reject client referrals to groups. When referring a client to a group through the Group Referrals module in the ECR, the Group Approval Staff field contains only the staff members who are assigned to this supervisor group. The Group Approval Staff member also receives a Group Referral alert when the new group referral record is submitted.
When entering an employee into the system on the Employment Entry page, if it was indicated that a staff member bills through a supervisor, (See the Employee Guide) or if the Show Bill To Staff configuration is enabled, (contact Qualifacts for assistance), the Incident To supervisor groups are used to filter the Bill To Staff drop-down list, which appears when marking the status of a scheduled activity. (See the Schedule Guide.)
1. Navigate to Administration > Show Menu > Supervisory Group Admin. The Supervisory Group Search page appears.

2. Fill out the needed information and click Submit in the status bar. The Supervisory Group page appears.

This page is used to perform the following tasks:
• Update the Members in a Supervisor Group
1. Navigate to Administration > Show Menu > Supervisory Group Admin > Add New Group. The Supervisory Group Form page appears.

2. Fill out the needed information and click Submit in the status bar. The supervisor group record is saved and the Batch Group Member Entry page appears.
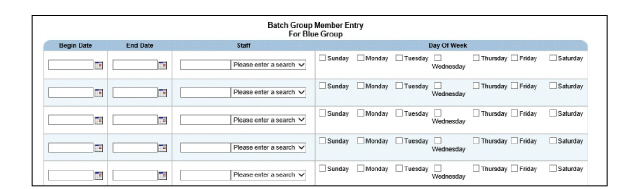
3. Fill out the needed information and click Submit in the status bar. The staff member assignment is saved and listed on the Group Members page.
1. Navigate to Administration > Show Menu > Supervisory Group Admin > click the Select button for the record needing an update. The Supervisory Group Form appears.

2. After making the desired edits, click Submit in the status bar. The supervisor group record is saved and listed on the Supervisory Group page.
Update the Members in a Supervisor Group
1. Navigate to Administration > Show Menu > Supervisory Group Admin > Click the Members button for the record needing an update. The Group Membership page appears for the selected supervisor group.

2. To update the date range and days of the week schedule for a current staff member, click the Select button. The Days of the Week page appears for the selected staff member.

3. Fill out the needed information and click Submit in the status bar. The staff member assignments are updated.
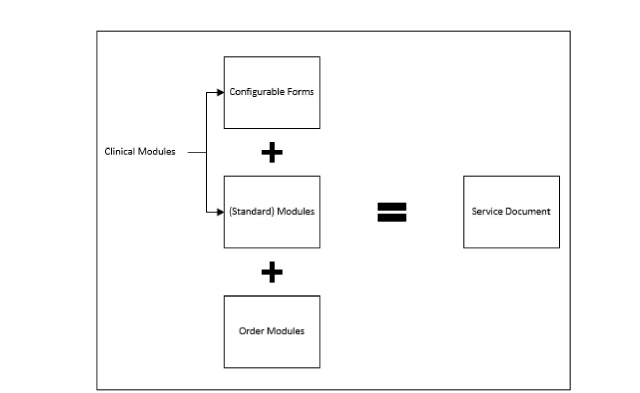
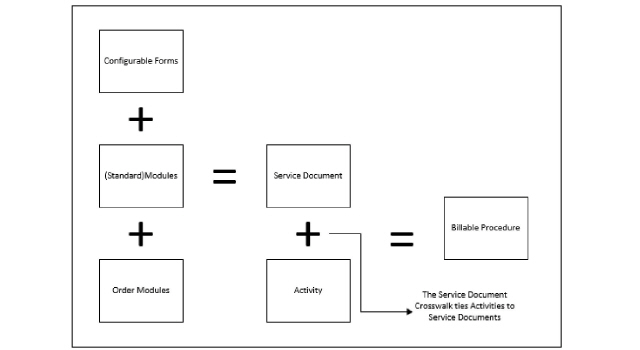
Service documents are made up of clinical modules and order modules. Many clinical modules are already built in CareLogic. The Configurable Forms module can be used to build unique clinical modules that are organization specific. (See Building Configurable Forms.) A service document can consist of any number of combined configurable forms, standard modules, and order modules.

|
When orders are created through service documents, the service document is linked to the order. Orders created through service documents must still be signed separately. |
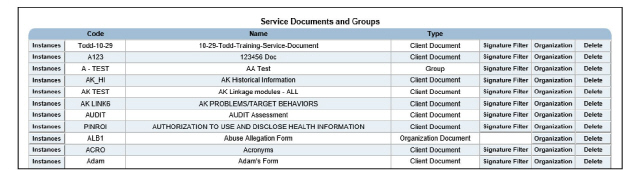
1. Navigate to Administration > Show Menu > Service Documents. The Service Documents page appears.
The process of creating a service document involves completing the following tasks:
• Add Instances to Service Documents
• Add Signature Filters to Service Documents
• Associate Service Documents with Organizations
1. Navigate to Administration > Show Menu > Service Documents > Add Service Document. The Service Document Data Entry page appears.

2. Fill out the needed information and click Submit. The service document record is saved and listed on the Service Documents page.
Add Instances to Service Documents
An instance defines the begin date, specifies the clinical modules, and identifies the signature requirements for a service document.
1. Navigate to Administration > Show Menu > Service Documents > Click the Instances button for the service document desired. The Instances page appears for the selected service document.

2. Click the Add Instance button in the status bar. The Service Document Group Instance Entry page appears.
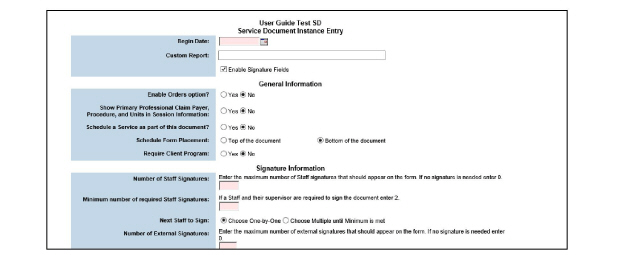
3. Fill out the needed information, including all modules wanted in the instance, and click Submit in the status bar. The service document instance is saved and the clinical modules become part of the service document. Once the begin date arrives, the service document will be available for use.
|
After creating the service document, add the menu link through the Menu Management System. (See Add Menu Items.) |
Some modules can be customized when they are included in a service document. This section describes accessing the service document configurations. Each module’s configuration is different, configuration details are described in the setup generically.
|
Only certain modules can be configured. Modules that cannot be configured will not display a Configure button or be included in the configuration side menu. |
1. Navigate to Administration > Show Menu > Service Documents > Click the Instances button for the desired service document. The instances for the selected service document will be displayed.

|
The service document needs to be instanced before the Configure option will be displayed. (Refer to Add Instances to Service Documents.) |
2. Click the Configure button on the desired instance. Each module that is configurable will be displayed in the side menu.
|
The Configure button will only be displayed if at least one module included in the instance can be configured. |

3. Select a module in the side menu.
4. Complete the configuration form according to organization needs and module documentation.
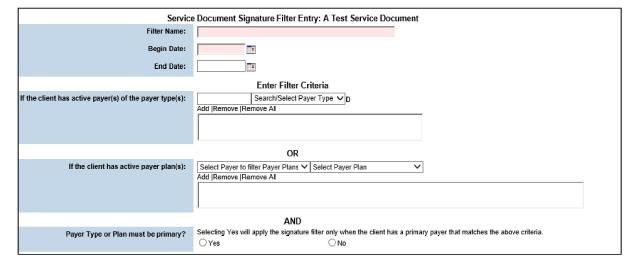
Add Signature Filters to Service Documents
A signature filter allows the setup of credential-based signature requirements for the selected instance of service document. These credential-based signature filters are tied to payer types or payer plans and should be set up to meet the requirements of the selected payer.
1. Navigate to Administration > Show Menu > Service Documents > Click the Signature Filter button for the service document needing a signature filter. The Service Document Signature Filters page appears for the selected service document.

2. Click the Add Filter button in the status bar. The Service Document Signature Filter Entry page appears.
3. Fill out the needed information and click Submit in the status bar. The signature filter is saved to the system and listed on the Service Document Signature Filters page.
Associate Service Documents with Organizations
When a new service document is created, it is only available at the organization of the staff member who added it. The following instructions make service documents available to additional organizations.
1. Navigate to Administration > Show Menu > Service Documents > Click the Organization button for the desired service document. The Service Document Organization List page appears for the selected service document. This list includes the organization currently logged into and its child organizations.
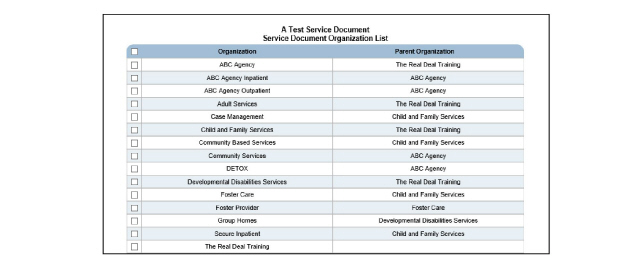
2. Check the boxes next to organizations needing to be associated with the service document and click Submit in the status bar. The service document organization matrix record is saved.
By default, CareLogic includes a wide variety of modules that can be used to capture and report on a client’s diagnosis and treatment progression. These modules can be used as building blocks to construct service documents. (See Add Service Documents.)
If additional forms and functionality are required outside of CareLogic standard modules, Configurable Forms can also be used as building blocks for service documents. They can be combined, along with standard modules and order modules, to build organization-specific service documents. The flexibility offered by the Configurable Forms module ensures an organization can build the service documents that meet its specific needs.
This chapter includes the following topics:
• Previewing Configurable Forms
1. Navigate to Administration > Show Menu > Configurable Forms. The Configurable Forms page appears.

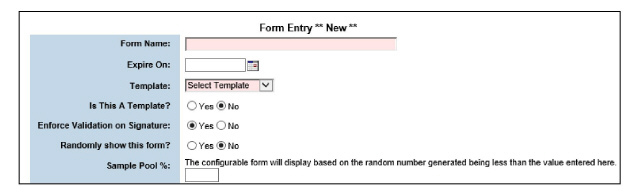
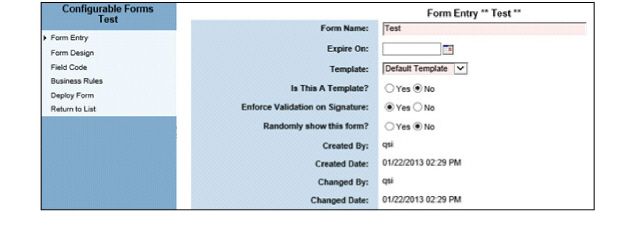
2. Click New Form in the status bar. The Form Entry **New** screen appears.
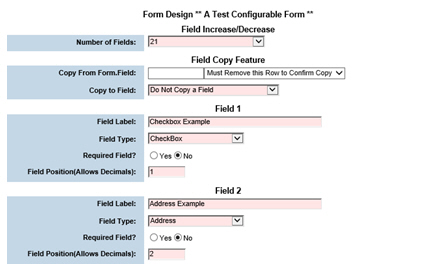
3. Fill out the needed information and click Submit in the status bar. The data is saved, the Configurable Forms wizard is refreshed, and the Form Design screen appears. This screen is used to define the fields that will appear on the clinical module form.
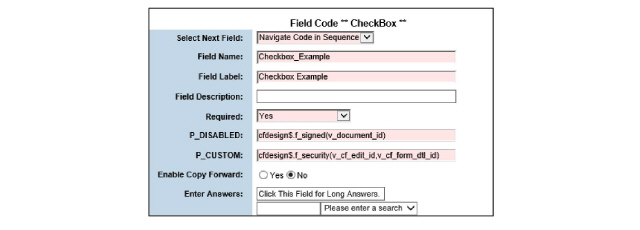
4. Fill out the needed information and click Submit in the status bar to refresh the page. The Field Code page will appear for each field described in Form Design. Fill out each page and click Submit to advance the wizard.
5. When every Field Code page has been submitted, the Business Rules page appears.

6. Click Add a Business Rule. The Conditions and Actions screen appears.
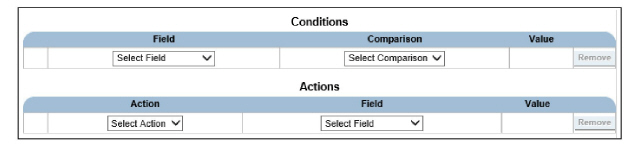
7. Fill out the needed information and click Submit. The business rule created is listed in the Business Rules screen.

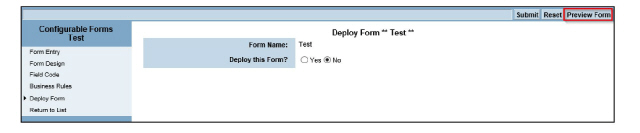
8. Click Deploy Form in the wizard to advance it to the Deploy Form page.
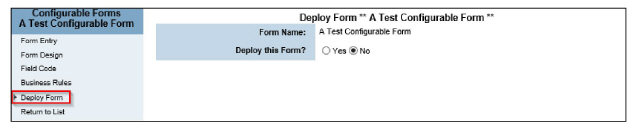
|
Before deploying a configurable form, it is recommended to preview it by clicking Preview Form in the status bar to verify it was created as intended. (See Previewing Configurable Forms.) Once a form is deployed, it cannot be modified. If left at this point, the form will display on the Configurable Forms page and can be reviewed if needed. |
9. Select Yes then click Submit. The Configurable Forms page appears.
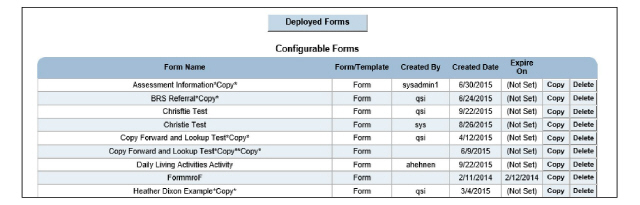
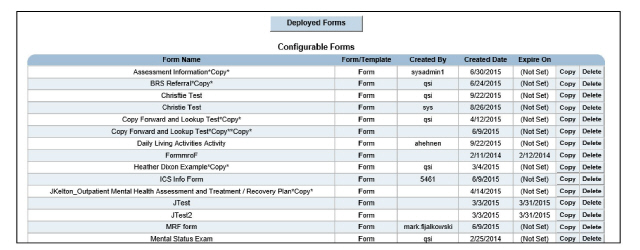
10. Click the Deployed Forms button to view the module created
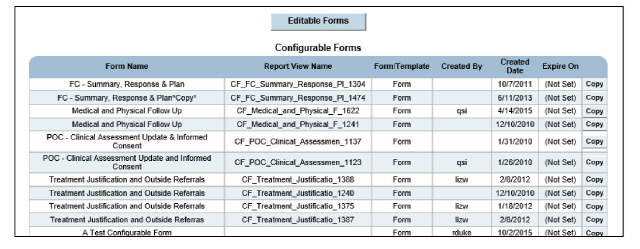
It is recommended to preview a clinical module form to verify it was created as intended before deploying it to be used in a service document. When previewing clinical module forms, the system allows users to test the form with existing client data.
1. Navigate to Administration > Show Menu > Configurable Forms. The Configurable Forms page appears.
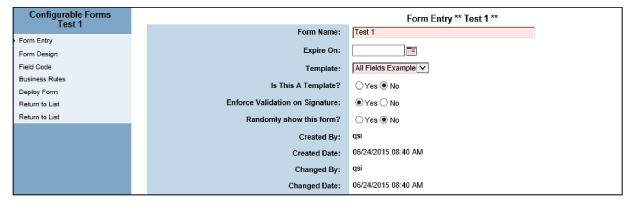
2. Click the name of the form it is desired to preview. The Configurable Forms wizard opens, displaying the Form Entry **Test** page.
3. In the Configurable Forms wizard, click the Deploy Form link. The Deploy Form page appears.
4. Click Preview Form in the status bar. The page is refreshed and the clinical module form is displayed exactly as it will appear when used in a service document. If the form displays correctly, it is ready to be deployed.
Once a configurable form has been deployed for use in a service document, it cannot be updated.
1. Navigate to Administration > Show Menu > Configurable Forms. The Configurable Forms page appears.
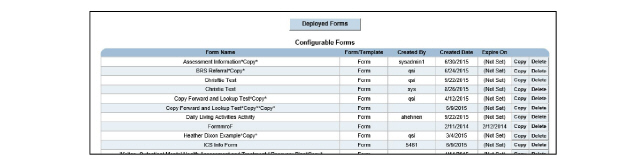
2. Click the configurable form needing an update. The Configurable Forms wizard opens. Any of the fields in this wizard can be edited.
3. Enter information and click Submit in the status bar to advance through the wizard. The configurable form is saved and listed on the Configurable Forms page.
1. Navigate to Administration > Show Menu > Configurable Forms > Click the Copy button for the desired form. The Configurable Forms page is refreshed to display the newly-created configurable form.
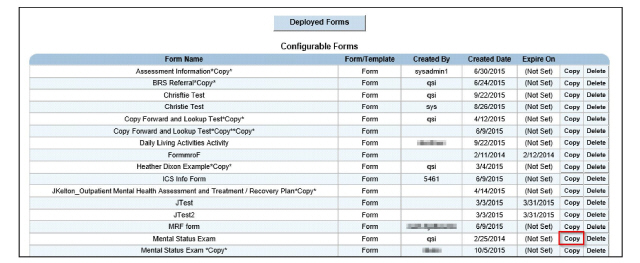
2. Once the new form is created, it can be clicked, and any of the fields in the wizard can be modified.
Once a configurable form has been deployed for use in a service document it cannot be deleted.
1. Navigate to Administration > Show Menu > Configurable Forms. The Configurable Forms page appears.
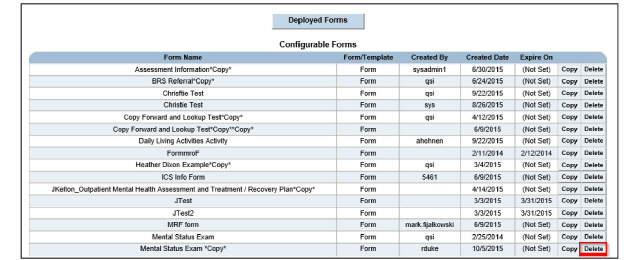
2. Locate the configurable form desired and click the Delete button. A delete confirmation page appears.
3. Select OK to confirm deletion. The selected configurable form is deleted.
A service document crosswalk defines what service documents are required for a scheduled activity. Each time an activity is marked as Kept in the Schedule module, the system checks to see if a service document is required. If a service document is required, the activity cannot be billed until the service document is completed and signed.
1. Navigate to Administration > Show Menu > Service Doc Crosswalk. The Service Document Crosswalk page appears.
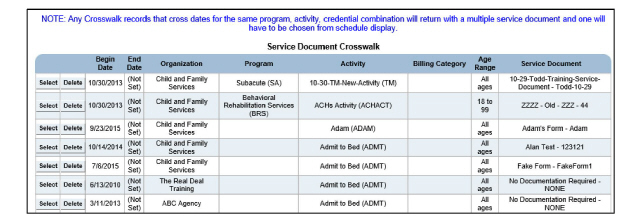
This page is used to perform the following tasks:
• Add Service Document Crosswalks
• Update Service Document Crosswalks
• Delete Service Document Crosswalks
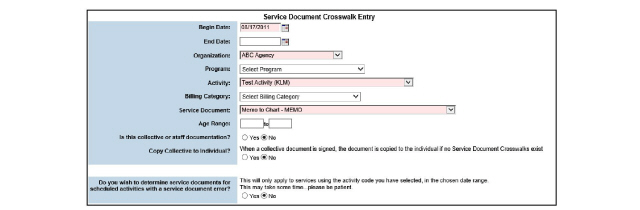
Add Service Document Crosswalks
|
A service document crosswalk record should be created for each activity set up in the Activities module. (See Setting Up Activity Codes.) Even when an activity does not require a service document, a service document crosswalk record should be created and the activity will be mapped to the service document None - No Service Documentation. |
1. Navigate to Administration > Show Menu > Service Doc Crosswalk > Add Service Document. The Service Document Crosswalk Entry page appears.

2. Fill out the needed information and click Submit in the status bar. The new service document crosswalk is saved and listed on the Service Document Crosswalk page.
Update Service Document Crosswalks
1. Navigate to Administration > Show Menu > Service Doc Crosswalk > Click the Select button of the service document crosswalk record desired. The Service Document Crosswalk Entry page appears.
2. After making the desired edits, click Submit in the status bar. The updated service document crosswalk record is saved and listed on the Service Document Crosswalk page.
Delete Service Document Crosswalks
1. Navigate to Administration > Show Menu > Service Doc Crosswalk.
2. Click the Delete button of the service document crosswalk record desired. The Delete Service Document Matrix Entry page appears.

3. Select Yes to confirm deletion and click Submit in the status bar. The selected service document crosswalk record is deleted from the system.
Once a service document is electronically signed by a staff member, it cannot be modified. The Service Document Unsign module gives system administrators the ability to unsign service documents so they can be modified. This module is only available to those with access to the Administration tab.
|
The process of unsigning a service document is a potential HIPAA violation. In order to monitor this process, CareLogic records unsigning activity in the Audit Table. |
1. Navigate to Administration > Show Menu > Service Document Unsign. The Signed Document Search page appears.

2. Fill out the search criteria and click Submit in the status bar. The Signed Document List page appears, which lists the signed service documents matching the search criteria.
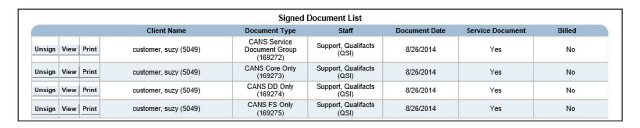
3. Click the Unsign button of the desired service document. The Unsign Document Form appears for the selected service document.
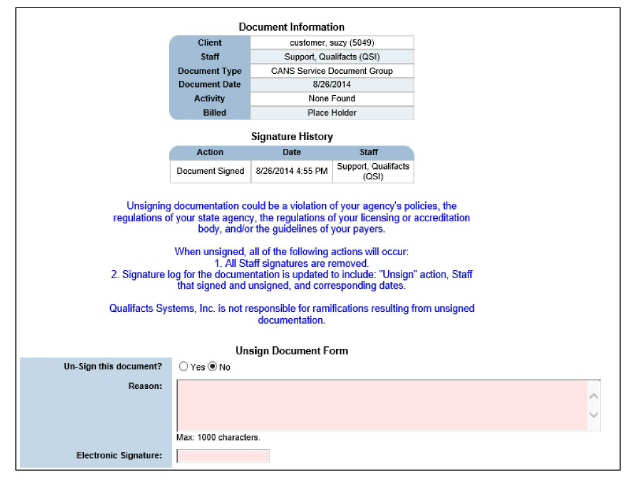
4. Fill out the needed information and click Submit in the status bar. An unsign confirmation page appears.
5. Select Yes to confirm the unsigning and click Submit in the status bar.
The following actions occur:
• The selected service document is unsigned, and now can be modified.
• An alert is sent to the staff members who signed the service document, indicating that it has been unsigned.
• A record of the unsign activity is written to the audit table. This unsign record will appear in the Signature History section of the service document.
The Order Status Admin module is used to set up and maintain the order statuses that will be used during the order workflow life cycle. After the order statuses are set up, they can be incorporated into the workflow life cycle of each order type. (See Configuring Order Status Workflows.)
1. Navigate to Administration > Show Menu > Order Status. The Order Status Records page appears.

2. Click Add an Order Status in the status bar. The Admin Order Status New Status Form appears.
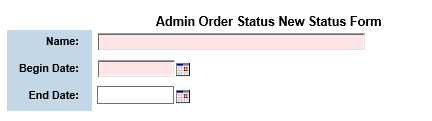
3. Fill out the needed information and click Submit in the status bar. The status record is saved and listed on the Order Status Records page.
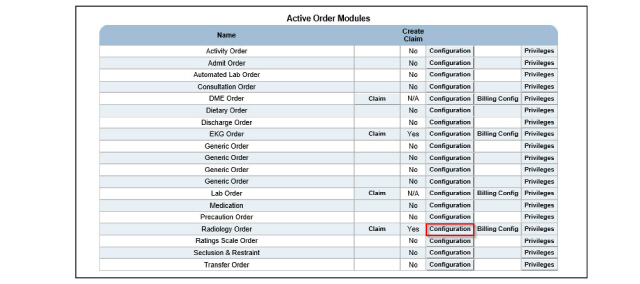
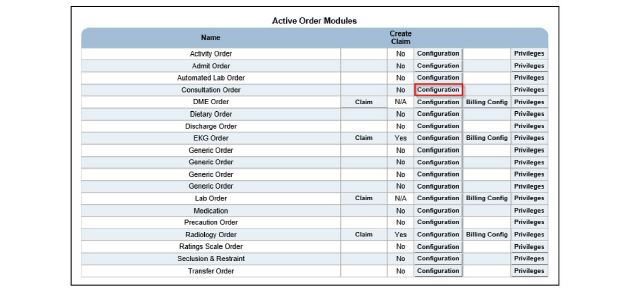
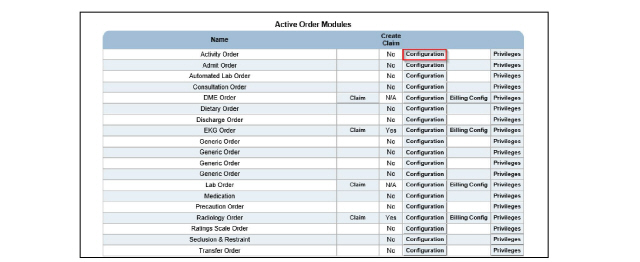
The Orders Administration module is used to set up and configure clinical orders. It enables configuration of the following types of orders:
• Medication
• Lab (billable)
• Automated Lab (electronic)
• Radiology (billable)
• Durable Medical Equipment (DME) (billable)
• EKG (billable)
• Admit
• Consultation
• Seclusion & Restraint
• Transfer
• Generic
• Discharge
• Dietary
• Precaution
• Activity Level
• Rating Scale
• Transportation
|
Once orders are configured, they can be entered through the ECR module. (See the Client Guide.) |
1. Navigate to Administration > Show Menu > Order Modules. The Order Modules page appears.
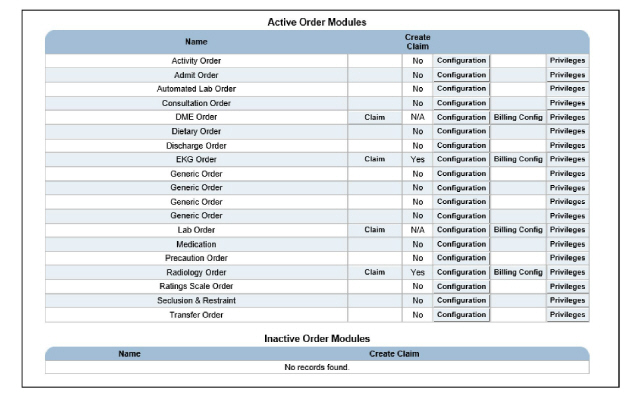
This page is used to perform the following tasks:
• Configuring Orders to Generate Claims
• Setting Up Order/Procedure Mappings
• Defining Order Privilege Levels
Although there are a wide variety of orders in the system, only certain order types are billable: Lab, Radiology, Durable Medical Equipment (DME), and EKG.
Once the billable order types are configured, the Claim Engine will process them like scheduled services. After the order activities are converted to claims, they can be batched and sent out for billing.
The following steps should be followed to configure Billable Orders:
1. Set up procedure codes/standard fees. (See Setting Up Procedure Codes.)
2. Set up payer plan fee matrices. (See Setting Up Payer Plan Fee Matrices.)
3. Create order activity codes. (See Setting Up Activity Codes.)
4. Create the order statuses that will be used by order types. (See Configuring Order Status Workflows.)
5. Mark each order type to generate claims. (See Configuring Orders to Generate Claims.)
6. Associate each order type to an activity. (See Configuring Clinical Orders.)
7. Define the types configuration for each order type. (See Configuring Order Types.)
8. Define additional radiology configurations. (See Configuring Additional Options for Radiology Orders.)
9. Define the order status workflow for each order type. (See Configuring Order Status Workflows.)
10. Configure alerts, triggers, and blockers throughout the order status workflow (Optional). (See Setting Up Order Status Alerts and Defining the Conditions for Order Status Blockers and Triggers.)
11. Define an order/procedure mapping record for each order type. (See Setting Up Order/Procedure Mappings.)
12. Define order privilege levels for each order type. (See Defining Order Privilege Levels.)
13. Enter the orders into the system. (See the Clinical Guide.)
14. Set the order to its finish state status. (See the Clinical Guide.)
Configuring Orders to Generate Claims
|
If an order type is not billable, the Claim button does not appear on the Order Modules page. |
1. Navigate to Administration > Show Menu > Order Modules > Click the Claim button for the order type needing configuration. The Claim History page appears.

2. Select Yes in the Create Claim field to indicate to the system that it should generate claims for the selected order type.
3. Enter an e-signature in the Electronic Signature field and click Submit in the status bar. The claim history record is saved and the Order Modules page appears. The Create Claim column is updated to indicate if the order type will create claims.
Before orders can be entered into the system through the ECR module, order types need to be configured.
1. Navigate to Administration > Show Menu > Order Modules > Click the Configuration button for the desired order module. The Configuration History page appears for the selected order type.

2. Click Add Configuration in the status bar. The Configuration Date Range page appears for the selected order type. This page is used to define the active date range for the configuration record. There can be only one active configuration record for a given date range.

3. Fill out the information needed and click Submit in the status bar. The configuration record is created and the Configuration Wizard appears in the left pane, with the Types option displayed by default.
The Configuration Wizard is used to perform the following tasks:
• Associating Service Documents with Order Types
• Configuring Order Status Workflows
• Setting Up Order Status Alerts
• Defining the Conditions for Order Status Blockers and Triggers
• Configuring Additional Options for Radiology Orders
• Configuring Additional Options for Consultation Orders
• Configuring Additional Options for Precaution Orders
• Configuring Additional Options for Transfer Orders
• Configuring Additional Options for Activity Level Orders
Before orders can be entered into the system through the ECR module, the Types configuration needs to be set up for each order type. Each order contains a unique set of user-defined Types configurations. The options that are set up here are used to populate the Order Type drop-down lists in the ECR module.
1. Navigate to Administration > Show Menu > Order Modules > Click the Configuration button for the desired order module > Click the Configure button for the desired date range > Click Types in the left pane. The Order Types page appears for the selected order type.

2. Click Add Type in the status bar. The (Name) Type Entry page appears for the selected order type.

3. Enter the name of the lab order type desired and click Submit in the status bar. The order type record is saved and listed on the Order Types page for the selected order.
Associating Service Documents with Order Types
A service document can be used as a blocker or trigger at any phase of the order status workflow life cycle. (See Defining the Conditions for Order Status Blockers and Triggers.) Once a service document is associated with an order, the document can be accessed directly through the order. (See the Client Guide.)
1. Navigate to Administration > Show Menu > Order Modules > Click the Configuration button for the desired order module > Click the Configure button for the desired date range > Click Types in the left pane > Click the Documents button for the order type needing a service document associated. The (Name) Order Types Document Setup page appears.
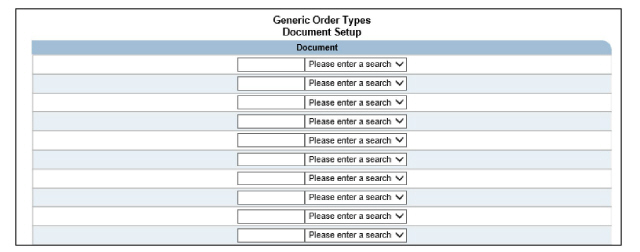
2. Fill out the needed information and click Submit in the status bar. The service document is associated with the selected order type.
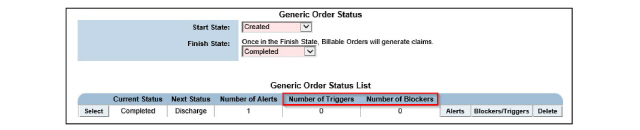
Configuring Order Status Workflows
Each workflow configuration requires a start and finish state. Once the start state is defined for an order type, orders of that type are assigned that status when the order is created. The finish state status is used to indicate that billable orders are ready to generate claims.
One status may have multiple next status records. Setting up workflow statuses defines how orders move through their life cycle. Once an order status workflow is established, alerts can be created and conditions for blockers and triggers can be defined. (See Setting Up Order Status Alerts and Defining the Conditions for Order Status Blockers and Triggers.)
1. Navigate to Administration > Show Menu > Order Modules > Click the Configuration button for the desired order module > Click the Configure button for the desired date range > Click Status in the left pane. The Order Status page appears for the selected order type.
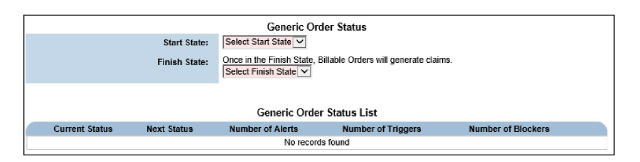
2. Fill out the needed information and click Submit in the status bar. The start and finish status values are saved for the selected order.
|
With the exception of medication orders, the remaining steps in this task should be followed to define the intermediate workflow statuses for orders. |
3. Click Add Status in the status bar. The Order Status Entry page appears. This page is used to define each progression in the order status workflow.

4. Fill out the needed information and click Submit in the status bar. The order status record is saved and listed on the Order Status page.

|
The Select and Delete buttons will not be available for lab and medication orders because their workflow transition records are predefined. |
5. Continue to add statuses as needed.
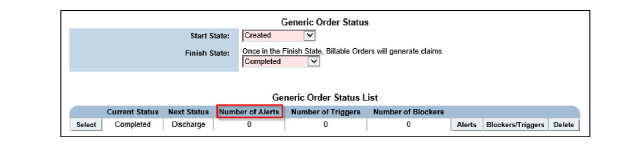
Setting Up Order Status Alerts
Alerts are sent when order statuses change from one state to another, as defined in their order status workflow record.
|
Even though the order status workflow records are predefined for lab and medication orders, it is recommended to set up an alert for each status transition. |
1. Navigate to Administration > Show Menu > Order Modules > Click the Configuration button for the desired order module > Click the Configure button for the desired date range > Click Status in the left pane. In the Order Status List grid, the Number of Alerts column indicates the number of alerts that are currently set up for each of the order status workflow records.
2. Locate the order status workflow record needing an alert and click the Alerts button. The Order Status Alert List page appears.

3. Click Add Alert in the status bar. The Order Status Alert Form appears.

4. Fill out the needed information and click Submit in the status bar. The alert record is saved and listed on the Order Status Alert List page. If desired, enter additional alerts for the selected order status workflow record.

5. After entering the desired alerts, click Return in the status bar. The Order Status List page appears and the Number of Alerts column reflects the number of alert records set up for the selected workflow record.
Defining the Conditions for Order Status Blockers and Triggers
Blockers are conditions that prevent order transitions from occurring. When a blocker is created, the order status cannot be changed until the defined condition is met. For example, a blocker condition can be set up to require a service document to be completed before the order status can be changed.
Triggers are actions that cause a transition to occur. When a trigger is used, the order status is changed when a defined condition is met. For example, a trigger condition can be set up to change the order status once a staff member signs the order.
1. Navigate to Administration > Show Menu > Order Modules > Click the Configuration button for the desired order module > Click the Configure button for the desired date range > Click Status in the left pane. The Order Status page appears for the selected order type. In the Order Status List grid, the Number of Triggers and Number of Blockers columns indicate the number of triggers and blockers that are currently set up for each of the order status workflow records.
2. Locate the order status workflow record needing blockers and triggers and click its Blockers/Triggers button. The Order Status Blocker/Trigger List page appears.

3. Click Add Blocker/Trigger in the status bar. The Order Status Blocker/Trigger Form appears.

4. Fill out the needed information and click Submit in the status bar. The blocker or trigger record is saved and listed on the Order Status Blocker/Trigger List page. If desired, enter additional blocker or trigger records for the selected order status workflow record.

5. After entering the desired blockers or triggers, click Return in the status bar. The Order Status List page appears and the Number of Triggers and Number of Blockers columns reflect the number of records set up for the selected workflow record.
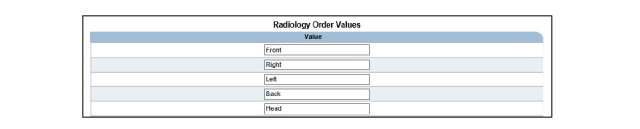
Configuring Additional Options for Radiology Orders
In addition to the Types configuration, Radiology orders require additional configuration set up for Sub-Types and Positions. The configuration options that are set up in this task are available in dropdown lists in the Radiology Order Entry page. (See the Client Guide.)
1. Navigate to Administration > Show Menu > Order Modules. The Order Modules page appears.
2. Click the Configuration button for the Radiology Order. The Radiology Order Configuration History page appears.

3. Click the Configure button. The Radiology Order Types page appears, with the Configuration Wizard in the left pane.

4. Click Radiology Sub Type in the left pane. The Radiology Order Values page appears.
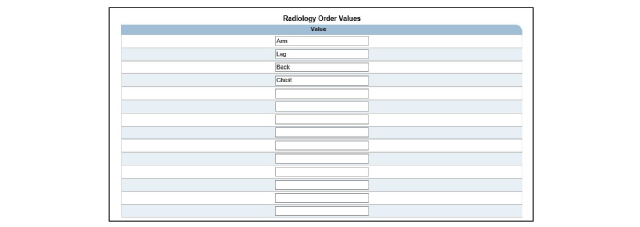
5. Fill out the needed information and click Submit in the status bar. The sub-types values are saved and the Radiology Order Values page is refreshed.
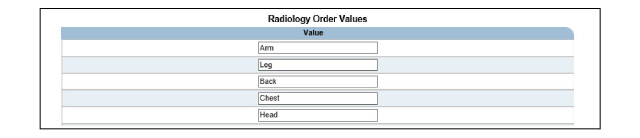
6. Click Radiology Position in the left pane. The Radiology Order Values page appears.
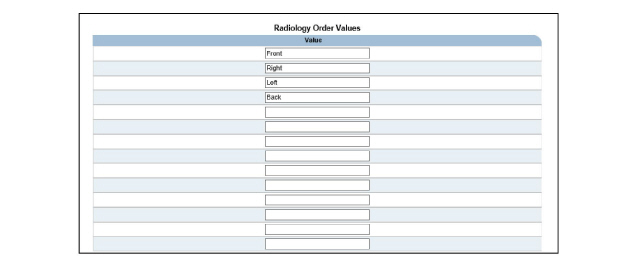
7. Fill out the needed information and click Submit in the status bar. The position values are saved and the Radiology Order Values page is refreshed.
Configuring Additional Options for Consultation Orders
In addition to the Types configuration, Consultation orders require additional configuration set up for Urgency. The configuration options that are set up in this task are available in the drop-down lists in the Consultation Order Entry page. (See the Client Guide.)
1. Navigate to Administration > Show Menu > Order Modules. The Order Modules page appears.
2. Click the Configuration button for the Consultation Order. The Consultation Order Configuration History page appears.

3. Click the Configure button. The Consultation Order Types page appears, with the Configuration Wizard in the left pane.

4. Click Urgency in the left pane. The Consultation Order Values page appears.
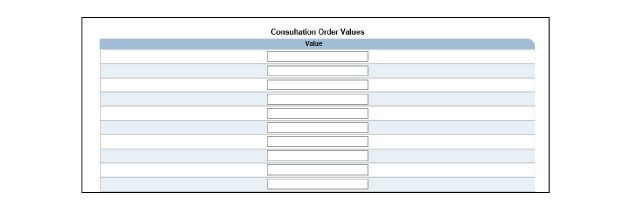
5. Fill out the needed information and click Submit in the status bar. The urgency values are saved and the Consultation Order Values page is refreshed.

Configuring Additional Options for Precaution Orders
In addition to the Types configuration, Precaution orders require additional configuration set up for Justifications. The configuration options that are set up in this task are available in the drop-down lists in the Precaution Order Entry page. (See the Client Guide.)
1. Navigate to Administration > Show Menu > Order Modules. The Order Modules page appears.
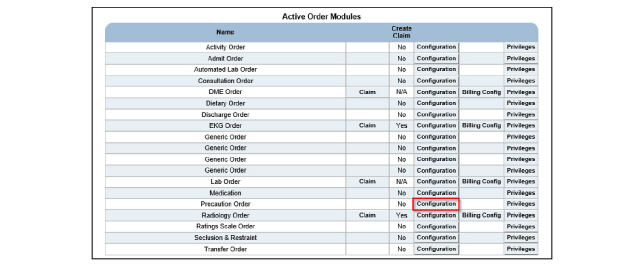
2. Click the Configuration button for the Precaution Order. The Precaution Order Configuration History page appears.

3. Click the Configure button. The Precaution Order Types page appears, with the Configuration Wizard in the left pane.

4. Click Justifications in the left pane. The Precaution Order Values page appears.
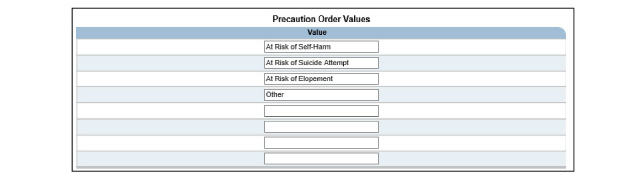
5. Fill out the needed information and click Submit in the status bar. The justification values are saved and the Precaution Order Values page is refreshed.

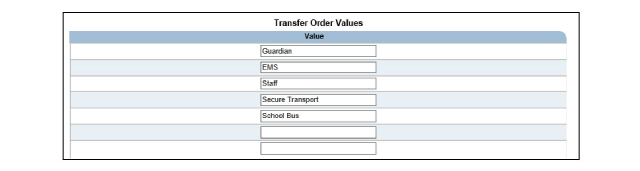
Configuring Additional Options for Transfer Orders
In addition to the Types configuration, Transfer orders require additional configuration set up for External Locations and Modes of Transport. The configuration options that are set up in this task are available in the drop-down lists in the Transfer Order Entry page. (See the Client Guide).
1. Navigate to Administration > Show Menu > Order Modules. The Order Modules page appears.
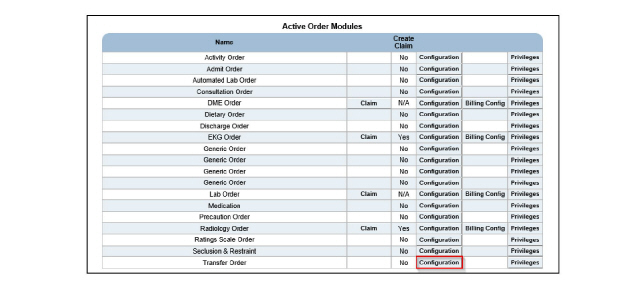
2. Click the Configuration button for the desired Transfer Order. The Transfer Order Configuration History page appears.

3. Click the Configure button. The Transfer Order Types page appears, with the Configuration Wizard in the left pane.

4. Click Transfer to External in the left pane. The Transfer Order Values page appears.
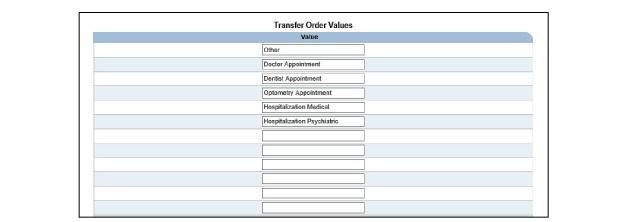
5. Fill out the needed information and click Submit in the status bar. The external location values are saved and the Transfer Order Values page is refreshed.
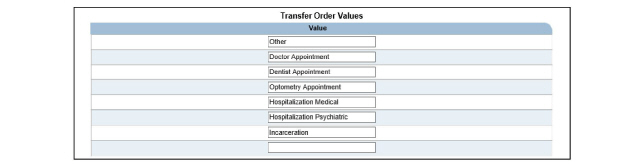
6. Click Mode of Transport in the left pane. The Transfer Order Values page appears.
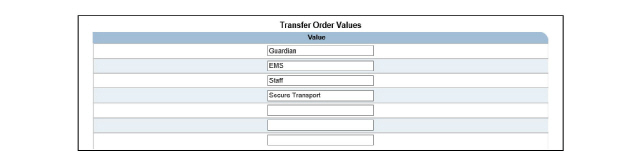
7. Fill out the needed information and click Submit in the status bar. The transport mode values are saved and the Transfer Order Values page is refreshed.
Configuring Additional Options for Activity Level Orders
In addition to the Types configuration, Activity Level orders require additional configuration set up for Mobility Level. The configuration options that are set up in this task are available in the drop-down lists in the Activity Level order entry page. (See the Client Guide.)
1. Navigate to Administration > Show Menu > Order Modules. The Order Modules page appears.
2. Click the Configuration button for the Activity Order. The Activity Order Configuration History page appears.

3. Click the Configure button. The Activity Order Types page appears, with the Configuration Wizard in the left pane.
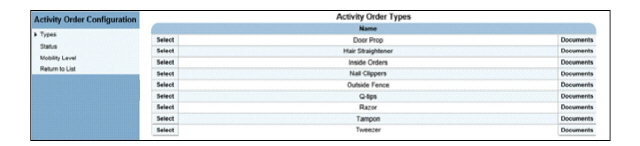
4. Click Mobility Level in the left pane. The Activity Order Values page appears.
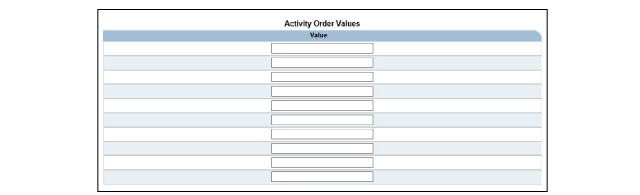
5. Fill out the needed information and click Submit in the status bar. The mobility level values are saved and the Activity Order Values page is refreshed.

Setting Up Order/Procedure Mappings
Each billable order requires a procedure code mapping. Order/procedure mappings contain user-defined criteria that the Claim Engine uses to establish a charge for the order.
This section includes instructions for setting up procedure mappings for the following billable order types:
• Setting Up Procedure Mappings for Lab Orders
• Setting Up Procedure Mappings for Radiology Orders
• Setting Up Procedure Mappings for DME Orders
• Setting Up Procedure Mappings for EKG Orders
Setting Up Procedure Mappings for Lab Orders
1. Navigate to Administration > Show Menu > Order Modules > Click the Billing Config button for the Lab order type. The Lab Order Billing Configuration page appears.

2. Click Add Configuration in the status bar. The Lab Order Billing Configuration Form appears.
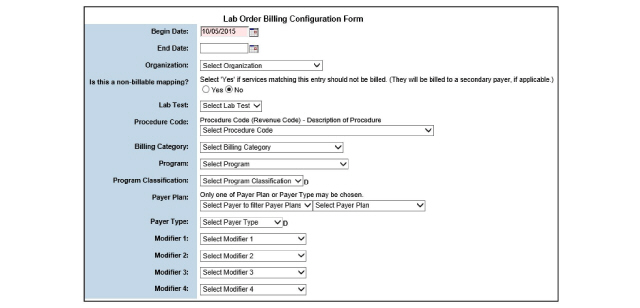
3. Fill out the needed information and click Submit in the status bar. The lab order/procedure mapping is saved and listed on the Lab Order Billing Configuration page.
Setting Up Procedure Mappings for Radiology Orders
In order to bill for radiology orders, radiology order/procedure mapping needs to be set up.
1. Navigate to Administration > Show Menu > Order Modules > Click the Billing Config button for the Radiology order type. The Radiology Order Billing Configuration page appears.

2. Click Add Configuration in the status bar. The Radiology Order Billing Configuration Form appears.
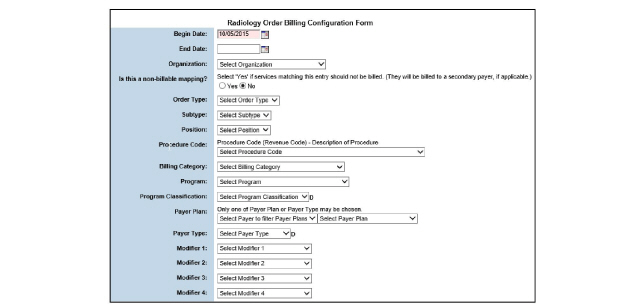
3. Fill out the needed information and click Submit in the status bar. The radiology order/procedure mapping is saved and listed on the Radiology Order Billing Configuration List page.
Setting Up Procedure Mappings for DME Orders
1. Navigate to Administration > Show Menu > Order Modules > Click the Billing Config button for the DME order type. The DME Order Billing Configuration page appears.

2. Click Add Configuration in the status bar. The DME Order Billing Configuration Form appears.
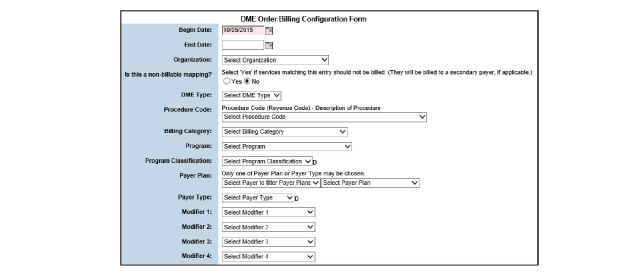
3. Fill out the needed information and click Submit in the status bar. The DME order/procedure mapping is saved and listed on the DME Order Billing Configuration page.
Setting Up Procedure Mappings for EKG Orders
1. Navigate to Administration > Show Menu > Order Modules > Click the Billing Config button for the EKG order type. The EKG Order Billing Configuration page appears.

2. Click Add Configuration in the status bar. The EKG Order Billing Configuration Form appears.
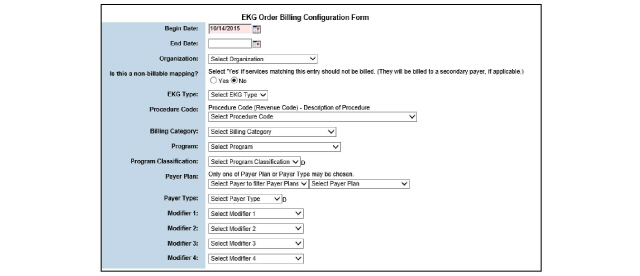
3. Fill out the needed information and click Submit in the status bar. The EKG order/procedure mapping is saved and listed on the EKG Order Billing Configuration page.
Defining Order Privilege Levels
For each order type, you must define a privilege level for the staff credential. Order privileging is based on the staff member’s primary credential.
1. Navigate to Administration > Show Menu > Order Modules > Click the Privileges button for the desired Order Module. The Order Privileges page appears.
2. Select the radio button of the privilege level desired for each credential and click Submit.
If an organization uses a defined set of orders for multiple clients, it can use the Standing Orders Protocol (SOP) module to group the individual orders together. For example, if an organization’s admission process requires a lab order, a consultation order, and an admit order, an Admission SOP can be created that contains all three orders.
|
If an SOP contains a billable order, the individual order will generate a claim once the SOP is completed. It is important to understand that billable orders apply to individual orders only. SOPs, as a whole, do not generate claims. |
1. Navigate to Administration > Show Menu > Standing Orders Protocol. The Standing Orders Protocol page appears.

This page is used to perform the following tasks:
• Creating Standing Order Protocols
• Adding Instances to Standing Orders Protocol
• Defining Standing Orders Protocol Privilege Levels
• Deleting Standing Orders Protocol
Creating Standing Order Protocols
1. Navigate to Administration > Show Menu > Standing Orders Protocol > Add Standing Orders Protocol in the status bar. The Standing Orders Protocol Entry page appears.

2. Fill out the needed information and click Submit in the status bar. The SOP record is saved and listed on the Standing Orders Protocol page.

Adding Instances to Standing Orders Protocol
The instance defines which orders are associated with the SOP. By default, the Sign & Complete SOP link is added to the end of each SOP created. The Sign & Complete SOP link is available when completing SOPs for clients. (See the Client Guide.)
1. Navigate to Administration > Show Menu > Standing Orders Protocol > Click the Instances button for the SOP record needing an instance. The Instances of page appears for the selected SOP.

2. Click Add Instance in the status bar. The Standing Order Protocol Instance Entry page appears for the selected SOP.
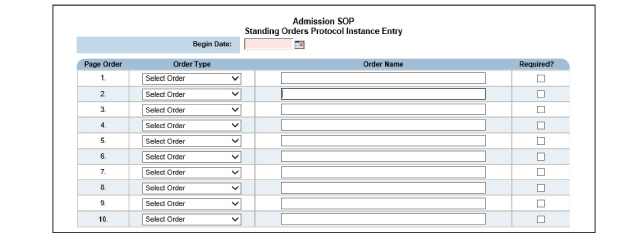
3. Fill out the needed information and click Submit in the status bar. The SOP instance is saved and listed on the Instances page. Once the begin date arrives, the SOP will be available for use in the ECR > Orders module.
Defining Standing Orders Protocol Privilege Levels
Order privileging is based on the staff member’s primary credential. Privilege levels determine what functionality each credential has in relation to the selected order type. By default, staff members are assigned the lowest Orders privilege level, read-only access.
1. Navigate to Administration > Show Menu > Standing Orders Protocol > Click the Privileges button for the order type needing privilege levels defined. The Order Privileges page appears.
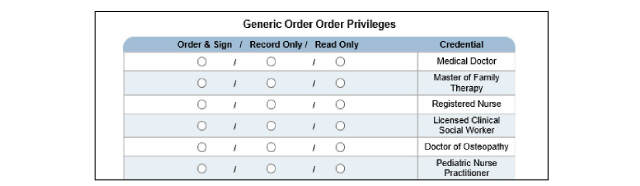
2. After defining the desired privilege levels, click Submit in the status bar. The privilege level record is saved for the selected order type. Each order type that is set up in the system needs its privilege levels defined.
Deleting Standing Orders Protocol
Once a SOP has been created for a client, the Delete button is replaced with In Use.
1. Navigate to Administration > Show Menu > Standing Orders Protocol > Click the Delete button for the desired SOP record. The Standing Orders Protocol Delete page appears.

2. Select Yes to confirm deletion.
3. Click Submit in the status bar. The selected SOP record is removed from the system.
1. Navigate to Administration > Show Menu > Groups. The Group List page appears.
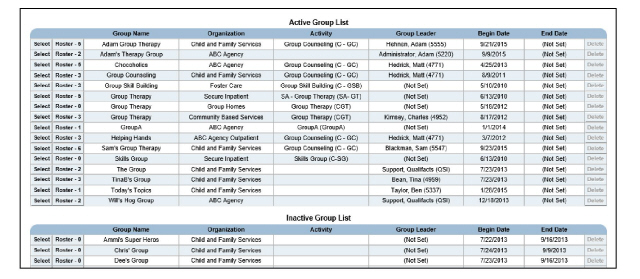
This page is used to perform the following tasks:
1. Navigate to Administration > Show Menu > Groups > New Group. The Group Information page appears.
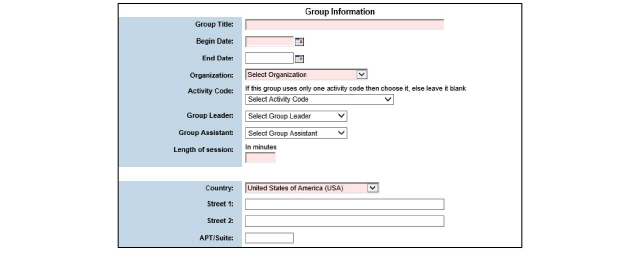
2. Fill out the needed information and click Submit in the status bar. The group record is saved and listed on the Group List page. At this point a group roster should be created. (See Defining Group Rosters.)
1. Navigate to Administration > Show Menu > Groups > Click the Select button for the group needing an update. The Group Information page appears.
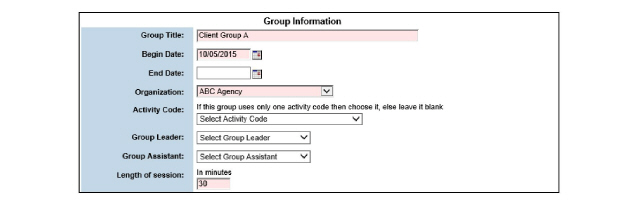
2. After making the desired edits, click Submit in the status bar. The updated group is listed on the Group List page.
1. Navigate to Administration > Show Menu > Groups > Click the Roster button for the group needing addition. The Roster page appears for the selected group.

2. Click the Add New Member button. The Client Assignment page appears.

3. Fill out the needed information and click Submit in the status bar. The client is added to the group roster.
1. Navigate to Administration > Show Menu > Groups > Click the Roster button for the group needing addition > Copy Members. The Copy Members page appears.

2. Click the drop-down list to select the group from which members will be copied.
3. Click Submit in the status bar. The members of the selected group are added to the new group roster.
Groups that have been scheduled or contain clients on the roster cannot be deleted.
1. Navigate to Administration > Show Menu > Groups > Click the Delete button for the group needing deletion. The Delete Group page appears.
2. Select Yes to confirm deletion.
3. Click Submit in the status bar. The selected group is deleted from the system.
The Bed Administration module is used to manage the occupancy and availability of beds.
1. Navigate to Administration > Show Menu > Bed Administration. The Active Beds page appears.
This page is used to perform the following tasks:
• Setting Up Programs for Beds
1. Navigate to Administration > Show Menu > Bed Administration > Add a Bed. The Bed Administration page appears.

2. Fill out the needed information and click Submit in the status bar. The bed is saved and listed on the Active Beds page for the selected organization.
Once a bed is added to the system, it can be associated with certain programs. Doing so indicates that beds are reserved for clients who are enrolled in certain treatment programs.
1. Navigate to Administration > Show Menu > Bed Administration > Click the Programs button for the desired bed. The Programs page appears for the selected bed and location.
2. Fill out the needed information and click Submit in the status bar. The selected program is assigned to the selected bed.
1. Navigate to Administration > Show Menu > Bed Administration > Click the Select button of the bed needing an update. The Bed Administration page appears.
2. After making the desired edits, click Submit in the status bar. The updated bed is saved and listed on the Active Beds page for the selected organization.
|
A bed that has been reserved for a client or has a client assigned to it cannot be deleted. |
1. Navigate to Administration > Show Menu > Bed Administration > Click the Delete button of the bed needing deletion. The Confirm Delete page appears.

2. Select Yes to confirm deletion and click Submit in the status bar. The selected bed is deleted from the system.
The Treatment Plan Grid module is used to set up problem types. This module also allows the setup of treatment goals, interventions, and objectives for each problem type.
1. Navigate to Administration > Show Menu > Treatment Plan Grid. The Problem Types page appears.

2. Click Add Problem in the status bar. The Problem Entry page appears.
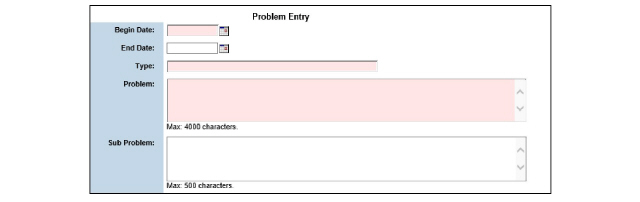
3. Fill out the needed information and click Submit in the status bar. The problem type record is saved and listed on the Problems page.

This page is used to perform the following tasks:
• Associating Treatment Plan Grids with Organizations
• Setting Up Treatment Objectives
• Setting Up Treatment Interventions
Associating Treatment Plan Grids with Organizations
1. Navigate to Administration > Show Menu > Treatment Plan Grid > Click the Select button for the treatment plan grid needing association with organizations. The Active Problems for the treatment plan grid page appears.

2. Locate the problem to associate with an organization and click the corresponding Organization button. The Organization List page appears for the selected treatment plan grid.
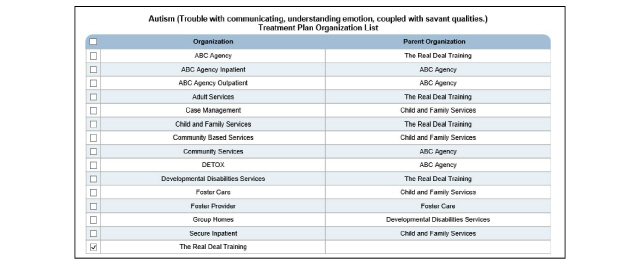
3. Check the organizations’ boxes needing association. The treatment plan grid is available to the selected organization.
4. Click Submit in the status bar. The treatment plan grid organization matrix record is saved.
1. Navigate to Administration > Show Menu > Treatment Plan Grid > Click the Diagnosis button for the treatment plan grid needing a diagnosis code. The Diagnosis page for the treatment plan grid appears.

2. Click Add Diagnosis Link in the status bar. The Diagnosis Entry page appears.
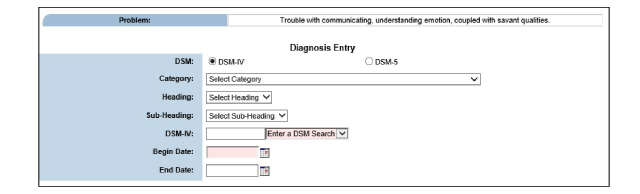
3. Fill out the needed information and click Submit in the status bar. The diagnosis is saved.
1. Navigate to Administration > Show Menu > Treatment Plan Grid > Click Select for the treatment plan grid needing sub problems > Add Problem. The Problem Entry page appears for the selected problem type.
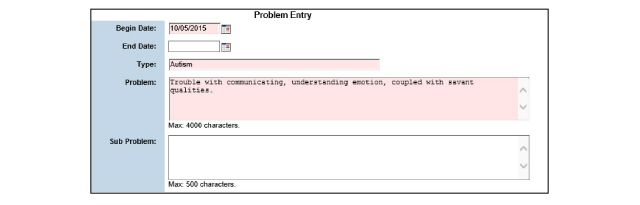
2. Fill out the Sub Problem field and click Submit.
3. Fill out the needed information and click Submit in the status bar. The sub problem is saved and listed in the Sub Problems column of the Active Problems page.
1. Navigate to Administration > Show Menu > Treatment Plan Grid > Click Select for the desired Problem Type > Click the Goals button for the treatment plan grid needing treatment goals. The Goals page appears for the selected problem type.

2. Click Add Goal in the status bar. The Goal Entry page appears.
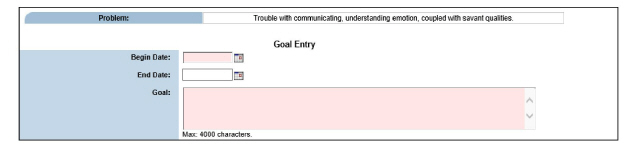
3. Fill out the needed information and click Submit in the status bar. The goal is saved and listed on the Goals page.
Setting Up Treatment Objectives
1. Navigate to Administration > Show Menu > Treatment Plan Grid > Click Select for the desired Problem Type > Click the Objectives button for the desired treatment plan grid. The Objectives page appears for the selected goal.

2. Click Add Objective in the status bar. The Objective Entry page appears.
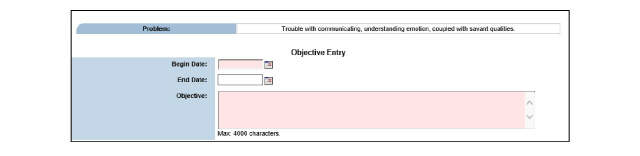
3. Fill out the needed information and click Submit in the status bar. The objective record is saved and listed on the Objectives page.
Setting Up Treatment Interventions
1. Navigate to Administration > Show Menu > Treatment Plan Grid > Click Select for the desired Problem Type > Click the Objectives button for the desired treatment plan grid > Click the Interventions button for the desired objective. The Interventions page appears for the selected objective.

2. Click Add Intervention in the status bar. The Intervention Entry page appears.
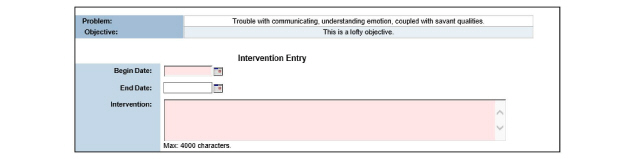
3. Fill out the needed information and click Submit in the status bar. The intervention record is saved and listed on the Interventions page.
CareLogic offers the following approaches for assigning the correct diagnosis to a service:
• Manual Process - The staff member who provides the services manually selects the correct diagnosis via a service document containing the Attach Existing Diagnosis module. (See the Client Guide.)
• Automatic Process – To use this approach, the system administrator should set up the Diagnosis Category module. Once the module is set up, the system will select the correct diagnosis by using the diagnosis category associated with the treatment program. Use the following outline to set up the Diagnosis Category feature.
- Set Up the Diagnosis Category Module
- Assign Diagnosis Categories to Programs
Set Up the Diagnosis Category Module
Once service is delivered and a claim is batched, the system uses the diagnosis category associated with the program to determine which diagnosis to assign.
1. Navigate to Administration > Show Menu > Diagnosis Category. The Diagnosis Categories page appears.
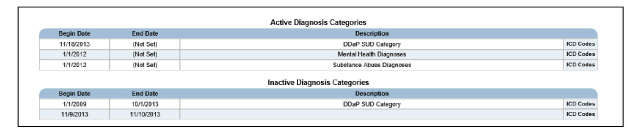
2. Click Add Diagnosis Category in the status bar. The Diagnosis Category Entry page appears.

3. Fill out the needed information and click Submit in the status bar. The record is saved and listed on the Diagnosis Categories page.
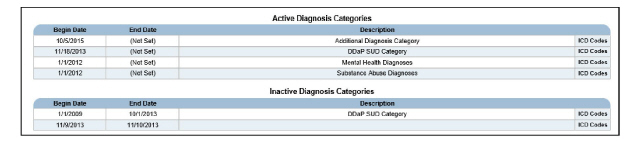
4. Click the ICD Codes button for the Diagnosis Category added. The Diagnosis Category ICD Codes page appears.

5. Click Add Diagnosis Category ICD Code in the status bar. The Diagnosis Category ICD Codes Entry page appears.
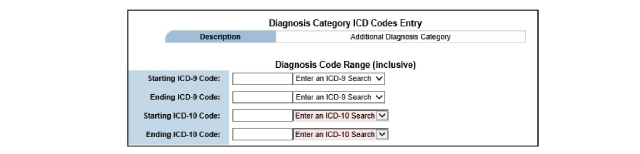
6. Fill out the needed information and click Submit in the status bar. The diagnosis code range record is saved and listed on the Diagnosis Category ICD Codes page.

Assign Diagnosis Categories to Programs
1. Navigate to Administration > Show Menu > Programs. The Program Administration page appears.
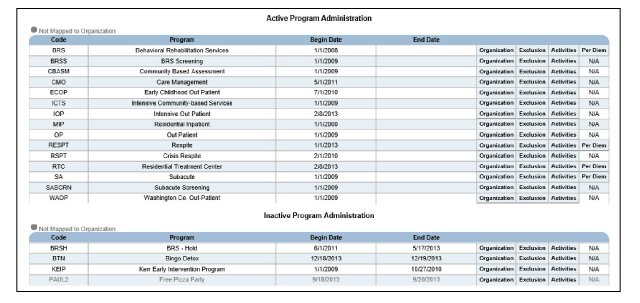
2. Click the program needing a Diagnosis Category. The Program Administration page appears.
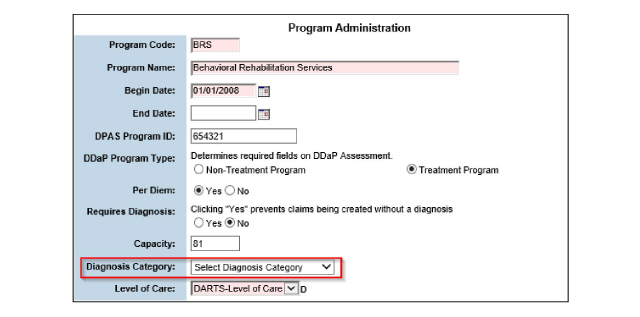
3. Select from the Diagnosis Category dropdown and click Submit in the status bar. The information is saved.
The Call Log enables an organization to provide phone services to clients who are not enrolled in a treatment program.
1. Navigate to Administration > Show Menu > Call Log Administration. The Call Log Administration page appears.

2. Click Add Call Log Administration in the status bar. The Call Log Administration entry page appears.
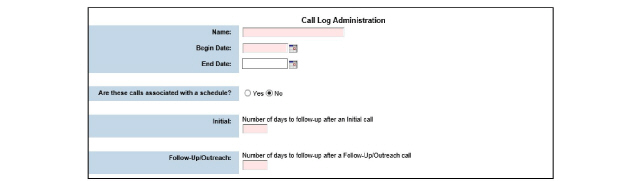
3. Fill out the needed information and click Submit in the status bar. The call log administration record is saved and listed on the Call Log Administration page. At this point, the call log administration record can be used to configure a service document instance.
Diagnostic Related Groupings (DRG) codes are diagnosis codes that are used by inpatient and residential treatment facilities. By default, the DRG module contains a list of nationally standardized codes. System administrators have the ability to activate and inactivate DRG codes. Active DRG codes can be used by clinicians to diagnose clients. The inactive DRG codes will not be available to diagnosis clients.
1. Navigate to Administration > Show Menu > DRG Codes. The DRG Codes page appears.
2. Fill out the needed information and click Submit in the status bar. The active and inactive settings are saved for the DRG codes.
Diagnosis Related Group (DRG) codes are used by payers to determine patient classifications that relate types of patients treated to the resources they consume. The DRG codes are related to a group of diagnoses. The DRG Mapping module is used to map a group of diagnoses to a DRG code.
1. Navigate to Administration > Show Menu > DRG Mapping. The DRG Mapping page appears.
2. Fill out the needed information and click Submit in the status bar. The DRG Mapping record is saved to the system.
|
After DRG codes have been mapped in the system, they can be deleted by accessing the DRG Mapping page and clicking the Delete button for the DRG mapping needing deletion. |
The 3rd Party Source module allows the set up and storage of information for any 3rd party organizations or persons that may have relationships with clients that need to be tracked in CareLogic.
1. Navigate to Administration > Show Menu > 3rd Party Source. The Search List for 3rd Party Sources page appears.

This page is used to complete the following tasks:
• Associate 3rd Party Sources with Organizations
1. Navigate to Administration > Show Menu > 3rd Party Source > Add 3rd Party Source. The 3rd Party Source Entry page appears.
2. Fill out the needed information and click Submit in the status bar. The 3rd party source information is saved in the system.
Associate 3rd Party Sources with Organizations
1. Navigate to Administration > Show Menu > 3rd Party Source > Click the Organizations button for the 3rd party source needing association with organizations. The Organization List page appears.
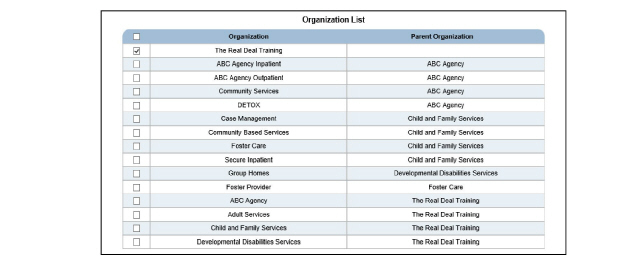
2. Check the organization’s boxes that need to be associated and click Submit in the status bar. The 3rd party source is associated with the selected organizations.
1. Navigate to Administration > Show Menu > 3rd Party Source > Click the Select button for the source needing an update. The 3rd Party Source Entry page appears for the selected source record.
2. After making the desired edits, click Submit in the status bar. The selected rule is updated saved to the system.
|
If the source has an active relationship to one or more clients, it cannot be deleted. |
1. Navigate to Administration > Show Menu > 3rd Party Source > Click the Delete button for the source needing deletion. A delete confirmation page appears.

2. Select Yes to confirm deletion and click Submit in the status bar. The selected source is deleted and is no longer listed on the 3rd Party Sources page.
Referring Physician Configurations
The Referring Physician Configuration allows an agency to define basic rules to indicate when a client or service requires a Referring Physician, based on criteria like payer plan, procedure, and age range.
1. Navigate to Administration > Show Menu > Referring Physician Configuration. The Referring Physician Configurations page appears.

This page is used to complete the following tasks:
• Add Referring Physician Configurations
• Update Referring Physicians Configurations
• Delete Referring Physicians Configurations
Add Referring Physician Configurations
1. Navigate to Administration > Show Menu > Referring Physician Configuration > Add Configuration. The Referring Physician Configuration Entry page appears.

2. Fill out the needed information and click Submit in the status bar. The configuration is saved and listed on the Referring Physician Configurations page.
Update Referring Physicians Configurations
1. Navigate to Administration > Show Menu > Referring Physician Configuration > Click the Select button for the configuration needing an update. The Referring Physician Configuration Entry page appears for the selected configuration record.
2. After making the desired edits, click Submit in the status bar. The selected configuration is updated and listed on the Referring Physician Configurations page.
Delete Referring Physicians Configurations
1. Navigate to Administration > Show Menu > Referring Physician Configuration > Click the Delete button for the configuration needing deletion. A delete confirmation page appears.

2. Select Yes to confirm deletion and click Submit in the status bar. The selected referring physician configuration is deleted and is no longer listed on the Referring Physician Configuration page.
The CareLogic Business Rules module allows the setup of business rules around Scheduling, Clinical Decision, Employee Document, and Treatment Plan activation.
1. Navigate to Administration > Show Menu > Business Rules. The Business Rules wizard page appears.
This page is used to complete the following tasks:
1. Navigate to Administration > Show Menu > Business Rules > Click the Scheduling Rules link in the wizard. The Scheduling Rules page appears.

2. Click Add Scheduling Rule in the status bar. The Scheduling Rule Entry page appears.
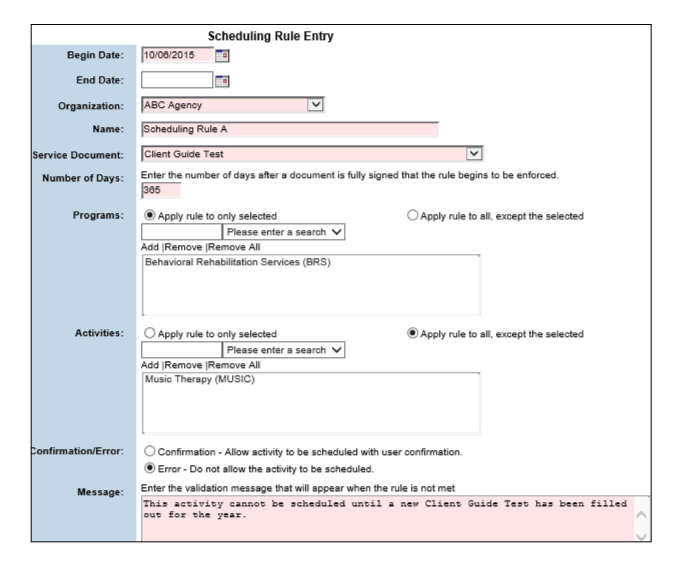
3. Fill out the needed information and click Submit in the status bar. The scheduling rule is saved to the system and listed on the Scheduling Rules page.
|
Schedule Rules can be set up to add soft and hard stops to the system so that administrators can put an expiration date on a service document and require that it be completed before and activity can be scheduled (Error radio button) or allow the activity to be scheduled with user acknowledgment (Confirmation radio button). In the example above, the Client Guide Test service document is valid for 365 days for clients in the Behavioral Rehabilitation Services (BRS) program, after which, the user will be prompted to complete that service document again before the client is permitted to be scheduled for additional services. Because the Error button is selected in the Confirmation/Error field it will be required. Music Therapy (MUSIC) will be allowed to be scheduled because it is included in the Activities field and the exception radio button is checked. |
1. Navigate to Administration > Show Menu > Business Rules > Click the Clinical Decision Rules link in the wizard. The Clinical Decision Rules page appears.

2. Click Add Clinical Decision Rule in the status bar. The Clinical Decision Rule Entry page appears.
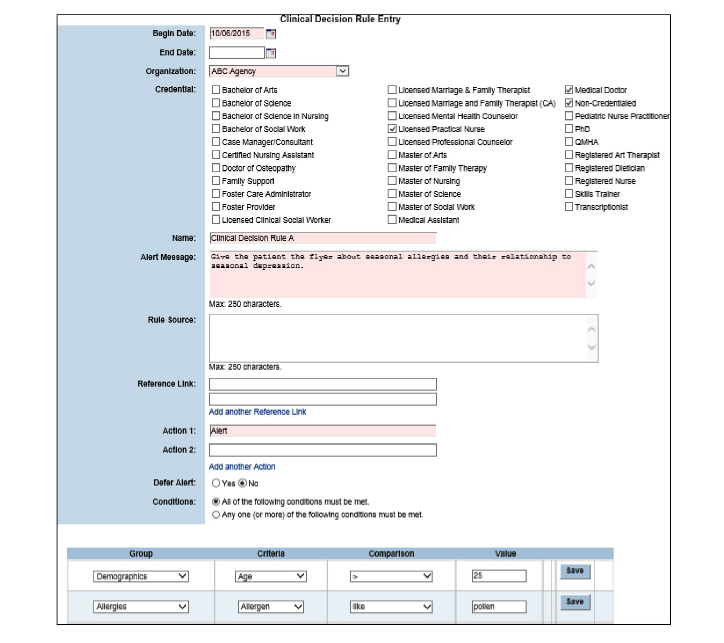
3. Fill out the needed information and click Save to save the clinical decision rule information entered. The Clinical Decision Rule information entered is saved.
|
Clinical Decision Rules allow administrators to manage and influence staff actions through the system and to alert staff when certain conditions are met. In the example above, Clinical Decision Rules will prompt LPNs, MDs, and Non-Credentialed staff to give the patient a flyer if their age is above 25 in demographics and report having an allergy to pollen. |
Employee Document Rules are configured to work with the Documentation Review module in the Employee tab. (See Documentation Review in the Employee Guide.) Documentation Review rules can be created and applied to staff by individual or role. Reviews can also be set based on a service document. Review periods can be adjusted to suit business needs.
1. Navigate to Administration > Show Menu > Business Rules > Click the Employee Document Rules link in the wizard. The Employee Document Rules page appears.
2. Click Add Employee Document Rule in the status bar. The Employee Document Rules Entry page appears.
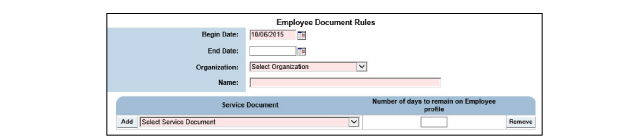
3. Fill out the needed information and click Submit.
1. Navigate to Administration > Show Menu > Business Rules > Click the Treatment Plan Rules link in the wizard. The Treatment Plan Rules page appears.

2. Click Add Treatment Plan Rule in the status bar. The Treatment Plan Rule Entry page appears.

3. Fill out the needed information and click Submit in the status bar. The treatment plan rule is saved to the system and listed on the Current Treatment Plan Rules page.
|
Treatment Plan Rules are configured to alert staff and their supervisors a set number of days before a treatment plan expires. The rule can be set to be activated based on staff credential, if desired. They are also used to set the end dates that Treatment Plans and Treatment Plan Reviews are valid. |
The object of Clinical Quality Measures is to report ambulatory clinical quality measures to Centers for Medicare and Medicaid (CMS). There are three core measures, three alternate core measures, and three additional measures. CareLogic provides nine measures to choose from. The measures are:
Core
• NQF 0421, PQRI 128 – Adult Weight Screening and Follow-Up
• NQF 0013 – Hypertension: Blood Pressure Management
• NQF 0028 – Preventive Care and Screening Measure Pair: a. Tobacco Use Assessment, b. Tobacco Cessation Intervention
Alternate Core
• NQF 0041, PQRI 110 – Preventive Care and Screening: Influenza Immunization for Patients 50 Years and Older
• NQF 0024 - Weight Assessment and Counseling for Children and Adolescents
• NQF 0038 – Childhood Immunization Status
Additional Measures
• NQF 0004 – Initiation and Engagement of Alcohol and Other Drug Dependence Treatment: a. Initiation, b. Engagement
• NQF 0105, PQRI 9 – Major Depressive Disorder (MDD): Antidepressant Medication During Acute Phase for Patients with MDD
• NQF 0027, PQRI 115 – Preventive Care and Screening: Advising Smokers to Quit
Inputs are gathered through service document modules and reported via XML document. (See Add Service Documents.)
A menu link for Clinical Quality Measures Report (admin_qm$.search_form) should be added to access reports. (Refer to Menu Management System.)
Create a Clinical Quality Measures Report
1. Navigate to Administration > Show Menu > CQM Reporting. The Clinical Quality Measure page appears.

2. Click Add New CQM Report. The Add New CQM Report page appears.
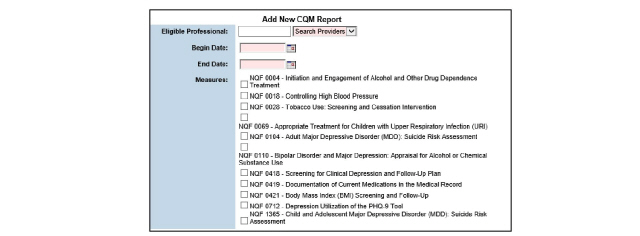
3. Fill out the needed information and click Submit. The Clinical Quality Measures page will be displayed and contain the completed report.
View a Clinical Quality Measures Report
1. Navigate to Administration > Show Menu > CQM Reporting. The Clinical Quality Measure page appears.
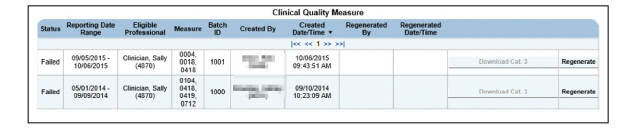
2. Click the desired report to view.
If an agency is not using a third party vendor partnered with CareLogic to prescribe and record medications, the Medications module is used to maintain a list of medications that can be prescribed to clients. Medications set up in this section are used to populate Medication drop-down list fields that appear in the Clinical Record module. A clinician can only prescribe medications that are set up in this section.
1. Navigate to Administration > Show Menu > Medications. The Medication List page appears.

This page is used to perform the following tasks:
• Associate Medications with Organizations
|
The Medication Manufacturer descriptor list must be populated before adding medications. |
1. Navigate to Administration > Show Menu > Medications > Add a Medication. The Medication Information page appears.
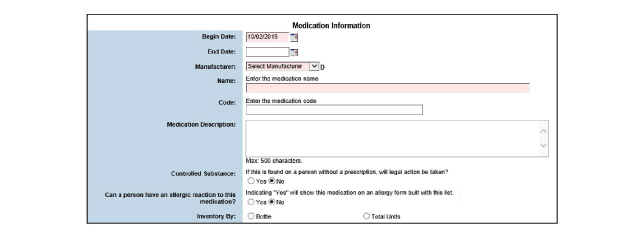
2. Fill out the needed information and click Submit in the status bar. The medication record is saved and listed on the Medication List page.
Associate Medications with Organizations
When a new medication record is added, it is only available at the organization of the staff member who added it initially. Following are instructions for making medications available to child organizations:
1. Navigate to Administration > Show Menu > Medications > Click the Organization button for the medication needing to be associated. The Medication Organization List page appears for the selected medication.
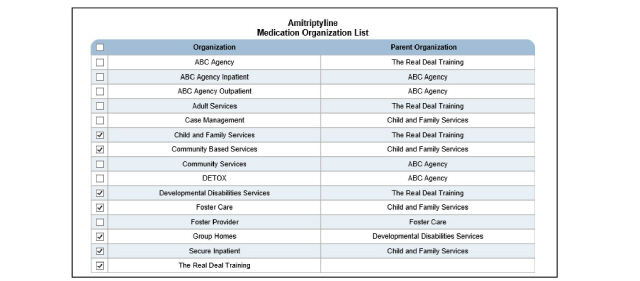
2. Select the checkbox next to each organization that should be associated with the medication and click Submit in the status bar. The medication organization matrix record is saved.
1. Navigate to Administration > Show Menu > Medications > Click the Select button of the medication needing an update. The Medication Information page appears.
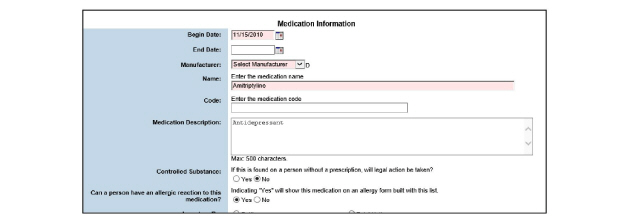
2. After making the desired edits, click Submit in the status bar. The updated record is saved and listed on the Medication List page.
Enabling the Medication Reconciliation feature will display a Reconciliation button on the Medications module and in any service document that contains the Medications module.
Set Up Medication Reconciliation
The Medication Reconciliation feature can be configured at any organization level. Child organizations will inherit parent configurations unless the child configuration is explicitly set.
Qualifacts recommends setting it at the parent level only unless a business case necessitates exceptions. Contact Qualifacts for assistance.
The Medication Consent process allows staff to obtain a client’s consent to medication. Client consent creates a record which can be reviewed. Child organizations can override their parent organization’s selection by configuring the Medication Consent feature at their level.
Organizations can customize the Medication Consent service document to meet their needs. Each organization using Medication Consent needs to have an electronic signature pad to capture the client’s signature.
|
Expiring consents will trigger an alert that displays the name of the expiring consent document. The alert provides a link to the expiring client consent form. |
Create a Medication Consent Service Document
A Medication Consent service document should be created to capture consents and signatures. The service document code should be MEDCON and the service document must be able to be created in the ECR. Refer to Add Service Documents.
The service document can be configured to capture the client signature on the same page as the information being consented to or capture the signature separately.
Instance a Medication Consent Service Document
The Medication Consent service document needs to include the Medication Consent module to function correctly. Refer to Add Instances to Service Documents.
This chapter is used to set up the billing-related administration modules. The following topics are included in this chapter:
• Maintaining HCFA and UB04 Configurations
• Checking Client Eligibility in Batch Mode
• Check a Client’s Payer Eligibility in Real Time
• Setting Up Service Locations by Organization
• Setting Up Type of Bill by Organization
• Setting Up Point of Entry Mappings
• Setting Up Sliding Fee Scales
• Setting Up Dynamic Sliding Fee Scales
• Setting Up Bill Next Procedure Mappings
• Setting Up Billing Categories
The Organizations module is used to set up organizations in a business unit. It can be configured for a single organization or multiple organizations.
1. Navigate to Administration > Show Menu > Organizations. The Organization List page appears.
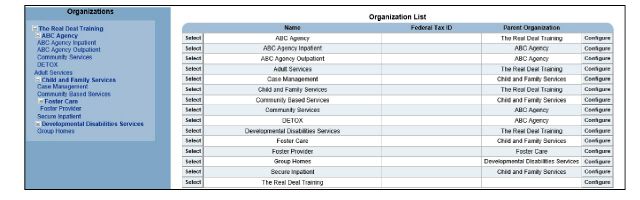
The Organization List page is used to perform the following tasks:
• Set Up a Multi-Tier Organizational Structure
1. Navigate to Administration > Show Menu > Organizations > Add an Organization. The Organization Information page appears.
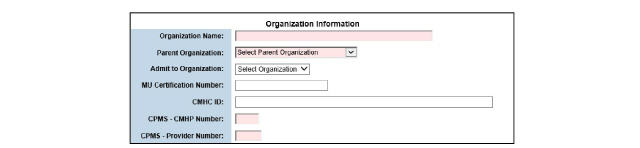
2. Fill out the required information and click Submit in the status bar. The organization record is saved and listed on the Organization List page.
Set Up a Multi-Tier Organizational Structure
The Organizations module can be used to configure a multi-tier (Parent-Child) organizational structure. Using the multi-tiered model, data, including consumer data, can be shared across organizations. The following rules apply:
• When a child organization is created, it inherits the menu management system that is defined for its parent organization. Once created, the menu management system can be modified to meet the child organization’s needs.
• System data is filtered at the organization level, so every drop-down list in the system is specific to an organization.
• Staff members in a parent organization have access to data in the child organizations.
• Client searches allow access to the clinical records that are in the current organizational branch alone. (An organizational branch includes all organizations above and below the current organization.) If the client episode was created in a different organizational branch, it cannot be accessed through client search.
|
Example: Parent Organization has two child organizations, Child 1 and Child 2. Users performing a search while logged into Parent Organization will query all 3 organizations. Users logged into a Child 1 organization will find patients in the Parent Organization when performing a search, but not in Child 2. |
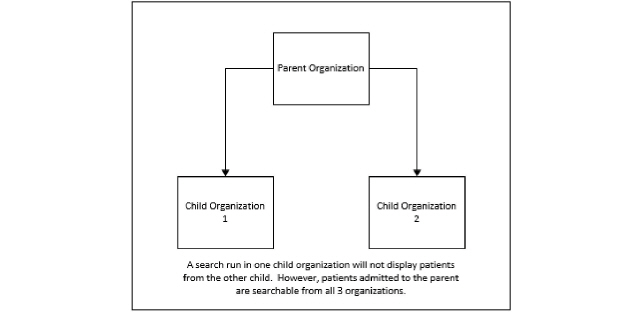
• Staff searches are used to search for staff members across all organizations. However, only the staff records that are in the current organization or a child organization can be accessed. If a staff record is in a parent of the current organization, or in a different organizational branch, the staff record cannot be accessed.
Staff members have access to data in their current organization level and child organizations by default.
1. Navigate to Administration > Show Menu > Organizations > Click the Select button for the organization desired. The Organization Information page appears.
2. After making the desired edits, click Submit in the status bar. The updated organization is saved and listed on the Organization List page. Changes are effective immediately.
Procedure codes are nationally standardized codes that describe the type of service provided. When a bill is submitted to a payer, a procedure code is included on the claim. The procedure code tells the payer about the type of service for which they are being billed. During the billing process, activity codes are converted to procedure codes.
|
Procedures in this section assume the revenue code feature is disabled. (Refer to Setting Up Revenue Codes to use revenue code features.) |
1. Navigate to Administration > Show Menu > Procedures. The Procedure Code Administration page appears.
This page is used to perform the following tasks:
• Reviewing Activity/Procedure Mappings
• Creating a New Standard Fee for an Existing Procedure Code
It is important to understand that the actual procedure code and the description need to be the same across every organization. However, a unique standard fee for each organization can be configured. This means the same procedure code and description can have different standard fees in different organizations.
1. Navigate to Administration > Show Menu > Procedures > Add a Procedure. The Procedure Code Entry page appears under the Procedure Fee History.
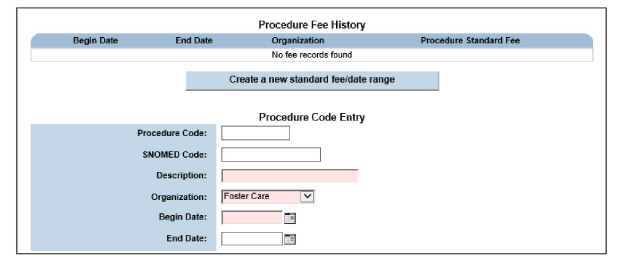
2. Fill out the information needed and click Submit in the status bar. The procedure code is saved and listed on the Procedure Code Administration page.
|
Once the procedure code is used to create a claim, the standard fee cannot be modified. Instead, use the instructions Creating a New Standard Fee for an Existing Procedure Code to create a new standard fee/date range record. |
Reviewing Activity/Procedure Mappings
The Activity-Procedure Mapping page is used to review procedure mappings that are set up for an activity. Activity/procedure mappings are set up through the Procedure module.
1. Navigate to Administration > Show Menu > Procedures > Click the Activity button for the Procedure needing to be viewed. The Activity-Procedure Mapping page appears for the selected procedure.
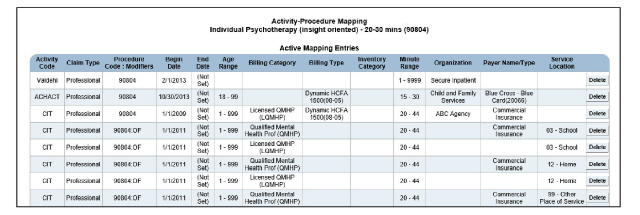
2. Select a record to view its details. The selected record appears on the Activity-Procedure Mapping Entry page. It can be modified, as needed.
A single procedure code record consists of two parts:
• The parent level, which includes the procedure code number and description.
• The child level, which includes the standard fee and date range.
There can be many child records associated with a single parent level. Each time a procedure code is accessed in edit mode, the standard fee/date range history is listed.
If the procedure code’s standard fee changes, create a new standard fee/date range record for the procedure code. (See Creating a New Standard Fee for an Existing Procedure Code.) By doing so, the procedure code remains backward compatible.
|
If a procedure code has been used to generate a claim, the procedure code number cannot be modified. A procedure code number can only be modified if it is not attached to a claim. |
1. Navigate to Administration > Show Menu > Procedures > Select the code that should be updated > Click the Select button for the Procedure Fee needing an update.
|
Each procedure code record needs a unique combination of organization and date range. If either item is modified for a record, it cannot overlap with an existing record listed in the Procedure Fee History section. |
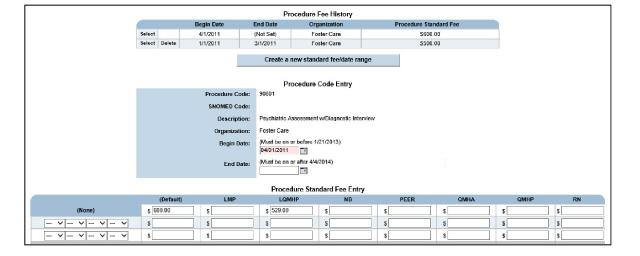
2. Make the desired edits and click Submit in the status bar. The selected procedure code is updated and listed on the Procedure Code Administration page.
|
If the procedure code has been used to create a claim, the Procedure Code field appears in view-only mode and cannot be modified. |
Creating a New Standard Fee for an Existing Procedure Code
When the standard fee associated with a procedure code changes, a new standard fee/date range can be created from the existing procedure code record. This method is preferable to updating the existing standard fee because it ensures that the procedure code will remain backward compatible.
Standard fee/date range records associated with a procedure code cannot overlap. Before a new standard fee/date range record can be created, the existing record must be end dated.
|
Example: The standard fee for a service changes. The existing standard fee and date range is end dated and a new record is completed. Two standard fee/date range records (new and old) will now be associated with the procedure code. Both of these records will be listed in the Procedure Fee History section. |
1. Navigate to Administration > Show Menu > Procedures > Click the procedure code needing an update. The Procedure Fee History page appears.
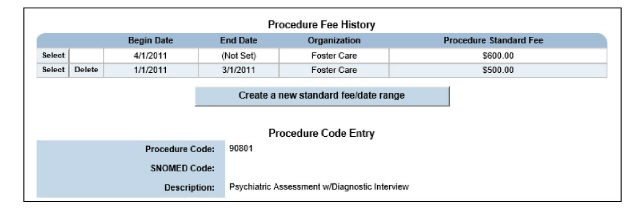
2. Click the Select button corresponding with the Procedure Revenue Fee needing an update. The page becomes editable.
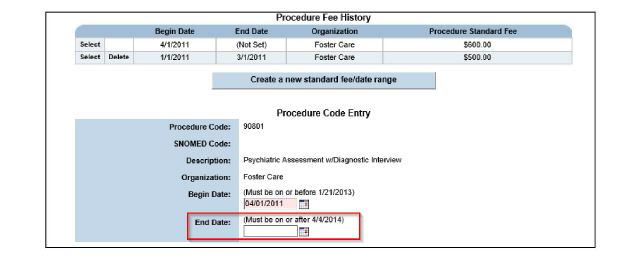
3. Complete the End Date field and click Submit in the status bar. The record is updated and the Procedure Code Administration appears.
4. Click updated code > Click the Select button of the record that was just end dated. The Procedure Code Entry page appears.
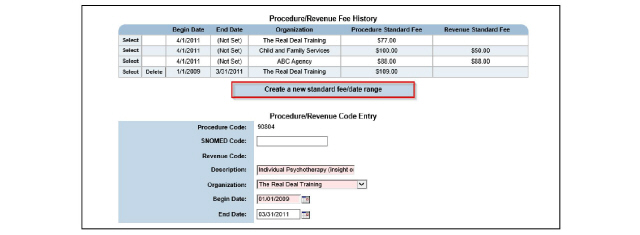
5. Click the Create a New Standard Fee/Date Range button. A copy of the Procedure Code Entry page is created. The existing values remain in the Procedure Code and Description fields.
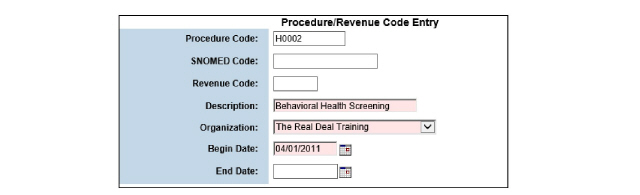
6. Fill out the new information and click Submit in the status bar. The new standard fee/date range record is created for the selected procedure code.
|
Once a procedure code has been used to generate a claim, it cannot be deleted. |
1. Navigate to Administration > Show Menu > Procedures > Click the Delete button for the procedure code needing deletion. A confirmation page appears.
2. Select OK to confirm deletion of the selected procedure code. The selected procedure code is deleted from the system.
Revenue codes and fees are used to generate Institutional claims. When the revenue code configuration is enabled by QSI, revenue codes and standard fees are set up in the Procedures module, and the contracted rates are set up in the payer plan fee matrices.
|
If revenue codes are needed for facility billing, enable the facility billing configuration. (See Setting System Configuration for Facility Billing.) |
Claim Engine Logic for Revenue Codes
The following diagram explains the logic used by the Claim Engine when processing revenue and procedure codes.
|
In the following illustration, revenue codes are used without the facility billing feature enabled. |
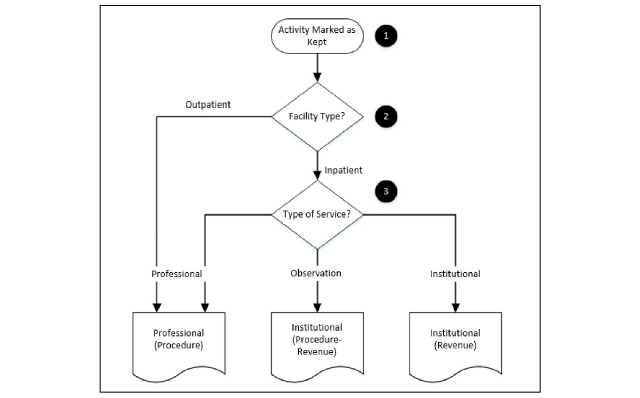
• Once the status of an activity is marked as Kept, it is processed by the nightly run of the Claim Engine.
• The first check by the Claim Engine is to determine the type of facility (outpatient or inpatient) that provided the service.
• For outpatient services, a Professional claim is created based on the procedure code and fee.
• For inpatient services, the Claim Engine will determine the type of service being processed.
• The Claim Engine’s final check is to determine the type of inpatient service being processed. The following options are possible.
- Professional services include Individual Therapy and Office Visits. For professional services, a Professional claim is generated based on the procedure code and fee.
- Observation services occur during pre-admission. Organizations use observation services to assess clients for less than 24 hours to determine if they should be admitted for treatment. For observation services, an Institutional claim is generated based on the procedure and revenue codes and fees.
- Institutional services include per diem services, such as room and board or food. For institutional services, an Institutional claim is generated based on the revenue code and fee.
By default, the system is not set up to allow revenue codes and fees. If revenue codes are needed, use the following outline to set it up:
1. Setting System Configuration to Enable Revenue Codes
2. Setting Up Procedure/Revenue Codes
3. Setting Up Payer Plan Fee Matrices
Setting System Configuration to Enable Revenue Codes
When this configuration is enabled, an organization can use revenue codes and fees. Contact Qualifacts for assistance.
Setting Up Procedure/Revenue Codes
The Procedures module is used to set up procedure codes, revenue codes, and their standard fees. The procedure code and fee is used to generate Professional claims. The revenue fee and the code format defined for the payer plan (Procedure only, Revenue only, Procedure-Revenue, or Revenue- Procedure) is used to generate Institutional claims.
1. Navigate to Administration > Show Menu > Procedures. The Procedure/Revenue Code Administration page appears.

2. Click Add a Procedure/Revenue in the status bar. The Procedure/Revenue Fee History page appears.
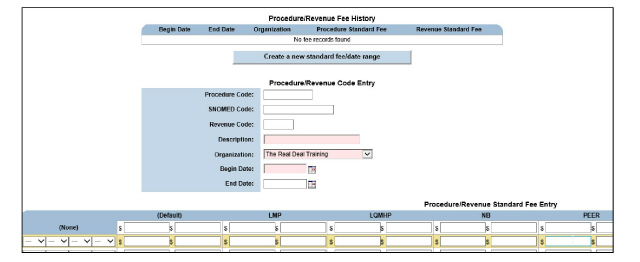
3. Fill out the needed information and click Submit in the status bar. The procedure/revenue code is saved and listed on the Procedure/Revenue Code Administration page.
Setting Up Payer Plan Fee Matrices
A fee matrix should be set up for each payer plan. The fee matrix defines contracted rates payer plans will pay for procedure codes and revenue codes.
|
In addition to the contracted rates set up for payer plans, standard fees for each procedure code and revenue code need to be set up. (See Setting Up Procedure/Revenue Codes.) The contracted rate must be equal to or less than the standard fee. If the standard fee is less than the contracted rate, the Claim Engine generates an error. |
1. Navigate to Administration > Show Menu > Payers. The Payers page appears.
2. Identify the payer needing a payer plan set up and click its Payer Plans button. The Payer Plans page appears for the selected payer.

3. Click the Fees button for the payer plan desired. The Fee Matrix page appears for the selected payer plan.

4. Click Add Fee Matrix in the status bar. The Payer Plan Date Range Entry page appears.
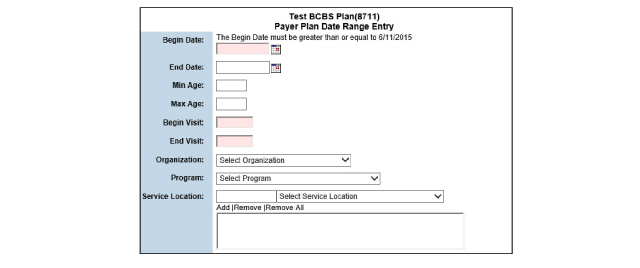
|
The begin date for the fee matrix must be equal to or later than the begin date for the payer plan. |
5. Fill out the needed information and click Submit in the status bar. The payer plan date range record is saved and listed on the Fee Matrix page.

6. Click the Fee Matrix button of the record created. The Fee Matrix page appears.

7. Click Add New Fees. The Fee Matrix page appears for the selected procedure code.

|
A fee for every billing category that the payer is responsible for should be defined. If a fee is not defined for a billing category, and staff associated with that billing category treat a client for the selected procedure, the Claim Engine will produce a Failed Claim. |
8. Fill out the needed information and click Submit. The fee matrix is saved for the selected procedure code.
Modifiers are nationally standardized codes attached to procedure codes to provide additional information about the billed procedure.
For example, if when billing for an office visit, the procedure code 99213 could be used with the modifier HE to indicate that it was related to a mental health program.
A modifier can affect the fee calculation for services. In these situations, it is important to remember that modifiers affect the contracted rate (the expected amount), rather than the standard fee (the billed amount).
1. Navigate to Administration > Show Menu > Modifiers. The Modifiers page appears.

This page is used to perform the following tasks:
• Associating Modifiers with Organizations
1. Navigate to Administration > Show Menu > Modifiers > Add Modifier. The Modifier Entry page appears.

2. Fill out the needed information and click Submit in the status bar. The modifier is saved and listed on the Modifiers page.
Associating Modifiers with Organizations
When a new modifier is added, it is only available at the organization where it is set up, by default.
1. Navigate to Administration > Show Menu > Modifiers > Click the Organization button for the modifier that needs to be associated with organizations. The Organization List page appears for the selected modifier. This list includes the current organization and its child organizations.
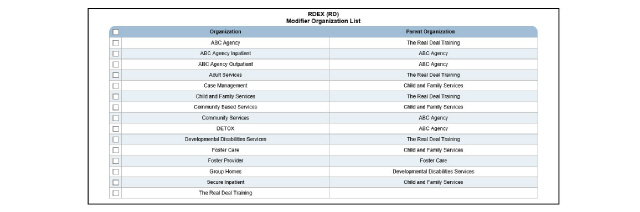
2. Select the checkbox next to each organization with which the modifier should be associated and click Submit in the status bar. The modifier organization matrix record is saved.
A single modifier record consists of two parts:
• The parent level, which includes the modifier code number and description.
• The child level, which includes the percentage fee and date range.
Each time a modifier is accessed in edit mode, the percentage fee change/date range history is listed.
If the modifier’s percentage fee changes, it is recommended to create a new percentage fee change/date range record for the modifier. This ensures the modifier remains backward compatible.
|
If a modifier has been used to generate a claim, the modifier code cannot be updated. A modifier code can only be updated if it is not attached to a claim. |
1. Navigate to Administration > Show Menu > Modifiers > Click the Select button for the modifier desired. The modifier appears in edit mode.

2. Make desired edits on the Modifier Entry page and click Submit in the status bar. The selected modifier is updated and listed on the Modifiers page.
Once a modifier has been used to generate a claim, it cannot be deleted.
1. Navigate to Administration > Show Menu > Modifiers > Click the Delete button for the desired modifier. A deletion confirmation appears.
2. Click OK to confirm deletion. The selected modifier is deleted from the system.
Activity codes define how an organization records services internally. Every billable event an organization provides needs an activity code.
|
Billable order activities require a different set up than client and group activities. When creating an order activity, a corresponding activity/procedure mapping or service document crosswalk does not have to be set up. (See Configuring Billable Orders for instructions about setting up billable orders.) |
Each billable activity, except billable order activities, should have an activity/procedure mapping and a service document crosswalk. (See Setting Up Activity/Procedure Mappings and Service Document Crosswalks.) When a billable activity is marked as Kept, it will be processed by the nightly run of the Claim Engine. If the activity/procedure mapping or service document crosswalk record is missing, an error will occur.
|
If the system is not configured to use the Activity-Program Matrix, the Program Matrix button will not appear in the Activities list by default. To update the activity-program mappings, click the Update Program Mappings button in the status bar. This button displays the Program Matrix button and also filters the Activities list to display only the activities mapped to the current organization. |
1. Navigate to Administration > Show Menu > Activities. The Active Activity Codes page appears.
This page is used to perform the following tasks:
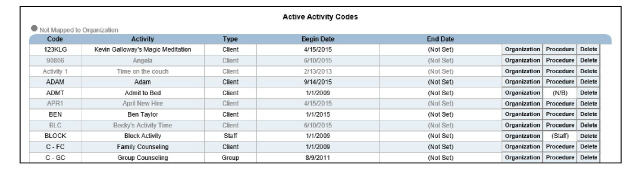
• Associating Activities with Organizations
• Setting Up Activity/Procedure Mappings
1. Navigate to Administration > Show Menu > Activities > Add Activity. The Add Activity page appears.
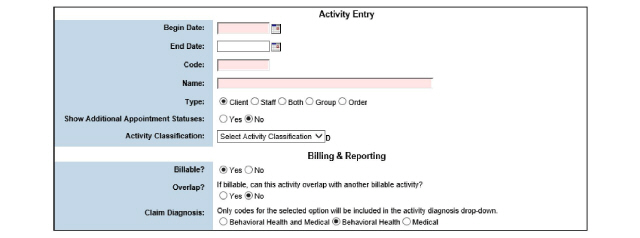
2. Fill out the needed information and click Submit in the status bar. The activity code is saved and listed on the Activity Codes page.
Associating Activities with Organizations
When a staff member adds a new activity, it will only be available at their location. However, it is possible to make activities available to other organizations.
1. Navigate to Administration > Show Menu > Activities. Click the Organization button of the activity desired. The Organization List page appears.
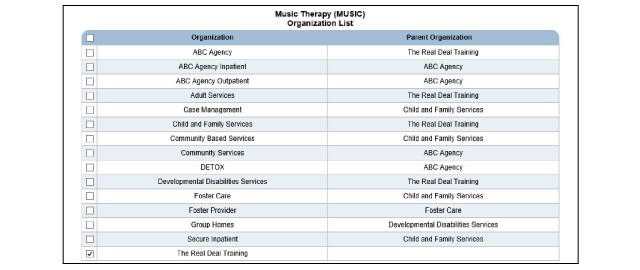
|
The activity will appear gray if the activity is not mapped to the organization where the user is logged in. |
2. Mark the desired checkboxes and click Submit in the status bar. The activity organization matrix record is saved.
1. Navigate to Administration > Show Menu > Activities > Click the activity needing an update. The Activity Entry page appears.
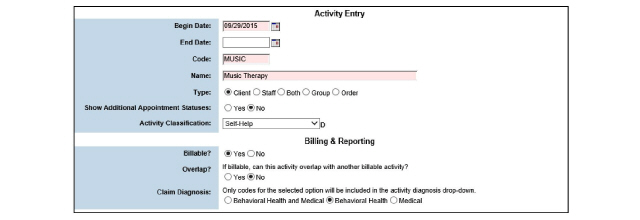
2. Make desired edits and click Submit in the status bar. The activity code is updated and listed on the Activity Codes page.
Setting Up Activity/Procedure Mappings
Activity/procedure mappings contain a set of user-defined parameters that tell the system which procedure code to use for an activity. It links an activity code to procedure codes.
1. Navigate to Administration > Show Menu > Activities > Click the Procedure button for the activity code desired. The Activity-Procedure Mapping page appears for the selected activity.
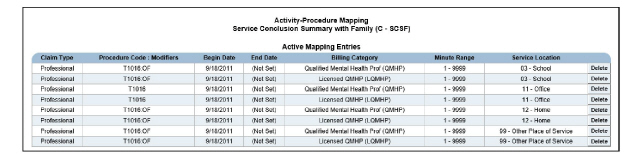
This page is used to perform the following tasks:
• Adding Activity/Procedure Mappings
• Updating Activity/Procedure Mappings
• Deleting Activity/Procedure Mappings
Adding Activity/Procedure Mappings
Activity/procedure mappings are used by the Claim Engine to convert internal activity codes to nationally standardized procedure codes that are used to generate claims. When setting up mappings, it should be remembered that a single activity code can be mapped to multiple procedure codes. Once the mappings are established, the standard fees that are set up for the procedure codes are used as the basis for calculating charges for the activity.
The Add-On Procedures section of the page is used to add procedure codes to the activity so that more that one billable procedure may result from a singe activity performed.
1. Navigate to Administration > Show Menu > Activities > Click the Procedure button for the activity code desired > Add Mapping Entry. The Activity-Procedure Mapping Entry page appears.
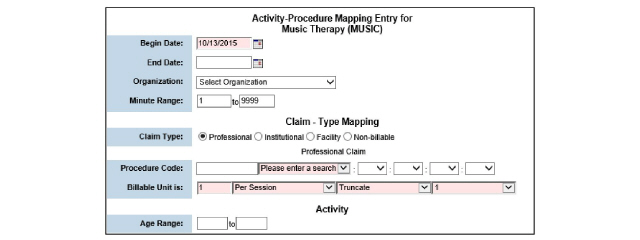
2. Fill out the needed information and click Submit in the status bar. The activity/procedure mapping is saved and listed on the Activity Procedure Matrix page.
Updating Activity/Procedure Mappings
1. Navigate to Administration > Show Menu > Activities > Click the Procedure button for the activity code desired > Click the activity/procedure mapping desired. The Activity-Procedure Mapping Entry page appears.
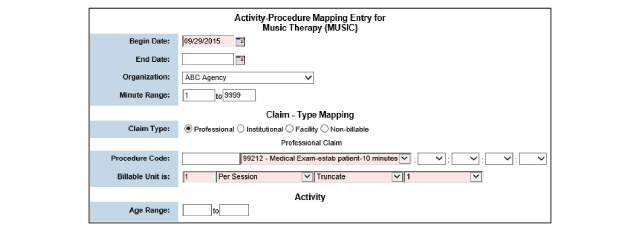
2. After making the desired edits, click Submit in the status bar. The activity/procedure mapping is updated and listed on the Activity Procedure Matrix page.
Deleting Activity/Procedure Mappings
Once an activity/procedure mapping has been used in the system, it cannot be deleted.
1. Navigate to Administration > Show Menu > Activities > Click the Procedure button for the activity code desired > Click the Delete button for the activity/procedure mapping needing deletion. A confirmation message appears.
2. Select OK to confirm deletion of the selected activity/procedure mapping. The activity/procedure mapping is deleted from the system.
Once an activity code has been used in the system, it cannot be deleted.
1. Navigate to Administration > Show Menu > Activities > Click the Delete button for the activity code needing deletion. A confirmation message appears.
2. Select OK to confirm deletion. The selected activity code is deleted from the system.
The Programs module is used to maintain a list of treatment programs an organization offers. Once the treatment programs are set up, clients can be enrolled through the ECR. When an activity is scheduled, the treatment program needs to be identified.
|
If the system is not configured to use the Activity-Program Matrix, the Activities button does not appear. To update activity-program mappings, click the Update Activity Mappings button in the status bar. |
1. Navigate to Administration > Show Menu > Programs. The Active and Inactive Program Administration page appears.

This page is used to perform the following tasks:
• Associate Programs with Organizations
• Simultaneous Program Exclusions
• Set Up an Activity Program Matrix
• Set Up Activities for Per Diem Programs
|
After adding a treatment program, the program should be added to an episode type in order to admit a client. (See Episode of Care Types.) |
1. Navigate to Administration > Show Menu > Programs > Add a Program. The Program Administration appears.
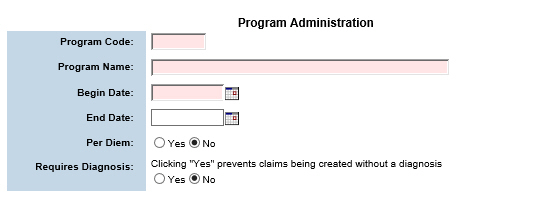
2. Enter the needed information and click Submit in the status bar. The new program is saved and listed on the Program Administration page.
Associate Programs with Organizations
When a new treatment program is added, it is only available at the organization of the staff member who added it initially. This task includes instructions for making treatment programs available to other organizations.
1. Navigate to Administration > Show Menu > Programs > Click the Organization button for the program needing association with organizations. The Organization List page appears.
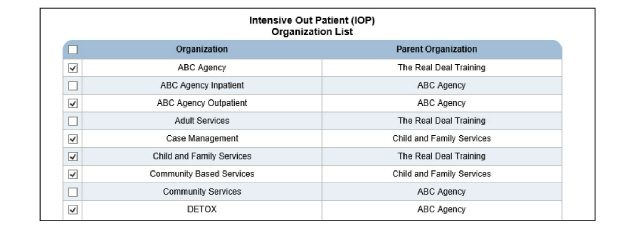
2. Check the boxes of the organizations desired and click Submit in the status bar. The program organization matrix record is saved.
Simultaneous Program Exclusions
Programs that should not be active at the same time can be mutually excluded. For example, a consumer should not be enrolled in an adult mental health program and a child and adolescent mental health program at the same time.
1. Navigate to Administration > Show Menu > Programs > Click the Exclusion button next to the desired program. The Program Exclusions page appears. It will allow users to exclude programs that should not be active at the same time.
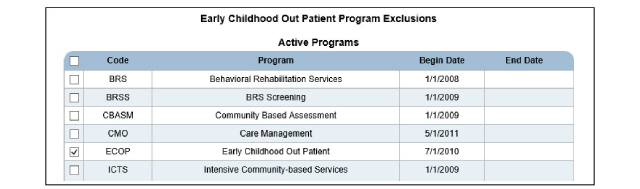
2. Identify any program that should not be active at the same time by clicking on the checkbox next to the program name and click Submit.
1. Navigate to Administration > Show Menu > Programs > Click the program needing an update. The Program Administration page appears.
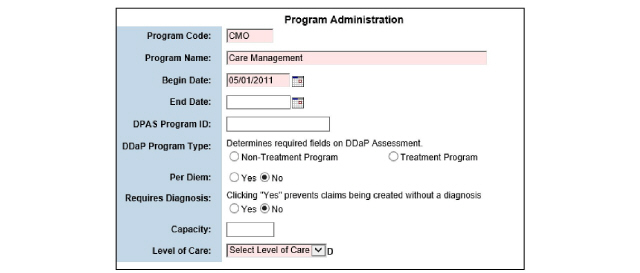
2. After making the desired edits, click Submit in the status bar. The updated program is saved.
Set Up an Activity Program Matrix
An activity program matrix is set up to define which activities can be associated with each treatment program. Once the matrix is set up, it is used by the Schedule.
1. Navigate to Administration > Show Menu > Programs > Click the Activities button for the program needing an update. The Activity Code List appears for the selected program.
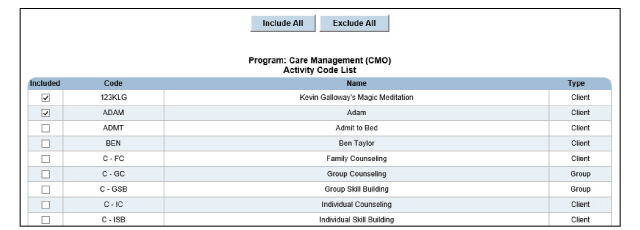
2. To associate an activity with the program, click its checkbox. Selecting the Included checkbox means the activity can be scheduled for the selected program. Click Submit in the status bar. The activity program matrix record is saved.
Set Up Activities for Per Diem Programs
Activities can be defined for each per diem treatment program. Once activities are set up, the system generates services each day clients are enrolled in the program. This feature allows the billing of multiple services for per diem programs. For example, inpatient detox programs can bill for rooms and food in addition to detox sessions attended by a client.
1. Navigate to Administration > Show Menu > Programs > Click the Per Diem button for the desired program. The Per Diem Activities page appears.

This page is used to perform the following tasks:
• Adding Activities to a Per Diem Program
• Updating the Activities Associated With a Per Diem Program
• Deleting the Activities Associated With a Per Diem Program
Adding Activities to a Per Diem Program
1. Navigate to Administration > Show Menu > Programs > Click the Per Diem button for the desired program > Add Per Diem Activities. The Admin Program Activity page appears for the selected program.
|
The date range of the per diem activity record must fall within the date range of the related per diem program. |
2. Add the desired activities and click Submit in the status bar. The per diem activity record is saved and listed on the Per Diem Activities page. Once the record becomes active, it will be processed by the nightly run of the Claim Engine. If the system finds a successful match for the combination of client, program, and date, the Claim Engine will generate the services for clients enrolled in the program. The services appear as one-minute activities on the Schedule and their status is set to Kept so they are processed by the Claim Engine.
Updating the Activities Associated With a Per Diem Program
Once a per diem activity record is used to create services, the only fields that can be modified are the Begin Date and End Date.
1. Navigate to Administration > Show Menu > Programs > Click the Per Diem button for the desired program > Click the Select button of the desired record. The Admin Program Activity page appears.
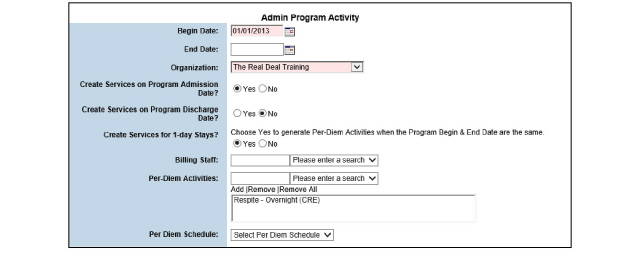
|
The Begin Date and End Date fields cannot be modified if the new date range will create orphan records. |
2. Make desired edits and click Submit in the status bar. The record is updated and listed on the Per Diem Activities page.
Deleting the Activities Associated With a Per Diem Program
|
Once a per diem activity record is used to create services, the record cannot be deleted. |
1. Navigate to Administration > Show Menu > Programs > Click the Per Diem button for the desired program > Click the Delete button desired. The Delete Per Diem Record page appears.

2. Select Yes to confirm deletion.
3. Click Submit in the status bar. The selected record is deleted.
Payer panels assign staff members to groups that can be attached to specific payers. Staff members who are part of the payer panel are authorized to perform services for that payer. Payer panels are useful when staff members are authorized to perform services for multiple payers.
When establishing payer panels, system administrators should be aware of the following information:
• A staff member can be a member of more than one payer panel.
• A staff member can be authorized to perform services for two different programs for the same payer. To do this, add the staff member to the same payer panel twice, once for each program.
• Staff members are always assigned to payer panels, which are then attached to specific payers.
1. Navigate to Administration > Show Menu > Payer Panels. The Payer Panel Administration page appears.

This page is used to perform the following tasks:
• Assign Staff Members to Payer Panels
• Associate Payer Panels with Organizations
1. Navigate to Administration > Show Menu > Payer Panels > Add Panel. The Panel Entry page appears.

2. Enter the name of the panel and click Submit in the status bar. The payer panel record is saved and listed on the Payer Panel Administration page.
Assign Staff Members to Payer Panels
Staff members can only be assigned after the payer panel has been created.
1. Navigate to Administration > Show Menu > Payer Panels > Click the Members button for the payer panel needing staff members assigned. The Panel Member List page appears.

2. Click the Add Panel Member button. The Panel Member Entry page appears.
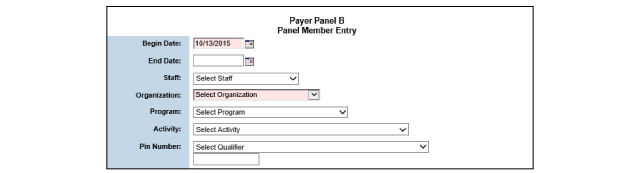
3. Fill out the needed information and click Submit in the status bar. The staff member is added to the payer panel and is listed on the Panel Member List page.
Associate Payer Panels with Organizations
When a new payer panel is added, it is only available at the organization of the staff member who added it initially. This task includes instructions for making payer panels available to other organizations.
1. Navigate to Administration > Show Menu > Payer Panels > Click the Organization button for the payer panel needing association with additional organizations. The Organization List page appears for the selected payer panel.
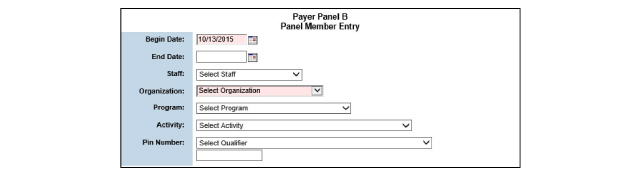
2. Associate the selected payer panel with organizations by selecting their checkboxes, then click Submit in the status bar. The payer panel organization matrix record is saved.
1. Navigate to Administration > Show Menu > Payer Panels > Click the payer panel needing an update. The Panel Entry page appears.

2. In the Panel Name field, edit the name of the payer panel.
3. Click Submit in the status bar. The payer panel record is updated and listed on the Payer Panel Administration page.
If there are payer provider records attached to a payer panel, it cannot be deleted.
1. Navigate to Administration > Show Menu > Payer Panels > Click the Delete button for the payer panel needing deletion. A confirmation window appears.
2. Select OK to confirm deletion. The selected payer panel is deleted from the system.
Maintaining HCFA and UB04 Configurations
The HCFA/UB04 Configuration module allows an organization to control the information that is printed on their HCFA and UB04 claim forms. As many dynamic HCFA or UB04 records can be created as needed.
|
The Dynamic HCFA module supports the CMS 1500 (08/05) form only. |
1. Navigate to Administration > Show Menu > Dynamic HCFA. The Available HCFA and UB04 Configurations lists appear.
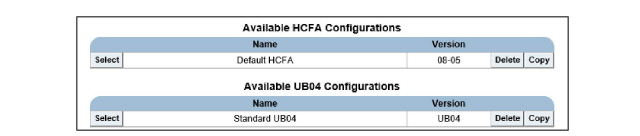
This page is used to complete the following tasks:
• Copying Dynamic HCFA Configurations
• Deleting Dynamic HCFA Configurations
• Deleting UB04 Configurations
1. Navigate to Administration > Show Menu > Dynamic HCFA > Add HCFA Config. The HCFA Configuration Setup page appears.
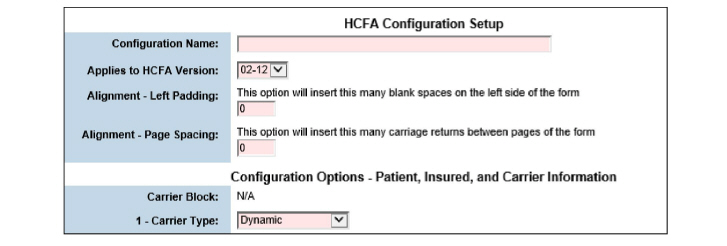
|
Not every box on the CMS 1500 form can be configured through the Dynamic HCFA module. If a box cannot be configured, ‘N/A’ appears beside the box number on the HCFA Configuration Setup page. |
2. Fill out the needed information and click Submit in the status bar. The dynamic HCFA configuration file is saved and listed on the Available HCFA Configurations page.
Copying Dynamic HCFA Configurations
1. Navigate to Administration > Show Menu > Dynamic HCFA > Click the Copy button for the desired HCFA configuration. The Dynamic Claim Config Copy page appears.

2. Enter the name of the new configuration and click Submit in the status bar. The copied dynamic HCFA record is saved to the system and listed on the Available HCFA/UB04 Configurations page.
Deleting Dynamic HCFA Configurations
1. Navigate to Administration > Show Menu > Dynamic HCFA > Click the Delete button for the HCFA configuration needing deletion. A delete confirmation page appears.
2. Select Yes to confirm deletion of the selected record and click Submit in the status bar. The selected HCFA configuration record is deleted.
1. Navigate to Administration > Show Menu > Dynamic HCFA > Add UB04 Config. The UB04 Configuration Setup page appears.
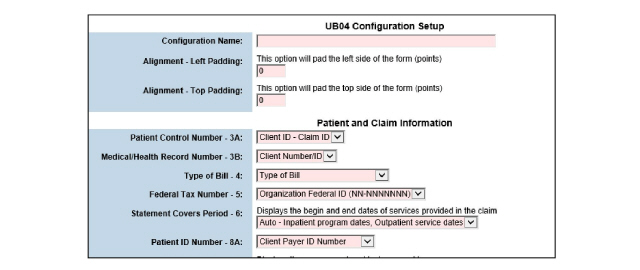
|
Not every box on the UB04 claim form can be configured through the UB04 Configuration module. If a box cannot be configured, a note appears beside the box number explaining what data populates that field on the UB04 Configuration Setup page. |
2. Fill out the needed information and click Submit.
This task is used to create a new UB04 configuration record by copying an existing record. When a UB04 configuration record is copied, the new record contains the same details as the copied record.
1. Navigate to Administration > Show Menu > Dynamic HCFA > Click the Copy button for the desired UB04 configuration. The Dynamic Claim Config Copy page appears.

2. Fill in the name of the new configuration and click Submit in the status bar. The copied dynamic UB04 record is saved to the system and listed on the HCFA/UB04 Configuration page.
1. Navigate to Administration > Show Menu > Dynamic HCFA > Click the Delete button for the UB04 configuration needing deletion. A delete confirmation page appears.
2. Select Yes to confirm deletion and click Submit in the status bar. The selected UB04 configuration record is deleted.
For each payer billed for services, a record should be in the system. The Payers module is used to maintain information necessary to successfully bill third-party payers.
The process of setting up payers involves:
3. Setting Up a Payer Plan’s Fee Matrix
Each payer billed for services should have a record set up in the system. The Payers module is used to maintain information for successful billing of third-party payers.
1. Navigate to Administration > Show Menu > Payers. The Active Payers page appears.
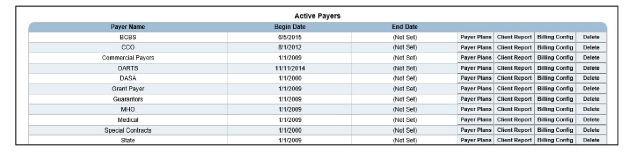
This page is used to perform the following tasks:
• Configuring Payer Billing Information
• Printing the Clients in a Payer Plan
1. Navigate to Administration > Show Menu > Payers > Add Payer. The Payer Entry page appears.

2. Fill out needed information and click Submit in the status bar. The payer record is saved and the system prompts the addition of payer plans for the payer.
• If OK is selected, the Payer Plan Entry page appears.
• If Cancel is selected, the Payers page appears.
Configuring Payer Billing Information
The Billing Config feature can be used to set up an organization’s sender code and general ledger account for submitting electronic claims to selected payers.
|
Normally, billing configurations are not set up at the Payer level. They are set at the Payer Plan level. (See Configuring Payer Plan Billing Information.) |
1. Navigate to Administration > Show Menu > Payers > Click the payer’s Billing Config button. The Billing Configurations page appears.

2. Click Add Billing Config in the status bar. The Billing Configuration Entry page appears.
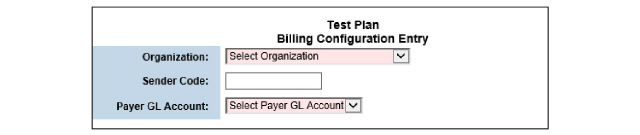
3. Fill out the needed information and click Submit in the status bar. The billing configuration record for the selected payer is saved and listed on the Billing Configurations page.
1. Navigate to Administration > Show Menu > Payers > Click the payer needing updates. The Payer Entry screen appears.

2. After making the desired edits, click Submit in the status bar. The payer record is saved and listed on the Payers page.
Printing the Clients in a Payer Plan
This task is used to export the clients associated with a particular payer plan to an Excel spreadsheet.
1. Navigate to Administration > Show Menu > Payers > Click the Client Report button for the desired payer. The Payer Report to Excel page appears for the selected payer.

2. In the Payer Plan field, use the drop-down list to select the payer plan needing export.
3. Click View Report. The system generates an Excel spreadsheet that contains the clients associated with the selected payer plan
Only payers that do not have payer plans associated with them can be deleted.
1. Navigate to Administration > Show Menu > Payers > Click the Delete button for the payer needing deletion. The Delete Payer page appears.

2. Select Yes to confirm deletion and click Submit in the status bar. The selected payer is deleted from the system.
Each payer set up should have at least one payer plan.
1. Navigate to Administration > Show Menu > Payers > Click the Payer Plans button for the desired payer. The Payer Plans page appears for the selected payer.

This page is used to perform the following task:
• Entering Payer Plan Addresses
• Viewing the Clients Associated with Payer Plans
• Overriding the Point of Service for Payer Plans
• Setting Up Insurance Codes for a Payer Plan
• Setting Up Procedures That Require Authorizations
• Configuring Payer Plan Billing Information
Each third-party payer set up, requires at least one payer plan.
1. Navigate to Administration > Show Menu > Payers > Click the Payer Plans button for the desired payer > Add Payer Plan. The Payer Plan Entry page appears.
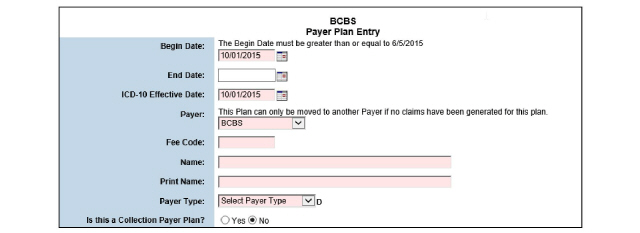
2. Fill out the needed information and click Submit in the status bar. The payer plan is saved and listed on the Payer Plans page.
|
After setting up the payer plans, a corresponding fee matrix should be set up. (See Setting Up a Payer Plan’s Fee Matrix.) |
1. Navigate to Administration > Show Menu > Payers > Click the Payer Plans button for the desired payer > Click the Address button for the payer plan desired. The Payer Plan Addresses page appears.

2. Click the Add Address button. The Payer Address Entry page appears.
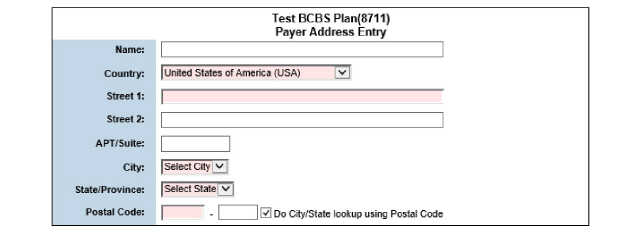
3. Fill out the needed information and click Submit in the status bar. The address record is saved.
Viewing the Clients Associated with Payer Plans
1. Navigate to Administration > Show Menu > Payers > Click the Payer Plans button for the desired payer > Click the Clients button for the payer plan desired. The following page appears.
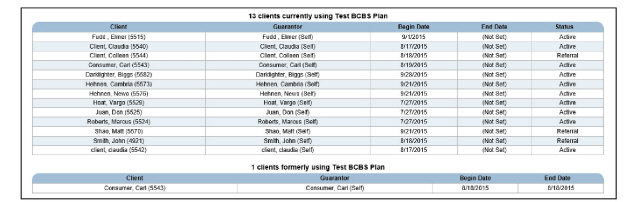
2. After reviewing this page, click the Return to Payer List button. The Payer Plans page appears.
Overriding the Point of Service for Payer Plans
The Override POS (Point of Service) feature allows the override of scheduled points of service with the specific service locations required by payer plans. This functionality is helpful when billing payer plans that require a specific service location on the claim.
1. Navigate to Administration > Show Menu > Payers > Click the Payer Plans button for the desired payer > Click the Override POS button for the payer plan needing override. The Payer Plan Override page appears for the selected payer plan.

2. Click Add Payer Plan Override in the status bar. The Override POS entry page appears.
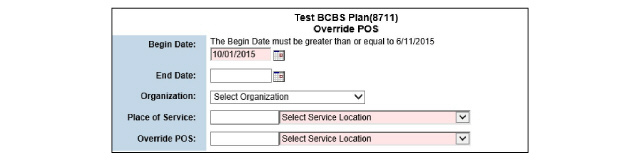
3. Fill out the needed information and click Submit in the status bar. The POS override record is saved and listed on the Payer Plan Override page.
Setting Up Insurance Codes for a Payer Plan
When filing electronic bills (837 files), some payers require insurance codes to be included. Insurance codes are service location codes that are used to determine the location and program that provided the service. The insurance codes are attached to the provider ID on electronic bills.
1. Navigate to Administration > Show Menu > Payers > Click the Payer Plans button for the desired payer > Click the Insurance Codes button for the payer plan needing insurance codes. The Insurance Codes page appears for the selected payer plan.

2. Click the Add Code button. The Insurance Code Entry page appears.
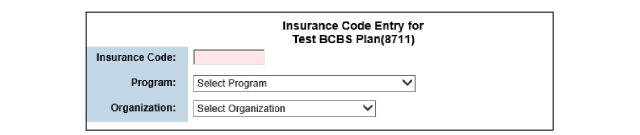
3. Fill out the needed information and click Submit in the status bar. The insurance code is saved and listed on the Insurance Codes page.
Setting Up Procedures That Require Authorizations
|
The Procedure Auths column is displayed on the Payer Plans page only if the Need Authorization configuration is set to Yes. If this configuration is disabled, the Procedure Auths column is not displayed. Contact Qualifacts Support for assistance enabling this configuration. |
By default, when a payer plan is flagged as requiring an authorization, the services provided and billed to the payer plan will require an authorization.
1. Navigate to Administration > Show Menu > Payers > Click the Payer Plans button for the desired payer > Click the Procedure Auths button. The Active Procedure Codes Needing Authorizations page appears.

|
The Procedure Auths button is available only if the Need Authorization field is set to Yes on the Payer Plan Entry page. If this field is set to No, No Auth Needed appears in the Procedure Auths column. |
2. Click Add Procedure Authorization in the status bar. The Procedure Code Needing Authorization Entry page appears.
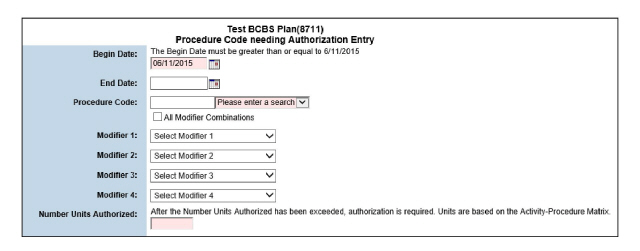
3. Fill out the needed information and click Submit in the status bar. The record is saved and listed on the Active Procedure Codes Needing Authorizations page.
Configuring Payer Plan Billing Information
The Billing Config feature is used to configure the billing information for submitting electronic claims to the selected payer.
1. Navigate to Administration > Show Menu > Payers > Click the Payer Plans button for the desired payer > Click the Billing Config button for the desired Payer Plan. The Billing Configurations page appears.

2. Click Add Billing Config in the status bar. The Billing Configuration Entry page appears.
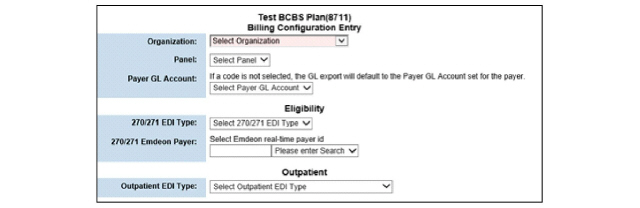
For reference, the following fields from the Billing Configuration Entry page are explained:
Panel - Used to associate with Payer Panels.
Payer GL Account - Used to assign GL Account.
270/271 EDI Type - Used to select the desired EDI type for 270 and 271 fields.
270/271 Emdeon Payer - Used to select the payer to which eligibility transactions should be submitted.
Outpatient EDI Type - Used to select file format for outpatient electronic claims.
Outpatient Billing Type - Used to select file format for outpatient paper claims.
Outpatient Payer ID - Used when submitting EDI claims to a clearinghouse that utilizes a unique payer ID for outpatient claims.
Inpatient EDI Type - Used to select file format for inpatient electronic claims.
Inpatient Billing Type - Used to select file format for inpatient electronic claims.
Inpatient Payer ID - Used when submitting EDI claims to a clearinghouse that utilizes a unique payer ID for inpatient claims.
3. Fill out the needed information and click Submit in the status bar. The billing configuration record for the selected payer plan is saved and listed on the Billing Configurations page.
1. Navigate to Administration > Show Menu > Payers > Click the Payer Plans button for the desired payer > Click the payer plan needing an update. The Payer Plan Entry page appears.
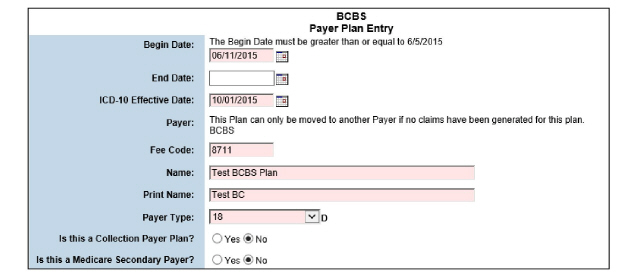
2. After making the desired edits, click Submit in the status bar. The payer plan record is saved and listed on the Payer Plans page.
Payer plans that have clients associated with them cannot be deleted.
1. Navigate to Administration > Show Menu > Payers > Click the Payer Plans button for the desired payer > Click the Delete button for the payer plan needing deletion. A confirmation message appears.
2. Select OK to confirm deletion. The selected payer plan is deleted from the system.
Setting Up a Payer Plan’s Fee Matrix
Each payer plan requires a corresponding fee matrix. The fee matrix defines contracted rates the payer plan will pay for procedure codes. They are based on the credentials of the staff member who provides the service. The contracted rate appears on claims as the Expected amount. It must be less than or equal to the standard fee that is defined for the procedure code.
1. Navigate to Administration > Show Menu > Payers > Click the Payer Plans button for the desired payer > Click the Fees button for the payer plan desired. The Active Fee Matrix page appears.

This page is used to perform the following tasks:
• Defining the Date Range for a Payer Plan Fee Matrix
• Defining a Payer Plan Fee Matrix
• Creating a New Payer Plan Fee Matrix from an Existing Record
• Copying a Fee Matrix from One Payer Plan to Another
• Updating the Date Range for a Payer Plan Fee Matrix
• Updating a Payer Plan Fee Matrix
• Deleting a Payer Plan Fee Matrix
Defining the Date Range for a Payer Plan Fee Matrix
The date range and number of client visits allowed by the payer plan should be determined prior to defining a fee matrix.
1. Navigate to Administration > Show Menu > Payers > Click the Payer Plans button for the desired payer > Click the Fees button for the payer plan desired > Add Fee Matrix. The Payer Plan Date Range Entry page appears.
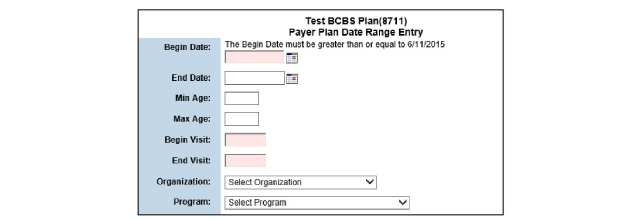
2. Fill out the needed information and click Submit in the status bar. The payer plan date range record is saved and listed on the Active Fee Matrix page.
Defining a Payer Plan Fee Matrix
The payer plan’s fee matrix is based on the contracted rate that has been negotiated with the payer plan. The amount entered in the payer plan’s fee matrix appears on claims as the Expected amount. The Billed amount that appears on claims is the standard fee that is set up for the procedure code.
1. Navigate to Administration > Show Menu > Payers > Click the Payer Plans button for the desired payer > Click the Fees button for the payer plan desired > Click the Fee Matrix button for the record desired. The Fee Matrix page appears for the selected payer plan.

2. Click Add New Fees in the status bar. The Fee Matrix page changes to add mode.
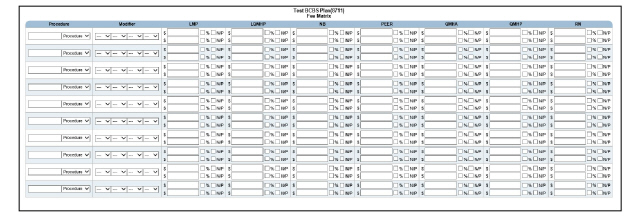
|
The column headings on the Fee Matrix are pulled from Billing Categories. If the % box is checked, the system will calculate a percentage of the bill instead of a flat co-pay. N/P stands for No Pay. If the N/P button is checked, any claims falling under that category will not be paid. |
3. Fill out the needed information and click Submit in the status bar. The fee matrix is saved and listed on the Active Fee Matrix page.
Creating a New Payer Plan Fee Matrix from an Existing Record
1. Navigate to Administration > Show Menu > Payers > Click the Payer Plans button for the desired payer > Click the Fees button for the payer plan desired > Click the Copy button for the fee matrix desired. The Copy Fee Matrix page appears.
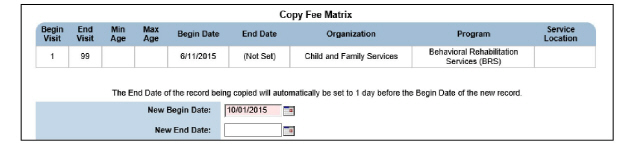
2. Fill out the needed information and click Submit in the status bar. The new fee matrix record is created and listed on the Active Fee Matrix page. The end date for the copied fee matrix record is set to one day before the begin date of the new fee matrix record.
Copying a Fee Matrix from One Payer Plan to Another
1. Navigate to Administration > Show Menu > Payers > Click the Payer Plans button for the desired payer > Click the Fees button for the payer plan desired > Click Copy Fee Matrix in the status bar. The Copy Existing Plan Fees page appears.
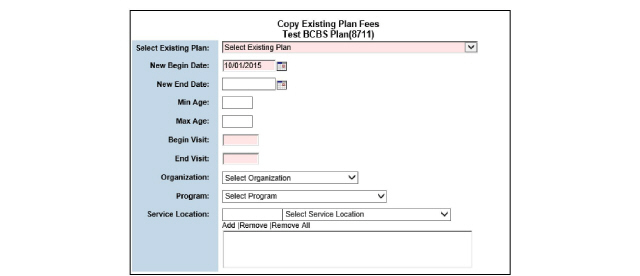
2. Fill out the needed information and click Submit in the status bar. The new fee matrix record is saved and listed on the Active Fee Matrix page for the selected payer plan.
Updating the Date Range for a Payer Plan Fee Matrix
1. Navigate to Administration > Show Menu > Payers > Click the Payer Plans button for the desired payer > Click the Fees button for the payer plan > Click the Select button for the desired record. The Payer Plan Date Range Entry page appears.
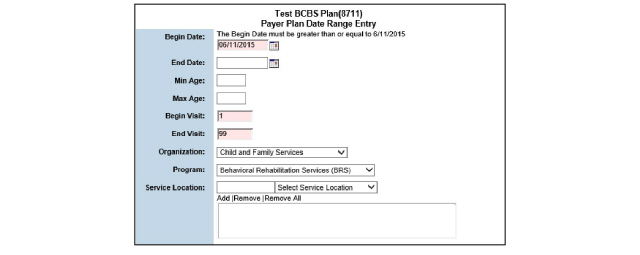
2. After making the desired edits, click Submit in the status bar. The updated record is saved and listed on the Active Fee Matrix page.
Updating a Payer Plan Fee Matrix
1. Navigate to Administration > Show Menu > Payers > Click the Payer Plans button for the desired payer > Click the Fees button for the payer plan > Click the Fee Matrix button for the desired record. The Fee Matrix page appears for the selected payer plan.

2. Click the Edit button for each procedure needing changes. The Fee Matrix changes to edit mode.

3. After making the desired edits, click Submit in the status bar. The fee matrix records are saved and listed on the Fee Matrix page.
Deleting a Payer Plan Fee Matrix
1. Navigate to Administration > Show Menu > Payers > Click the Payer Plans button for the desired payer > Click the Fees button for the payer plan > Click the Fee Matrix button for the desired record > Click the Delete button for the fee matrix needing deletion. A confirmation window appears.
2. Select OK to confirm deletion. The selected record is deleted.
The Payer Audit module is used to verify that payer-related data is set up correctly. After selecting a payer plan, this module allows the viewing of associated payer panels, the individual panel members, the procedure codes set up in the fee matrix, and the activity codes that are mapped to the procedure codes.
By clicking the various hyperlinks within the Payer Audit module, the data setup for the payer plans can be updated. Hyperlinks are available for payer panels, procedure codes, and activity codes.
1. Navigate to Administration > Show Menu > Payer Audit. The Payer Audit search page appears.
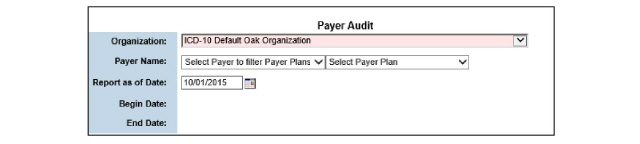
2. Fill out the needed information and click Submit in the status bar. The Payer Audit Screen appears for the selected payer plan.

3. In the left pane, click the procedure code needing audit. Its Fee Matrix Date Range, Fee Matrix Record, and Activity Mappings lists page appear in the right pane.
4. Within the Payer Audit module, click the Report button in the status bar to generate a Payer Audit Report for the selected payer plan. A new browser window opens, displaying the Payer Audit Report for the selected payer plan.
Checking Client Eligibility in Batch Mode
This process involves creating a 270 eligibility request batch file, sending it to a clearinghouse or payer, and then uploading a 271 eligibility response file.
The following diagram shows the batch eligibility process flow. An outline describing the process follows the diagram.
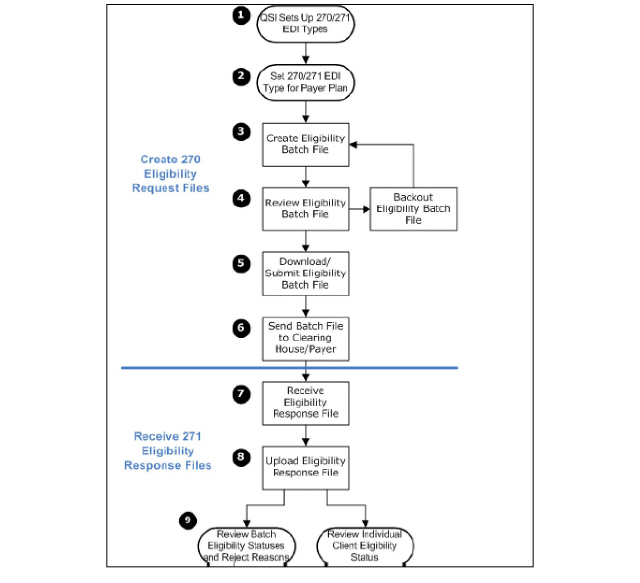
1. QSI Sets Up 270/271 EDI Types - Qualifacts will set up the necessary EDI types during the Implementation phase if requested.
2. Set 270/271 EDI Type for Payer Plans - The appropriate EDI type should be selected for each payer plan needing client eligibility verified.
3. Create Eligibility Batch File - The Eligibility Batch module is used to create a 270 eligibility batch file.
4. Review Eligibility Batch File - Review the clients included in the 270 file. If the batch file was not created as intended, it can be backed out. If the file is backed out, it should be recreated by defining new batching parameters.
5. Download/Submit Eligibility Batch File - When downloading the batch file, the system creates the file in the 270 standard format.
6. Send Batch File to Clearing House/Payer - The 270 batch file is sent to a clearing house or payer for eligibility verification.
7. Receive Eligibility Response File - The clearing house or payer will return a 271 eligibility response file. Take note of where this file is stored on the organization’s network.
8. Upload Eligibility Response File - The EDI Upload module is used to navigate to the network location of the 271 file and upload it into the system.
9. Review Client Eligibility Status - Once the 271 eligibility response file is uploaded, it can be reviewed through two different modules.
• To review the eligibility statuses and reject reasons for clients in the file, use the Administration > Eligibility Response module.
• To review the eligibility status of an individual client, use the ECR > Eligibility Status module.
Maintaining 270 Eligibility Batch Files
1. Navigate to Administration > Show Menu > Eligibility Batch. The Eligibility Batch page appears.
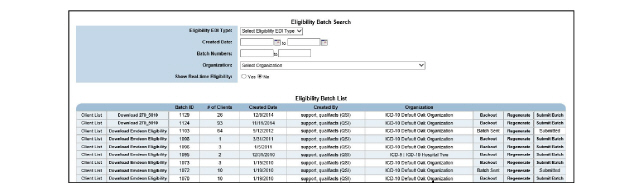
This page is used to perform the following tasks:
• Creating Eligibility Batch Files
• Searching for Existing Eligibility Batch Files
• Reviewing Batch File Details
• Backing Out Eligibility Batch Files
• Regenerating Eligibility Batch Files
• Downloading Eligibility Batch Files
• Submitting Eligibility Batch Files
Creating Eligibility Batch Files
When creating an eligibility batch file, the system only considers clients who are assigned to payer plans that have a 270/271 EDI type selected in the payer plan Billing Configuration module. (See Configuring Payer Plan Billing Information.)
1. Navigate to Administration > Show Menu > Eligibility Batch > Create Batch. The Create Batch page appears.
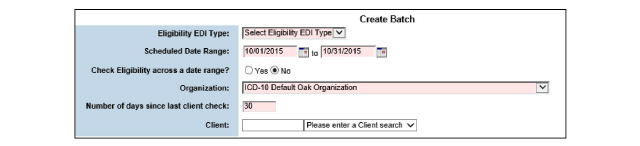
2. Fill out the needed information and click Submit in the status bar. The eligibility batch file is created and listed on the Eligibility Batch page.
Searching for Existing Eligibility Batch Files
1. Navigate to Administration > Show Menu > Eligibility Batch.
2. Fill out the needed information under Eligibility Batch Search and click Submit in the status bar. The page is refreshed and the batch files that match the search criteria are displayed in the Eligibility Batch List.
1. Navigate to Administration > Show Menu > Eligibility Batch > Click the Client List button for the batch file needing review. The Eligibility Detail List appears, which displays the clients in the 270 batch file.
Backing Out Eligibility Batch Files
If it is decided that a batch file was not created as intended, the batch file should be backed out.
1. Navigate to Administration > Show Menu > Eligibility Batch > Click the Backout button for the batch file desired. The Backout Eligibility Batch page appears.

2. Select Yes to confirm the back out and click Submit in the status bar. The selected batch is removed from the system and no longer displayed in the Eligibility Batch List.
Regenerating Eligibility Batch Files
When the system regenerates an eligibility batch file, it gathers any new subscriber data that did not exist at the time the original batch file was created. For example, a client’s provider ID is missing at the time the batch file is created. The provider ID can be added, then the batch file can be regenerated to include the client’s provider ID. By using the Regenerate feature, the batch file data can be refreshed without having to back out the file.
1. Navigate to Administration > Show Menu > Eligibility Batch > Locate the batch file needing regeneration and click the Regenerate button. The page is refreshed and the selected batch file is regenerated.
Downloading Eligibility Batch Files
1. Navigate to Administration > Show Menu > Eligibility Batch > Click the Download button of the batch file needing download. The system displays the 270 file, containing the client eligibility requests. This file will open in a text editor.
2. Save the text file. At this point, the 270 file can be sent to a clearing house or payer.
Submitting Eligibility Batch Files
After the 270 eligibility batch file has been sent, it is recommended to change the status of the file in the system. This task is optional and serves as a visual indication that the batch file has been submitted.
1. Navigate to Administration > Show Menu > Eligibility Batch > Locate the eligibility batch file that has been sent and click the Submit Batch button. The Mark Eligibility Batch as Submitted page appears.

2. Select Yes to confirm the selected batch file has been sent and click Submit in the status bar. The Eligibility Batch List appears and the Submit Batch button is updated with the text ‘Submitted’.
Reviewing 271 Eligibility Response Files
The clearing house or payer will return a 271 eligibility response file. Once the 271 file is uploaded to the system, use the Eligibility Response module to review client eligibility statuses and reject reasons in the file.
1. Navigate to Administration > Show Menu > Eligibility Response. The Eligibility Response page appears. A search needs to be performed in order to populate the page.

This page is used to perform the following tasks:
• Searching for Existing Response Files
• Reviewing a Response File’s Subscriber List
• Reviewing a Response File’s Reject Reasons
Searching for Existing Response Files
1. Navigate to Administration > Show Menu > Eligibility Response > Use the filter options and click Submit in the status bar. The page is refreshed and the 271 files that match are displayed in the Eligibility Response list.
Reviewing a Response File’s Subscriber List
1. Navigate to Administration > Show Menu > Eligibility Response > Click the Subscriber List button for the response file desired. The Subscriber List page appears.
|
If the 271 file only contains rejections, the Subscriber List button is replaced with the text No Subscribers. |
2. To view detailed information, click the Eligibility Detail button for the desired client. The Eligibility Detail page appears.
Reviewing a Response File’s Reject Reasons
1. Navigate to Administration > Show Menu > Eligibility Response > Click the Reject Reasons button for the desired response file. The Reject Reasons page appears.

1. Navigate to Administration > Show Menu > Eligibility Response > Click the Backout button for the response. The Backout Eligibility Batch page appears.

2. Select Yes to confirm backing out the selected 271 file.
3. Click Submit in the status bar. The selected 271 response file is backed out and removed from the Eligibility Response page.
Check a Client’s Payer Eligibility in Real Time
|
The Check Eligibility button can be displayed on POE, Front Desk, and on claim information by configuration. Clicking the Check Eligibility button in any location will submit an Emdeon eligibility request. Contact Qualifacts for assistance in enabling the desired button displays. |
The Real-time Eligibility Verification configuration must be enabled to use. Contact Qualifacts for assistance.
The Referral Sources module maintains a list of referral sources.
1. Navigate to Administration > Show Menu > Referral Sources. The Referral Source Search page appears.

2. Fill out the needed information and click Submit in the status bar. The page is refreshed and the search results are listed in the Search List for Referral Sources list.
|
In some systems the search is bypassed and the Search List of Referral Sources is displayed when the Referral Sources button is pushed. |
This page is used to perform the following tasks:
• Adding Staff Visits to Referral Sources
• Adding Notes about Referral Visits
1. Navigate to Administration > Show Menu > Referral Sources > Add Referral Source. The Referral Source Information page appears.
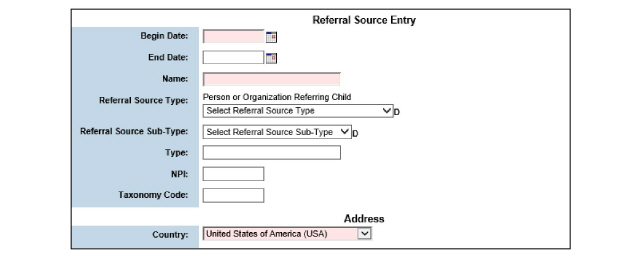
2. Fill out the needed information and click Submit in the status bar. The new referral source record is saved and is searchable on the Search List for Referral Sources page.
1. Navigate to Administration > Show Menu > Referral Sources > Click the Select button for the referral source desired. The Referral Source Entry page appears.
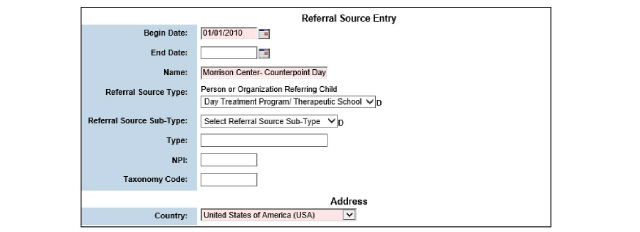
|
Referral Source Type and Referral Source Sub-Type descriptors must be populated before Referral Source Entry can be completed. (See Setting Up Descriptors) |
2. After making the desired edits, click Submit in the status bar. The updated referral source is saved.
Adding Staff Visits to Referral Sources
1. Navigate to Administration > Show Menu > Referral Sources > Click the Staff Referral button for the referral source who received a visit from a staff member. The Staff Referral page appears.

2. Click the Add Staff Visit button in the status bar. The Referral Source Staff Entry page appears.

3. Fill out the needed information and click Submit in the status bar. The staff member is added to the Referral Source Staff page.

Adding Notes about Referral Visits
1. Navigate to Administration > Show Menu > Referral Sources > Click the Referral Visit button for the referral source needing a note added. The Referral Visits page appears.

2. Click the Add Visit button in the status bar. The Referral Source Visit page appears.
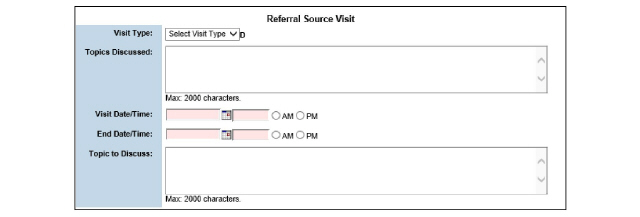
3. Fill out the needed information and click Submit in the status bar. The referral visit record is saved and listed on the Referral Visits page.
1. Navigate to Administration > Show Menu > Referral Sources > Click the Delete button for the referral source desired. The Delete Referral Source page appears.

2. Select Yes to confirm deletion.
3. Click Submit in the status bar. The selected referral source record is deleted from the system.
Setting Up Service Locations by Organization
The service location is the physical location where the staff member meets with the client.
1. Navigate to Administration > Show Menu > Service Location. The Service Location page appears.
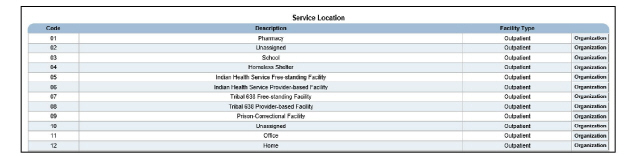
2. Locate the service location record desired and click the Organization button. The Organization List page appears for the selected service location.
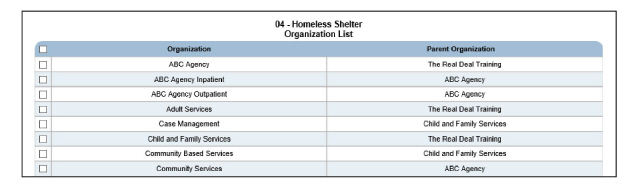
3. Check the organizations that should be associated with the service location.
4. Click Submit in the status bar. The service location organization matrix record is saved.
Setting Up Type of Bill by Organization
The Type of Bill module contains a nationally standardized list of HIPAA-compliant type of bill codes and descriptions.
1. Navigate to Administration > Show Menu > Type of Bill. The Type of Bill page appears.
2. Locate the type of bill record desired and click its Organization button. The Organization List page appears for the selected type of bill.
|
When the button appears in the Included column, the type of bill can be generated at that organization. When the button appears in the Excluded column, the type of bill cannot be generated at that organization. |
3. To associate the selected type of bill with an organization, click the Excluded button. The page is refreshed and the X button is moved to the Included column.
4. Click Return to Type of Bill List in the status bar. The type of bill organization matrix record is saved.
Setting Up Point of Entry Mappings
Point of Entry mappings link activities to programs used in the Point of Entry module. When a POE client is assigned to a program, the Point of Entry mapping can be used to schedule the client for the related activity.
1. Navigate to Administration > Show Menu > Point of Entry Mapping. The Point of Entry Mappings page appears.
This page is used to perform the following tasks:
• Adding Point of Entry Mappings
• Updating Point of Entry Mappings
• Deleting Point of Entry Mappings
Adding Point of Entry Mappings
1. Navigate to Administration > Show Menu > Point of Entry Mapping > Add Mapping. The Point of Entry Mapping Entry page appears.
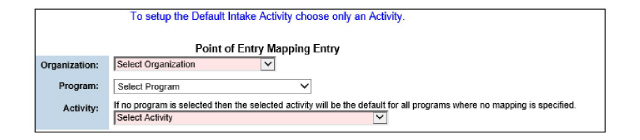
2. Fill out the needed information and click Submit in the status bar. The point of entry mapping record is saved and listed on the Point of Entry Mappings page.
Updating Point of Entry Mappings
1. Navigate to Administration > Show Menu > Point of Entry Mapping > Click the Select for the desired Point of Entry mapping record. The Point of Entry Mapping Entry page appears.
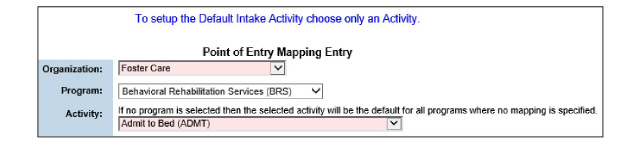
2. After making the desired edits, click Submit in the status bar. The selected Point of Entry record is updated and listed on the Point of Entry Mappings page.
Deleting Point of Entry Mappings
1. Navigate to Administration > Show Menu > Point of Entry Mapping > Click the Delete button for the Point of Entry mapping desired. The Delete Point of Entry Mapping page appears.

2. Click Yes to confirm deletion.
3. Click Submit in the status bar. The selected Point of Entry mapping record is deleted from the system.
The Claim Rollup Rules module is used to define the criteria by which individual services are rolled up into a single claim.
Claim rollup rules are used primarily in the following situations:
• To collect multiple services on a single claim.
• To roll up several different services into a single billable procedure.
• To satisfy payer requirements for the minimum and maximum number of billable services in a given time period.
There are two steps involved in setting up claim rollup rules:
• Creating a rollup record. (See Add a Rollup Record.) This is the parent-level record that defines the type of claims to which the rule will apply.
• Creating the rollup rules. (See Add a Rollup Rule.) This is the child-level record that defines which services will be rolled up.
1. Navigate to Administration > Show Menu > Claim Rollup Rules. The Active Rollups page appears.
This page is used to perform the following tasks:
• Add Billable Units for Rollup Records
The first step in creating claim rollup rules is to create a rollup record. The rollup record defines the type of claims the rule will apply to. Every rollup record applies to a specific payer or payer type, or it is specific to self-pay claims.
1. Navigate to Administration > Show Menu > Claim Rollup Rules > Add a Rollup. The Claim Rollup Setup page appears.

2. Fill out the needed information and click Submit in the status bar. The rollup record is saved and listed on the Rollups page.
Add Billable Units for Rollup Records
1. Navigate to Administration > Show Menu > Claim Rollup Rules > Click the Billable Units button for the desired rollup record. The Billable Units page appears.

2. Click the Add a Billable Unit button in the status bar. The Billable Units entry page appears.

3. Fill out the needed information and click Submit in the status bar. The billable unit entry is saved and listed on the Billable Units page.
Rollup rules define the types of services that will be rolled up.
1. Navigate to Administration > Show Menu > Claim Rollup Rules > Click the Rules button for the desired rollup record. The Rollup Rules page appears for the selected rollup record.

This page is used to perform the following tasks:
The rollup rule defines which types of services will be rolled up.
1. Navigate to Administration > Show Menu > Claim Rollup Rules > Add a Rollup Rule. The Rollup Rule page appears for the selected rollup record.
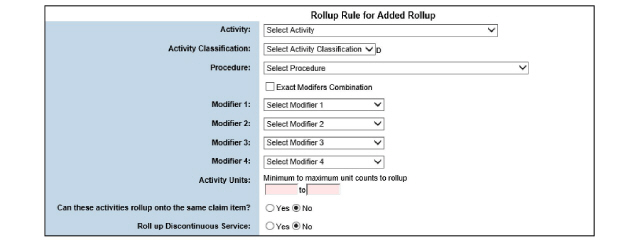
2. Fill out the needed information and click Submit in the status bar. The rollup rule is saved and listed on the Rollup Rule page for the selected rollup record.
1. Navigate to Administration > Show Menu > Claim Rollup Rules > Click the Select button for the desired rule. The Rollup Rule page appears for the selected rollup record.
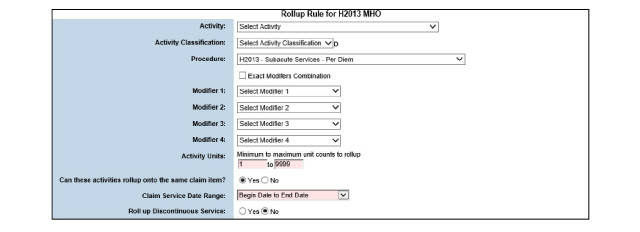
2. After making the desired edits, click Submit in the status bar. The selected rule is updated and listed on the Rollup Rule page for the selected rollup record.
1. Navigate to Administration > Show Menu > Claim Rollup Rules > Click the Delete button for the desired rule. A delete confirmation page appears.
2. Select OK to confirm deletion. The selected rule is deleted and is no longer a part of the rollup record.
1. Navigate to Administration > Show Menu > Claim Rollup Rules > Click the Select button for the rollup record needing updates. The Claim Rollup Setup page appears.
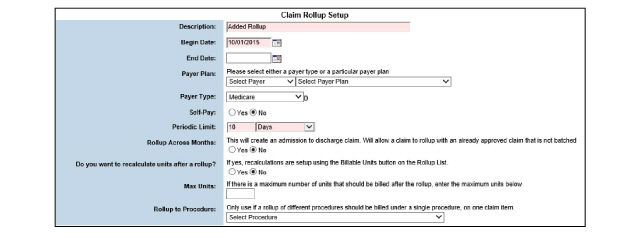
2. After making the desired updates, click Submit in the status bar. The selected record is updated and listed on the Rollups page.
Once a rollup record is used by the system, it cannot be deleted.
1. Navigate to Administration > Show Menu > Claim Rollup Rules > Click the Delete button for the desired rollup record. A delete confirmation page appears.
2. Select OK to confirm deletion. The selected record is removed from the system. When the rollup record is deleted, its related rollup rules are also deleted.
The Sliding Fee Scale module is used to define a fee schedule for guarantor claims and co-pay amounts. It is based on the number of people in the client’s family and the family income level. Sliding Fee Scales are determined by the organization.
|
If it is needed to define sliding fee scales based on anything other than number of people in the client’s family and client’s family income level, the Dynamic Sliding Fee Scale module can be used to define sliding fee scales based on custom, user-defined formulas. (See Setting Up Dynamic Sliding Fee Scales.) |
1. Navigate to Administration > Show Menu > Sliding Fee Scale. The Fee Scale List page appears.

This module is used to perform the following tasks.
• Adding a Fee Matrix to a Sliding Fee Scale
1. Navigate to Administration > Show Menu > Sliding Fee Scale > Click Add Fee Scale in the status bar. The Sliding Fee Scale Setup page appears.
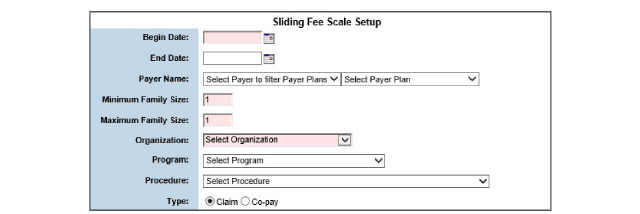
2. Fill out the needed information and click Submit in the status bar. The sliding fee scale record is saved and listed on the Fee Scale List page.
Adding a Fee Matrix to a Sliding Fee Scale
The Fee Matrix defines the percentage of the bill a client will be charged, based on their family’s size and monthly income level. The sliding scale percentages defined in the Sliding Scale Fee Matrix module apply to the current organization and its child organizations.
1. Navigate to Administration > Show Menu > Sliding Fee Scale > Click the Fee Matrix button for the sliding fee scale record needing a fee matrix set up. The Sliding Fee Scale page appears.

2. Click Add Adjusted Annual Income in the status bar. The Adjusted Annual Income page appears.

3. Fill in the needed information and click Submit in the status bar. The low and high income values entered are saved and listed as buttons in the grid on the Fee Scale page.
4. Repeat until all necessary monthly income levels are created.

5. Once the monthly income levels have been created, enter the sliding scale percentage that will be charged, based on the client’s family size. Repeat until all percentages have been filled in.

6. Click Submit in the status bar. The sliding scale values are saved.
1. Navigate to Administration > Show Menu > Sliding Fee Scale > Click the Select button for the sliding fee scale record needing an update. The Sliding Fee Scale Setup page appears.
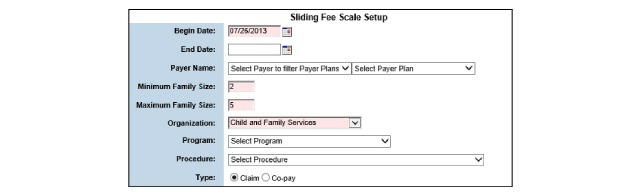
2. Update the values on this page as desired.
3. Click Submit in the status bar. The updated record is saved and listed on the Fee Scale List page.
1. Navigate to Administration > Show Menu > Sliding Fee Scale > Click the Delete button for the sliding fee scale record needing deletion. A delete confirmation page appears.

2. Select Yes to confirm deletion.
3. Click Submit in the status bar. The sliding fee scale record is deleted and removed from the Fee Scale List page.
Setting Up Dynamic Sliding Fee Scales
The Dynamic Sliding Fee Scale module can be used to create custom formulas for sliding fee scales.
1. Navigate to Administration > Show Menu > Dynamic Fee Scale. The Dynamic Sliding Fee Scale page appears.

2. Click Add Formula in the status bar. The Dynamic Formula Entry page appears.
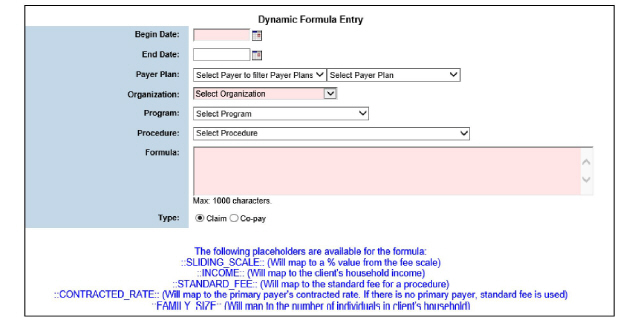
3. Fill out the needed information and click Submit in the status bar. The dynamic fee scale record is saved and listed on the Dynamic Sliding Fee Scale page.
Setting Up Bill Next Procedure Mappings
The Bill Next Procedure Mappings module allows the establishment of bill next mappings that are tied to the creation of bill next claims. The created mappings allow the modification of procedure codes, revenue codes, and modifiers when the primary code or modifier combination waterfalls to the next payer.
1. Navigate to Administration > Show Menu > Bill Next Procedure Mappings. The Bill Next Procedure Mappings page appears.
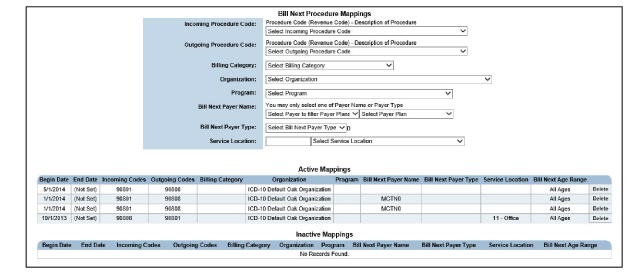
2. Click Add Mapping in the status bar. The Bill Next Procedure Mapping Entry page appears.
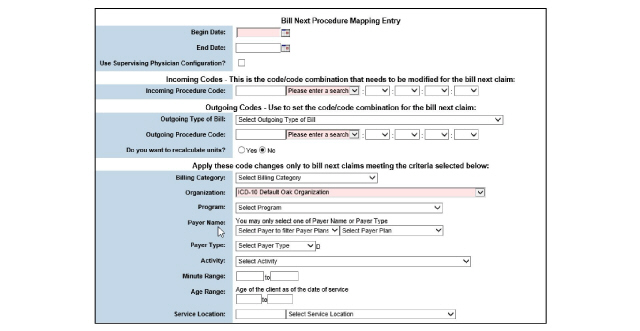
3. Fill out the needed information and click Submit in the status bar. The bill next procedure mapping is saved to the system and listed on the Bill Next Procedure Mappings page.
Once billing categories are set up, they can be used to create a fee matrix for payer plans. (See Setting Up Payer Plan Fee Matrices.)
1. Navigate to Administration > Show Menu > Billing Categories. The Billing Category List page appears.
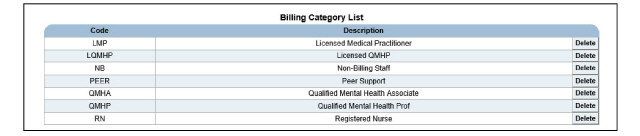
This page is used to perform the following tasks:
• Adding Billing Categories to Employee Records
Adding Billing Categories to Employee Records
Each credential should be associated with a billing category when they are set up in the Employee module. When service document crosswalk records are created, they can also be associated with a billing category.
1. Navigate to Administration > Show Menu > Billing Categories > Add Billing Category. The Billing Category page appears.

2. Fill out the required information and click Submit in the status bar. The billing category is saved and listed on the Billing Category List page.
1. Navigate to Administration > Show Menu > Billing Categories > Select the billing category desired. The Billing Category page appears.
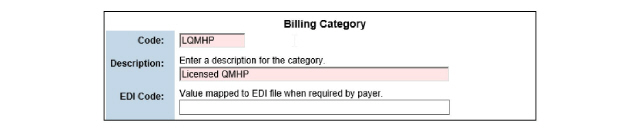
2. Change the desired information and click Submit in the status bar. The selected billing category is updated and listed on the Billing Category List page.
|
Billing categories can only be deleted if they are not associated with a record. |
1. Navigate to Administration > Show Menu > Billing Categories > Click the Delete button for the billing category desired. The Delete Billing Category Entry page appears.

2. Select Yes to confirm deletion and click Submit in the status bar. The selected billing category is deleted from the system.
In addition to standard Administration modules, CareLogic also offers a variety of configurations that can be applied.
This chapter includes the following topics:
• Payer Authorization Statuses
• Service Document Report Layout
• State Reporting Configuration
|
In order to use the Client Payer Auth Statuses module, the Authorization Status Indicator configuration needs to be enabled. Contact Qualifacts for assistance. |
In some cases, there are stipulations that prevent authorizations from being used immediately. In these cases, the Client Payer Auth Statuses module should be used to set up user-defined statuses. These statuses help track the authorizations until they have been approved by the payer. Once the authorizations are approved, they can be used by the organization to deliver services to clients.
1. Navigate to Administration > Show Menu > Client Payer Auth Statuses. The Authorization Statuses page appears.

2. Click Add Authorization Status in the status bar. The Authorization Status page appears.

3. Fill out the needed information and click Submit in the status bar. The record is saved and listed on the Authorization Statuses page.
Facility billing enables organizations to split one service into two billing codes for the purpose of creating two separate claims: a professional claim and an institutional claim. The professional claim is based on the procedure code and the institutional claim is based on the revenue code.
By default, the system is not set up for facility billing. If facility billing is needed, use the following outline to set it up:
1. Setting System Configuration for Facility Billing
2. Setting Up Organizations to Enable Facility Billing
3. Setting Up Procedure/Revenue Codes
4. Setting Up Activity/Procedure Mappings
5. Setting Up Payer Plans for Facility Billing
6. Setting Up Payer Plan Fee Matrices
After the Administration options are set up, the following options should be set up in the ECR:
1. Assign Payer Plans to Clients. (See the Client Guide.)
2. Set Up Payer Authorizations. (See the Client Guide.)
3. Set Up the Client Co-Pay Records. (See the Client Guide.)
4. Set Up the Client Sliding Scales. (See the Client Guide.)
Setting System Configuration for Facility Billing
By default, the facility billing configuration is disabled and the system can only produce Professional claims. When System Configuration for Facility Billing is enabled, an organization can produce Professional and Institutional claims. This organization configuration must be enabled by Qualifacts. In order to enable the facility billing configuration, contact a member of the Support team.
Setting Up Organizations to Enable Facility Billing
1. Navigate to Administration > Show Menu > Organizations. The Organization List page appears.
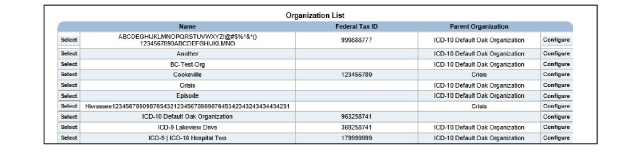
2. Click the Add an Organization button. The Organization Information page appears.
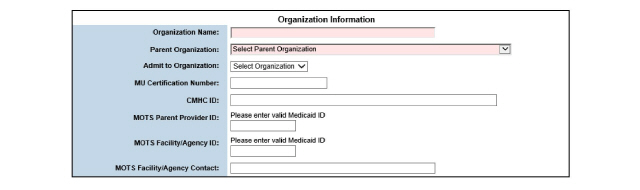
3. Fill out the needed information and click Submit in the status bar. The organization record is saved and listed on the Organization List page.
Setting Up Payer Plans for Facility Billing
1. Navigate to Administration > Show Menu > Payers. The Active Payers page appears.

2. Identify the payer needing a payer plan and click its Payer Plans button. The Payer Plans page appears for the selected payer.

3. Click the Add Payer Plan button. The Payer Plan Entry page appears.
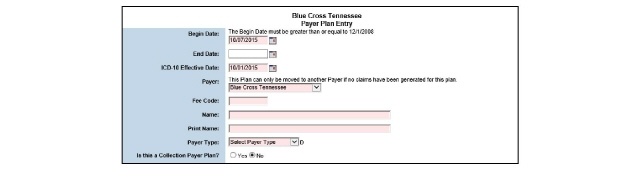
4. Fill out the needed information and click Submit in the status bar. The payer plan is saved and listed on the Payer Plans page.
|
After setting up a payer plan, a corresponding fee matrix should also be configured for the payer plan. (See Setting Up Payer Plan Fee Matrices.) |
If an organization receives grant payments, CareLogic can be used to track the grant payer’s financial transactions. By default, the system is not set up to support grant payers.
Once a claim associated with a grant payer has been approved, the system checks to see if a grant payment is available in the system. If a grant payment is available, the claim is attached to the grant payment. If a grant payment is not available, the claim can be written off.
1. Navigate to Administration > Show Menu > Payers. The Active Payers page appears.

2. Click the Payer Plans button for the payer needing a payer plan. The Payer Plans page appears.

3. Click the Add Payer Plan button. The Payer Plan Entry page appears.
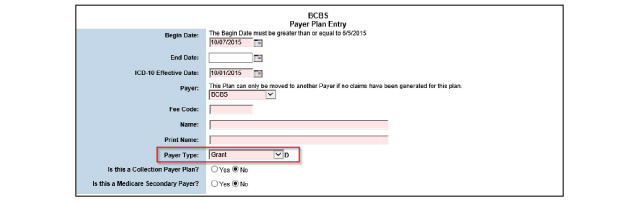
4. Fill out the needed information. Be sure to select Grant in the Payer Type field. Click Submit in the status bar. The payer plan is saved and listed on the Payer Plans page.
|
After setting up a payer plan, a corresponding fee matrix should be configured. (See Setting Up Payer Plan Fee Matrices.) |
The Liability Matrix determines a client’s maximum monthly payment responsibility. Payments for services are based on adjusted family income, after deductions and residential status are taken into account. CareLogic will calculate liability based on the client’s income and Liability Matrix entries.
Alerts will trigger based on a specified number of days before the Client Liability Matrix End Date. This is done to create a message to the Front Desk as a reminder for the client. If a new Client Liability Matrix is set up, the previous Client Liability Matrix will still generate an alert unless the message is removed.
The menu link (admin_liability$.liability_list) needs to be added to the Administration menu to access the setup. The menu link (client_liability$.client_list?P_CLIENT_ID=::CLIENT_ID::) needs to be added to the ECR menu to use the feature.
This section covers the following tasks:
1. Navigate to Administration > Show Menu > Liability Matrix.

2. Click the Add Liability Matrix button in the status bar. The Liability Matrix Entry page appears.
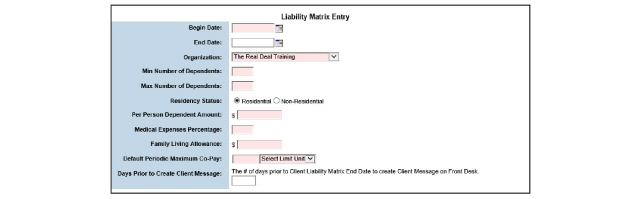
3. Fill out the needed information and click Submit.
1. Navigate to Administration > Show Menu > Liability Matrix > Click the Liability Matrix button for the matrix needing an Income Range Record. The Liabilities page appears.

2. Click the Add Adjusted Family Income button in the status bar. The Adjusted Family Income Range page appears.

3. Enter the lower and upper limits of the adjusted family income range and click Submit. The Liabilities page appears with the new income range.

4. Fill out the tiered amounts as desired and click Submit. The Liabilities page is updated with the information entered.

Service Document Report Layout
Service Document Reports display headers and footers as chosen by Qualifacts. The Service Document Report Layout will allow administrators to determine what information appears in the headers and footers and make changes as needed.
A menu link (admin_pdf_label$.list) for Service Document Report Layout needs to be added to the Administration menu to enable setting up report layouts. Once the link is available, report layouts can be set up.
Set up Service Document Report Layout
Only one Service Document Report Layout can be set up for each organization.
1. Navigate to Administration > Show Menu > Service Document Report Layout. The Service Document Report Layout appears.

2. Click Add Service Document Report Layout in the status bar. The Service Document Report Layout Entry page appears.
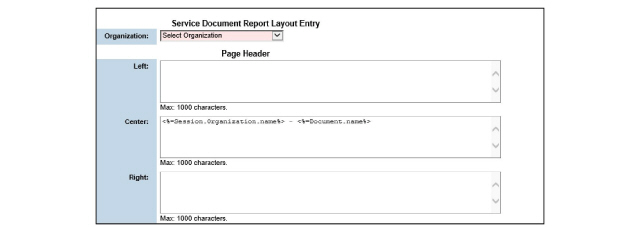
3. Fill in fields as desired, according to the key at the bottom of the page and click Submit. The report layout is saved.
State Reporting for many states is controlled through the State Reporting Administration module. Reports are normally sent using the State Reporting Batch module.
In this section:
• State Reporting Administration
State Reporting Administration
The State Reporting Administration module records information and sets parameters for the State Reporting Batch module to create state-specific batch files.
Access the State Reporting Administration Module
1. Navigate to Administration > Show Menu > State Reporting Admin. The State Reporting Administration page appears.

This page is used to complete the following tasks:
• Add a State Reporting Administration Record
• Associate State Reporting Administration Records with Organizations
• Update a State Reporting Administration Record
• Set Up a State Reporting Administration Activity Matrix
• Delete a State Reporting Administration Record
Add a State Reporting Administration Record
1. Navigate to Administration > Show Menu > State Reporting Admin > Add Record in the status bar. The State Reporting Administration data entry page appears.
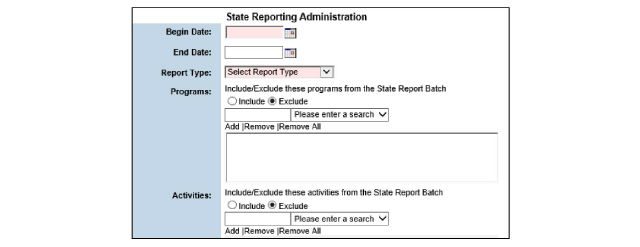
|
If Include in the Programs or Activities fields is selected, CareLogic only includes the selected programs or activities. |
2. Fill out the needed information and click Submit in the status bar. The State Reporting Administration page appears, displaying the state report administration record created.
Associate State Reporting Administration Records with Organizations
1. Navigate to Administration > Show Menu > State Reporting Admin > Click the Organization button for the record needing association. The State Reporting Administration Organization List page appears.
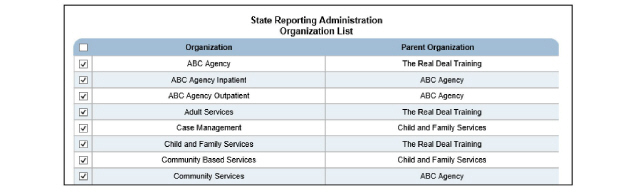
2. Select the checkbox next to the organizations needing association with the state reporting administration record.
3. Click Submit in the status bar. The state reporting administration organization matrix record is saved.
Update a State Reporting Administration Record
1. Navigate to Administration > Show Menu > State Reporting Admin > Click the Select button for the record needing edits. The State Reporting Administration page changes to edit mode.
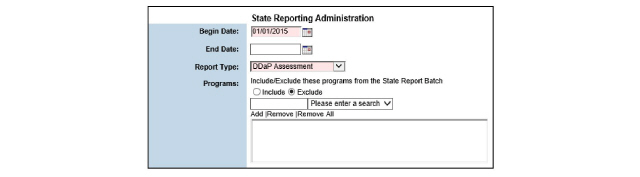
2. After making the desired edits, click Submit in the status bar. The state reporting administration record is updated and listed on the State Reporting Administration page.
Set Up a State Reporting Administration Activity Matrix
An activity program matrix can be set up that defines which activities can be included in the state report batch. Once the matrix is set up, it is used by the state report batch.
1. Navigate to Administration > Show Menu > State Reporting Admin > Click the Activity Matrix button for the record needing association with activities.
2. Locate the state reporting administration record needing association with activities, and click its Activity Matrix button. The State Reporting Activity Procedure Matrix page appears.
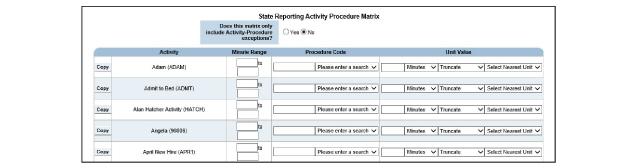
3. Indicate if the matrix only includes Activity-Procedure exceptions. Selecting Yes means the state reporting batch uses the normal activity procedure matrix for procedures, except the ones selected. Selecting No means the selections in this matrix will override the standard activity procedure matrix for this service file.
4. Add activities to the state reporting activity procedure matrix and click Submit in the status bar. The state reporting activity procedure matrix record is saved.
Delete a State Reporting Administration Record
1. Navigate to Administration > Show Menu > State Reporting Admin > Click the Delete button for the state reporting administration record needing deletion. A Delete confirmation pop-up appears.
2. Select OK to confirm deletion. The selected state reporting administration record is deleted from the system.
The State Reporting Batch module is used to create state-specific reporting batch files. When creating a state reporting batch file, define the parameters (date range, report type, organization, etc.) that the system uses to create the file. Once the file is created, it can be reviewed. If the batch file was created as intended, it can be downloaded and submitted for state reporting.
Access the State Reporting Batch Module
1. Navigate to Administration > Show Menu > State Reporting Batch. The State Reporting Batch page appears.
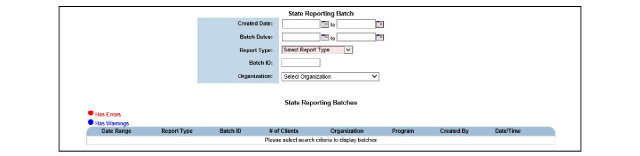
This page is used to perform the following tasks:
• Create State Reporting Batch Files
• Search for Existing State Reporting Batch Files
• Review State Reporting Batch Details
• Delete State Reporting Batch Files
• Regenerate State Reporting Batch Files
• Download State Reporting Batch Files
• Lock State Reporting Batch Files
Create State Reporting Batch Files
1. Navigate to Administration > Show Menu > State Reporting Batch > Create Batch. The State Reporting Batch Creation page appears.
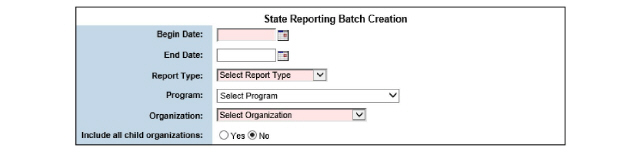
2. Fill out the needed information and click Submit in the status bar. The state reporting batch file is created and listed on the State Reporting Batch page.
|
A system-generated Batch ID is created for the state reporting batch. This Batch ID can be used to identify and search for the batch later. |
Search for Existing State Reporting Batch Files
1. Navigate to Administration > Show Menu > State Reporting Batch.
2. Use the filter fields at the top of the page to sort out the needed information and click Submit in the status bar. The page is refreshed and batch files that match the search criteria are displayed in the State Reporting Batch list.
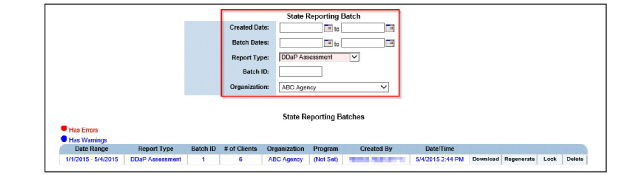
Review State Reporting Batch Details
1. Navigate to Administration > Show Menu > State Reporting Batch > Use the filter fields and click Submit in the status bar > Click the batch file needing review. The Batch Detail Records page appears.

Delete State Reporting Batch Files
1. Navigate to Administration > Show Menu > State Reporting Batch > Click the Delete button for the batch file needing deletion. The Delete a State Reporting Batch confirmation page appears.

2. Select Yes to confirm deletion of the selected batch file and click Submit in the status bar. The selected batch is removed from the system and no longer displayed in the State Reporting Batch list.
Regenerate State Reporting Batch Files
When a state reporting batch file is regenerated, it gathers new data that did not exist at the time the original batch file was created. By using the Regenerate feature, batch file data can be refreshed without deleting the batch file.
1. Navigate to Administration > Show Menu > State Reporting Batch > Click the Regenerate button for the batch file needing regeneration. The page is refreshed, and the selected batch file is regenerated with new data.
Download State Reporting Batch Files
1. Navigate to Administration > Show Menu > State Reporting Batch > Click the Download button for the desired batch file. A download confirmation page appears.
2. Choose to save the file and submit for state reporting.
Lock State Reporting Batch Files
After the state reporting batch file has been sent, it is recommended to change the status of the file in the system. This task is optional and serves as a visual indication that the batch file has been submitted.
|
If the steps are followed in this task to lock the batch file, it can no longer be deleted. |
1. Navigate to Administration > Show Menu > State Reporting Batch > Click the Lock button for the desired batch file. The Lock a State Reporting Batch page appears.

2. Select Yes to confirm the selected batch file has been sent for state reporting. Click Submit in the status bar. The batch is locked.